When making crochet animals, the attaching of body parts is something that goes with it. But how do you do it the neatest and best possible way? For example, when I started making these animals, sometimes my sewed on muzzle looked very different from when it was pinned on, and certainly not better.
When designing my latest animals, I paid close attention to how I attach the muzzles and heads. How do I do it and how can I explain it to you? I have come up with two photo tutorials.
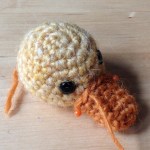
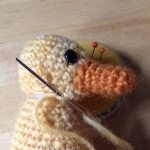
How to attach a muzzle.
You can see the direction of the needle for all four steps of both tutorials in the pictures.
1. Of course the muzzle or beak is pinned to the head before you start. When you start sewing, make sure the thread is at the outside of the muzzle, like you see in the first image.
2. To make your first stitch, sew through both loops of the next stitch of the muzzle and pull the thread.
3. Now find ‘the right stitch’ in the head and sew through that stitch and pull the thread. Usually that stitch is below the pinned on muzzle. Sometimes you have to try a few stitches to get the desired result.
4. Now sew through both loops of the same stitch of the muzzle you just came from, as illustrated in the last picture.
If you repeat step 2 till 4 for the complete muzzle or beak, you have it sewed on exactly as it looks when pinned on. Because you have sewed behind the crochet loops, the stitches you’ve just made are barely visible. Now you can decide if and which stitches need to be tighter, so the muzzle blends in better. You can stitch them the way you like to.


Attaching the head to the body, both open pieces with the same stitch count.
The most challenging thing about sewing these parts together, is preventing the neck from becoming too narrow. You also want the pieces to blend together nicely.
1. I usually sew with the tail of the head. Make sure it is on the outside of the head when you start.
2. Now sew through both loops of the body, from the outside to the inside and pull the yarn, but not too tight.
3. Sew now through only the outside loop of the stitch of the head, which is just above the stitch of the body you just sewed through, like you see in the second picture. Again, pull the yarn, but not too tight.
4. Now sew through both loops of the second stitch of the body and repeat the steps.
By pulling the yarn not too tight, the stitches become less visible and the neck won’ become too narrow. It does have to feel steady, so experiment a bit how tight works best for your doll.


I hope this tutorial is a good tool so everyone who makes my patterns can attach their animals perfectly. If you think something is missing, please let me know.
