In this post I’m going to explain the importance of stuffing and shaping amigurumi. Because if you do this carefully, it can make a lot of difference to the end result.
Let’s start with stuffing. When I stuff a crochet animal head, I start by putting in a piece of fiberfill, from which I know it’ll cover the inside of the head, but isn’t yet enough to fill the complete head. When the fiberfill is inside, I push it outwards, so all sides now are covered with a layer of fiberfill. That leaves a hole in the filling. Carefully I add more fiberfill in the remaining hole, still pushing it a little outwards till the entire head it stuffed. If you want a piece to stay in a certain shape, stuff it tighter. And also keep in mind the stuffing will ‘shrink’ a bit after some time so always use enough. I stuff heads a bit more firm than bodies.
Now the shaping part.
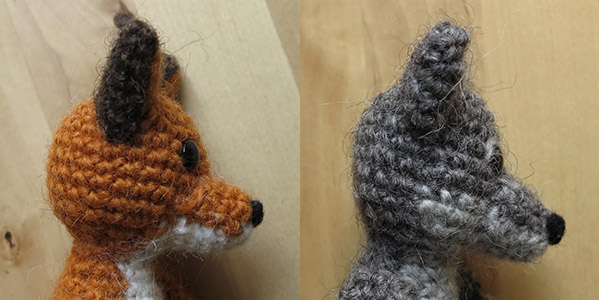
While stuffing, I also shape. To illustrate this, I’ve used the fox and wolf heads as an example. Their basic shape is the same, only the wolf has bigger cheeks. The stitches are different at the chin of the wolf, but that doesn’t matter for what I’m trying to explain. What I mean is, you can make a round shape round like a ball, but that same shape, you can also make flatter. The wolf needed to have a wider, less rounder shape. So, while stuffing, I made sure the cheeks stood out and I also made the head flatter by pushing the stuffing more to the sides and pinching the head a bit flatter, so it wouldn’t be round. You can see that in the image. I keep everything a bit soft but firm, it should never feel hard. The wolf I stuffed firmer than the fox, because I shaped the head.
This is the way I do it and it seemed useful to explain here.
Have fun crocheting.
