My favourite time of the year has started and I wanted to share my joy by giving you something fitting & fun to make. What about a free pattern for these two crochet pumpkin cuties?

Fall has always been my favourite time of the year. The light is getting softer and warmer, the temperatures are dropping and the colours are changing from shiny brights to warm darks. Especially the end of summer is dear to me, as it still is nice and warm to enjoy everything nature gives. My favourite lantern plant’s cheerful little ‘lanterns’ are shining ever so bright and it is time to harvest the pumpkins. Here I have to correct myself, I can’t actually harvest any pumpkins. My precious city garden is too shadowy and small to grow veggies. That is why I decided to ‘grow’ my own pumpkins out of wool instead of seeds 🎃
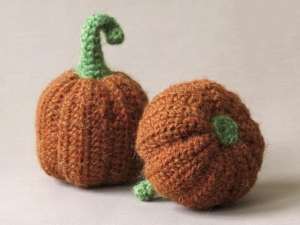
The abundance of lovely free pumpkin patterns made it quite difficult to come up with something original. But I had my mind set on how the pumpkins should look. They had to be realistic, which meant the shape should have vertical lines instead of horizontal like when you crochet in the round. They also needed to have a smooth surface, so that when you create the characteristic pumpkin bumps, there aren’t any bumps in the way. I came up with these two pumpkins and love them. They have an almost knitted feel and if you use the recommended yarn, they are about the same size as those little pumpkins used for decoration. In the pattern, which you can find below these images, you can find all the info you need.


And here it is, the pumpkin duo pattern, enjoy it! If you prefer having a neat PDF file of this pattern, you can donate me a little amount of your own choice and I will email you the pattern.
Crochet pumpkin duo pattern
This pattern is written in standard American crochet terms. If you use the recommended yarn, your wide pumpkin will be 9 cm wide by 6.5 cm high without the stem (2.5 by 3.5 inch) and the high pumpkin 8 cm wide by 9 cm high (3 by 3.5 inch).
For these pumpkins you’ll need worsted weight yarn and an E US/3.5 mm crochet hook. The yarn I’ve used is Istex Lètt lopi, a 100% wool, you need two colours; orange (1704) and a small amount of green (1406). You can easily make 2 pumpkins with one skein of orange Lopi yarn. You will also need strong orange embroidery thread to close and shape the pumpkins and fibrefill to stuff the pumpkins. Pipe cleaners for the stems are optional.
Abbreviations: ch = chain, sc = single crochet, st = stitch, sl st = slip stitch, hdc = half double crochet stitch, BLO = work in back (inside) loops only, s2tog = invisible decrease
The pumpkins are worked flat in rows. After each row you do a chain 1 and then turn. The first stitch of each next row you do in the second chain from the hook. The stems and bottoms are worked in the round/ spirals. You can use a stitch marker to mark the beginning of a round. Move it up each time you start a new round.
Instructions

Wide pumpkin In orange and worked flat in rows. Leave a long yarn end at the beginning of your chain.
1. ch 21, in 2nd ch from hook sc, sc in next 4, hdc in next 10, sc in next 5 = 20
2. ch 1 & turn. In 2nd ch from hook sc, sc in next 4, hdc in next 10, sc in next 5 = 20
3-33. repeat row 2
34. repeat row 2 but sl st in last and leave a long yarn end.
Bottom patch In green and worked in the round. Make two if you make both pumpkins.
1. magic ring of 6 = 6
2. (sc in next, 2 sc in next) x 3 = 9, sl st and leave yarn end for sewing.
Stem In green and worked in the round. Make two if you make both pumpkins.
1. magic ring of 6 = 6
2. in BLO, sc in each around = 6
3. s2tog, sc in next 4 = 5
4-9. sc in each around = 5
10. 2 sc in next, sc in next 4 = 6
11. sc in each around = 6
12. (sc in next, 2 sc in next) x 3 = 9
13. (sc in next 2, 2 sc in next) x 3 = 12
14. (sc in next 3, 2 sc in next) x 3 = 15, sl st and leave yarn end for sewing.
Skip the next part and continue with finishing if you are only making the wide pumpkin.

High pumpkin In orange. Work flat in rows. Leave a long yarn end at the beginning of your chain.
1. ch 25, in 2nd ch from hook sc, sc in next 4, hdc in next 14, sc in next 5 = 24
2. ch 1 & turn. In 2nd ch from hook sc, sc in next 4, hdc in next 14, sc in next 5 = 24
3-31. repeat row 2
32. repeat row 2 but sl st and leave a long yarn end.
Finishing the pumpkins
Below this section you can find step by step images of the process. Read this whole section before you start sewing, to get a complete idea of how it works.
Slip stitch together the side edges of the pumpkins. Fold the piece in half, wrong side out if you have a favourite side. Insert your hook through the 1st loop on the edge with the starting chain and through both loops of the stitches on the edge you ended with, yarn over and finish the stitch as a sl st (photos 1 and 2). Work your way like this till you reach the end. Turn the piece right side out so that the slip stitched seam is on the inside.
Use a strong embroidery thread to close the bottom; you don’t want it to snap when you pull it tight (I used it doubled to be sure). Leave a long end at the beginning for a knot and sew it clockwise through the highest stitches on the outside of the edge (photo 3). The stitches aren’t all easy to see, but if you sew through 3 out of 4 the little trick will work. When you’ve worked your way around, tie a knot with the beginning of the strand and pull it as tight as you can, leaving the smallest gap possible (photo 4). Secure your knot and work the thread ends to the inside.
Stuff your pumpkin. When you stuff it, push the stuffing outwards to prevent the pumpkin from getting stretched in length, leaving a hole in the middle that you can fill last. If you have stuffed it correctly, your stuffing sits close to the edge but doesn’t bulge out when you knead your pumpkin. Now your pumpkin is ready to be closed. Do it the same way you closed the bottom (photo 5).
When the pumpkin is closed, it needs a bit of extra shaping. Attach a very long strand of the strong embroidery thread to the edge of the hole at the bottom. Leave a long end to tie knots with and make sure the rest of the strand is long enough so it can encircle the pumpkin a few times. Encircle the pumpkin with the strand once and mark the path (photo 6). Now start at the beginning and sew under and then over the stitches of the path you chose (photo 7). When you are at the bottom again, pull the yarn as tight as you think looks good and make a knot with the beginning. Now repeat this step a few more times to create the right pumpkin shape. When you are satisfied, sew the last end of your strand a few times from the bottom to the top to create a nice dent in the middle (photo 8).
To finish your lovely pumpkins, attach the bottoms and the stems. The bottoms are sewn between the stitches of the edge of the bottoms, so the shape stays the same (photo 8). When you attach the stems, insert a pipe cleaner first if you want the stems to be bendable and insert the end into the pumpkin. When you sew the stem on, sew over the edge and into the pumpkin to create an invisible seam (photo 9).

Enjoy nature’s change of seasons!
Copyright © 2018 by Sonja van der Wijk. Please do not reproduce this pattern in any way.

Gorgeous!
Thank you Bethany-Jade. I’m glad you’re still loving my work. There will be another free little pattern soon!
These are just darling!
Absolutely love these, thank you! I’m going to make one for my sister, she loves pumpkins
That’s lovely, happy crocheting 🎃
These are sweet; thanks!
Clear pattern, lovely result. Many thanks 🙂
Thank you for your comment, have fun with your pumpkins! 🎃