Woot woot, I’m so happy I can finally present this pattern to you! I wasn’t sure about how to define this owl, because it resembles both the European little owl (steenuil in Dutch) and the American pigmy owl. Both are most adorable small owls, and I believe Okiri would almost make a live-size Pigmy owl. So meet my new realistic crochet owl pattern, isn’t he adorable?!
When I started this pattern, I was worried that crafters wouldn’t really fancy making a cranky-faced plushy, but my worries receded when I posted a first teaser picture and so many of you fell in love with the face right from the start! Now I knew I had to make sure I would meet your expectations and design a fabulous cranky and cute owl amigurumi.
How I designed the face is a funny story. I started out with the barn owl face as a basis, but that didn’t work out for a little owl or a pigmy owl face. So I fumbled around trying different things. At some point, when I was playing with a basic round shape, I discovered that if I folded the top down, I got the perfect owl’s frown, how delightfully simple! Just the folded circle wouldn’t do, it needed some colouring and a beak. So I worked ahead and that’s how this striking face came to be.
Many of you asked about these striking eyes. The eyes I used for this crochet owl pattern are animal safety eyes with a dark pupil and transparent backs. I painted the backs yellow with acrylic paint and added a little felt patch to create the dark line around the eyes, voila, easy peasy.
The body is pretty basic by itself, but when I started to add the spots things became somewhat challenging to crochet. And as I wrote the pattern down, my head started to spin at some point. I’m sorry about all the colour changes, even I didn’t enjoy them! But they really are worth the effort because they make the most fabulous textured owl’s body. And if you keep your yarns separated, like one on the left and one on the right, and you keep grabbing them from the same direction, they will not tangle. You need to get into that ‘rhythm’ for the wings as well.
To sum things up, this crochet owl has a seamless body and head made from the bottom up. Right before you close the head, you attach the face with eyes to the head. Not much sewing needs to be done here because the eyes secure the face quite well already. The feet, tail and wings need to be sewn to the body and that’s it.
Here are some more pictures of this little / pigmy owl amigurumi, and below them you can find all the info you need about the pattern.
Info about & links to buy the pattern
The pattern for this realistic crochet little owl and pigmy owl is pretty straightforward. The colour changes can make your had go spinning, so take your time there! This animal is made with Istex Lett Lopi, a 100% wool with a lot of fuzziness. It’s 4.3 inch / 11 cm tall. The pattern contains a clear and colour-coded description of how to crochet and assemble the doll, with instruction images next to the text and example pictures at the bottom to help you get everything right. In the pattern you can also find out what materials you need, the yarn colour numbers — in short, everything you need to know to make your own cranky owl. All the additional information you need to know about this pattern you can find in the shop listings. You can purchase it in my shop at Ravelry, Etsy or order it here.
And heads up! This pattern has a one dollar release discount until the 4th of November!
I am so happy I can finally show you my finished crochet foxes. Meet Flamsie and the little ones!
This adventure started with the idea of making a fox with cubs. I’m monitoring wildlife as a volunteer, and this time of the year we see a lot of young foxes on our camera traps. I really love seeing them and was lucky enough to spot one when we were checking a heather field for badger activity. Suddenly a cute fox cub was looking straight at us!
I started this project with the cubs. Shaping something much smaller is a whole new thing for me, and I really had to get used to it. Also, getting the light-coloured chin and chest symmetrical turned out to be quite a challenge. It took me a long time to create a cub that I adored, and I soon realised that this little fox was way too special to just add to the fox pattern. This had to be a separate pattern so everyone could make it.
After the little ones were finished I started working on the adult. And you know what was ever so silly? Each head I made I found huge! Now I had to re-adjust to my normal size. I ignored my feelings of finding everything enormous and patiently designed the right shapes and colouring for the adult fox amigurumi. I stumbled upon the same colouring difficulties as for the cub, but I stubbornly kept trying until I got it right. There was no way I was going to make this crochet fox with a sewn-on muzzle, the head had to be made in one piece, just like the wolf.
Making the fox’s body was much easier because I got familiar with this way of working when I made the wolf. The fox had to be smaller and more slender with a bigger tail. When the fox was finished, I placed the wolf and fox next to each other and I was satisfied. They are both such lovely doll versions of the real animals, the slender fox and the sturdy wolf.
When I was working on the cubs and realised how much extra work it was going to be, I decided I wasn’t going to do something like this again. Nevertheless cats and kittens are popping into my mind already, because the end result is so delightful. Every time I pass my adorable fox family I get a smile on my face, they are so cute together! The adult fox is a playful doll which you can place in different poses, and the cubs are even easier to play with.
For those of you who look forward to making a family, the fox and cubs are ‘a pack’ until one week after the pattern release. After that they will be separate patterns. So I get them soon if you want them all!
Here are some more pictures of these totally cute crochet foxes, and below them you can find all the info you need to know about how to get the patterns.
Info about & links to buy the pattern
These realistic foxes are made with Istex Lett Lopi, a 100% wool with a lot of fuzziness. Flamsie is 5.5 inch / 14 cm sitting, the cubs are 6 inch / 15 cm long when made with this yarn. They aren’t very difficult to crochet, even the seamless bits are quite easy to attach if you follow the instructions.
The patterns contain a clear and colour-coded description of how to crochet and assemble the animals, with extra illustrations and example pictures at the bottom to help you get everything right. In the patterns you can also find what materials you need, the yarn colour numbers, in short, everything you need to know to make your own fox amigurumis. All the additional information you need to know about this pattern you can find in the shop listings.
You can buy the pattern for Flamsie by clicking this Ravelry or Etsy link. And the pattern for the cubs by clicking this Ravelry or Etsy link. You can also buy both patterns directly from me here.
And heads up! For one week from now Flamsie’s pattern includes the pattern for the cubs. So if you want both, get it before the 22nd of Juli.
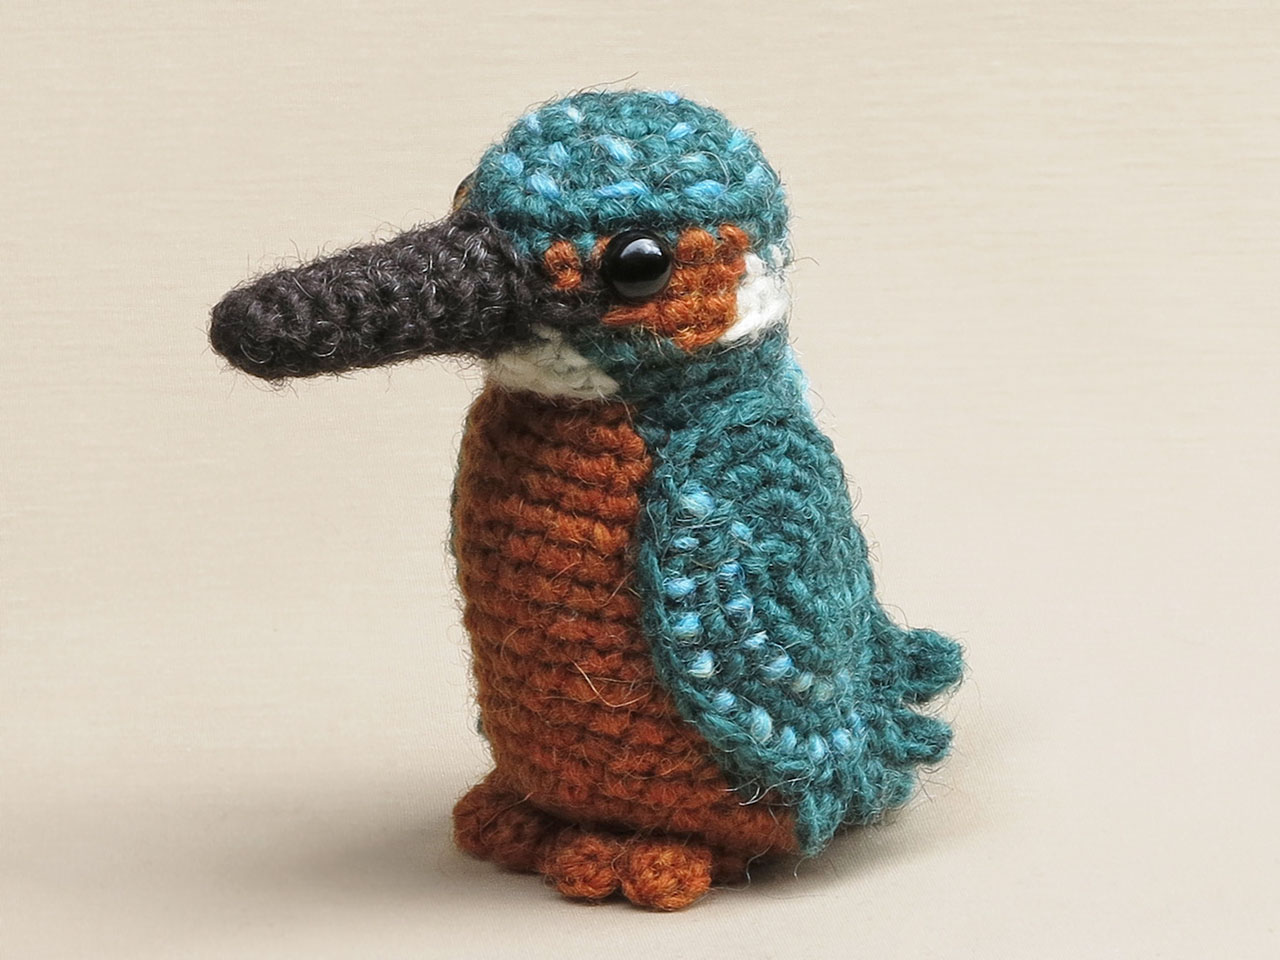
This must be the most challenging pattern I’ve ever designed. I proudly present to you Flisby, the amigurumi kingfisher!
Birds are slowly becoming part of the collection of crochet animal patterns I’ve designed. Because birds aren’t fluffy and cuddly, they somehow often miss my attention. Only the ones that are very dear to me make it into a crochet pattern. The kingfisher is an example of that. For the last few years I’ve been doing volunteer work as a fieldworker, basically I’m tracking animals so that the local wildlife organisations can map what lives where, to protect the animals and, for example, to create save passageways underneath roads, etc. I started in a badger team, but this year I expanded my work by collecting otter spraints (scat) for DNA analyses. That’s when I stumbled upon beaver tracks in an area they had not been seen before (it was fabulous, imagine how excited I was!). That of course led to a search for the beaver’s home, and that brings me back to the kingfisher. Practically every time I was following the beaver’s trail, which was an amazing adventure, I heard or saw a gorgeous kingfisher. They are birds of an exceptional beauty, and you always hear their cheerful shrieks before you see them flash by. I’ve been fortunate to see one sitting down a few times, and I was surprised by how small they actually are. Somehow I made them bigger in my mind because they are so beautiful.
So then came the challenge to create a crochet version. How was I going to mix realism and my doll-ish style in a little crochet bird? I started with designing the bill, which had to be as small and pointed as possible. If I got the bill right, I basically knew the size for the rest of the bird. I had in mind to make the kingfisher in one piece, so a seamless bill, head and body. But when I made the bill seamless, the shape was all wrong, way too flat. And when I finished the head with all the colour changes in the right place, I crocheted ahead to make the body, but I couldn’t get the shape right. So I started a new body, from the bottom up. When all the pieces where finished, I decided to keep it like this. I liked the seam between the head and body, the versions I had that were made in one piece looked stiff. My crochet animals must look playful, and for a bird that’s more difficult than a mammal. I think I managed to add a bit of doll-style in how I designed the feet and wings. Of course real birds have tiny feet, so I could have used a different material to create realistic feet, but I love the features of crochet, so I made the smallest possible, cute little bobble stitch feet. It gives Flisby the right personality, it makes him a Popke!
I could write so much more about this process, about how difficult it was to choose the right colours and the effort to create the perfect colour changes. All I’ll say is, I really love my little kingfisher. I love how the embroidered spots create that glowing shine of feathers, and I also love how this crochet kingfisher is about life-size when he’s made with the yarn I used, how about that! Here are some more pictures of Flisby, and below them you can find all the info you need about this pattern.
Info about & links to buy the pattern
This realistic crochet kingfisher is made with Istex Lett Lopi, a 100% wool with a lot of fuzziness. He is 4.3 inch / 11 cm tall when made with this yarn. Despite the many colour changes for the head, this isn’t a very difficult pattern to crochet, as long as you follow the instructions to the letter and untangle your skeins after every round. The spots on the head and wings are easy enough to embroider because of the way they are placed. Assembling the animal and getting all the pieces in the right place will require some skill, but I guide you with the text and images in the pattern. As long as you take your time, you can make yourself a gorgeous little bird, I’m sure!
The pattern contains a clear and colour-coded description of how to crochet and assemble this animal, with extra illustrations and example pictures at the bottom. In the pattern you can also find what materials you need, the yarn colour numbers, in short, everything you need to know to make your own kingfisher amigurumi. All the additional information you need to know about this pattern you can find in the shop listings. You can buy this pattern in my shop at Ravelry, Etsy or order it here.
This pattern has a one dollar release discount till Thursday the 21st of May!
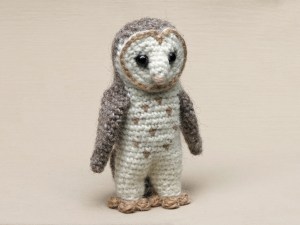
I’m so excited to present you this pattern! Meet Barnsby, a super-realistic but too-cute-to-be-real crochet barn owl.
It has been such an interesting ride to design this owl amigurumi pattern. First of all, barn owls are wondrous-looking creatures with their flat dish-like-looking face. Basically, the face functions as a big ear. The flat disc catches sounds incredibly well, so that they can hear even the tiniest rustle of prey. The challenge for me was to create a flat face that would stay flat when attached to the head. Also, for this streamlined animal I wanted to make a design without too many bumps and attached bits. The owl had to be as seamless as possible.
And that was something new for me. This summer I’ve been experimenting with new techniques, and I had something in mind that could do the trick. I had never tried something like it before, but how hard could it be? I enthusiastically accepted the challenge. After a few silly-looking experiments, I learned how to use this technique properly. I’m not going to go into details, but attaching a body piece to an unfinished body and then crocheting ahead is a brilliant and super-easy way to get a seamless result. It won’t work for every animal or design, but it’s perfect for birds.
And the face! I got so many positive reactions about the owl’s face, so many people found it perfect. So very jolly you all liked it so much. The face is simply sewn to the head, and by pushing the stuffing to the back of the head and keeping the front practically empty, the face stays nice and flat.
I really hope the finished crochet owl meets your expectations! I can’t deny that I’m very proud of the looks and simplicity of this pattern. With this pattern I think even someone with basic skills can make this super-realistic-looking barn owl amigurumi.
Here are a few more pictures of Barnsby the barn owl, and below them you can find info about and links to buy the pattern.
Info about & links to buy the pattern
Barnsby the realistic barn owl is made with Istex Lett Lopi, a 100% wool with a lot of fuzziness. If you use the recommended yarn, he will be 6 inch / 15 cm high. I would strongly recommend a fuzzy yarn, because it hides the seams of the colour changes.
The pattern is written in US terms and contains a clear and colour-coded description of how to crochet and assemble the crochet owl amigurumi, with extra illustrations and example pictures at the bottom to help you get everything right. In the pattern you can also find what materials you need, the yarn colour numbers, in short, everything you need to know to make your own wondrous owl. All the additional information you need to know about this pattern you can find in the shop listings. You can buy this pattern in my shop at Ravelry, Etsy or order it here.
Heads up: it has a one-dollar release discount till Thursday the 10th of October.
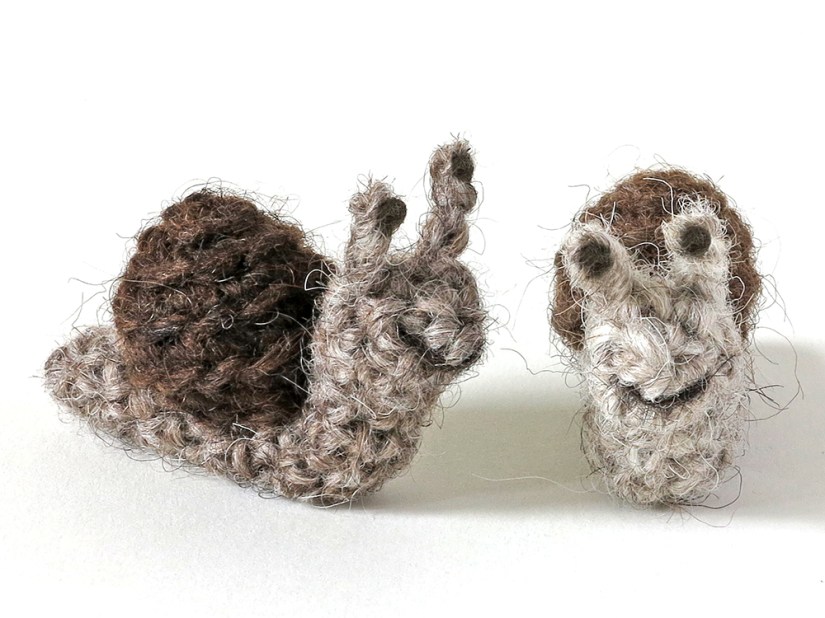
Am I serious? Yes, I thought it would be fun to make a crochet snail, a little friend who can accompany the hedgehog in pictures. So why not make a free pattern as well. I know you all yearned for a crochet snail. Who doesn’t want to make a crochet snail?!
Crochet snail pattern
Before you start
This pattern is written in standard American crochet terms. It’s useful to read it before you start. If you use the recommended yarn, your snail will be 3 inch / 7 cm long. The yarn I’ve used is Istex Lètt lopi, a 100% wool. Use a stitch marker to mark the beginning of a round, move it up each time you start a new round.
Materials
For these snails you’ll need worsted weight yarn and an E US/3.5 mm crochet hook. You need 2 colours of yarn (left-over bits are enough): I’ve used light beige (0086) and acorn (0053) for the light snail and oatmeal (0085) and chocolate (0867) for the darker one. I’ve split a strand of the darkest colour to embroider a mouth. You will also need fibrefill to stuff the snail and a pipe-cleaner to bend the body is optional. Not really my style, but I painted the eyes, using acrylic paint. I couldn’t think of another way the create dark dots. (Needle felting could do the trick, but most people don’t have the tools for that.)
Accessories
Hook E US / 3.5 mm, scissors, embroidery needle, stitch markers or paper clips.
Abbreviations: ch = chain, sc = single crochet, st = stitch, sl st = slip stitch, hdc = half double crochet stitch, dc = double crochet stitch, s2tog = invisible decrease, dec = normal decrease.
Instructions
Shell
The whole shell (round 2 – 5) is worked in the backloops only, so the unworked frontloops form a visible spiral on the outside of the shell.
1. magic ring of 4 = 4
2. 2 sc in each around = 8
3. (sc in next, 2 sc in next) x 4 = 12
4. sc in each around = 12
5. (sc in next, dec) = 8, sl st in 1st backloop and leave yarn end for sewing.
Body
1. magic ring of 4 = 4
2. sc in each around = 4
3. (sc in next, 2 sc in next) x 2 = 6
4-9. sc in each around = 6
10. sc in next, s2tog, sc in next, 2 sc in next 2 = 7
11. sc in next, s2tog, sc in next 2, 2 sc in next, sc in next = 7
12. s2tog, sc in next 2, 2 sc in next, sc in next 2 = 7
13. repeat round 12 = 7
14. sc in next, 2 sc in next, sc in next, s2tog x 2 = 6, sl st and leave yarn end for sewing.
You can now insert a pipe cleaner if you like to use one. Sew the hole closed by putting the needle from the inside out through all the outside loops of the 6 st, clockwise. Ifyou do it correctly, you can now pull the end and it will close the gap. Weave in the end.
Make the eyes by attaching the yarn at the side of the head, between round 2 and 3. Ch 3 st, in 2nd ch from hook sl st and weave in the yarn ends as shown in the image. You can embroider the mouth between round 1 and 2.
Now stuff the shell and attach it to the body. Position the shell as shown in the image and sew between the frontloops of the last round so you don’t change the edge. I’ve sewn back and forth between the side of the snail.
There, your not-so-slimy slimy new friend is finished!
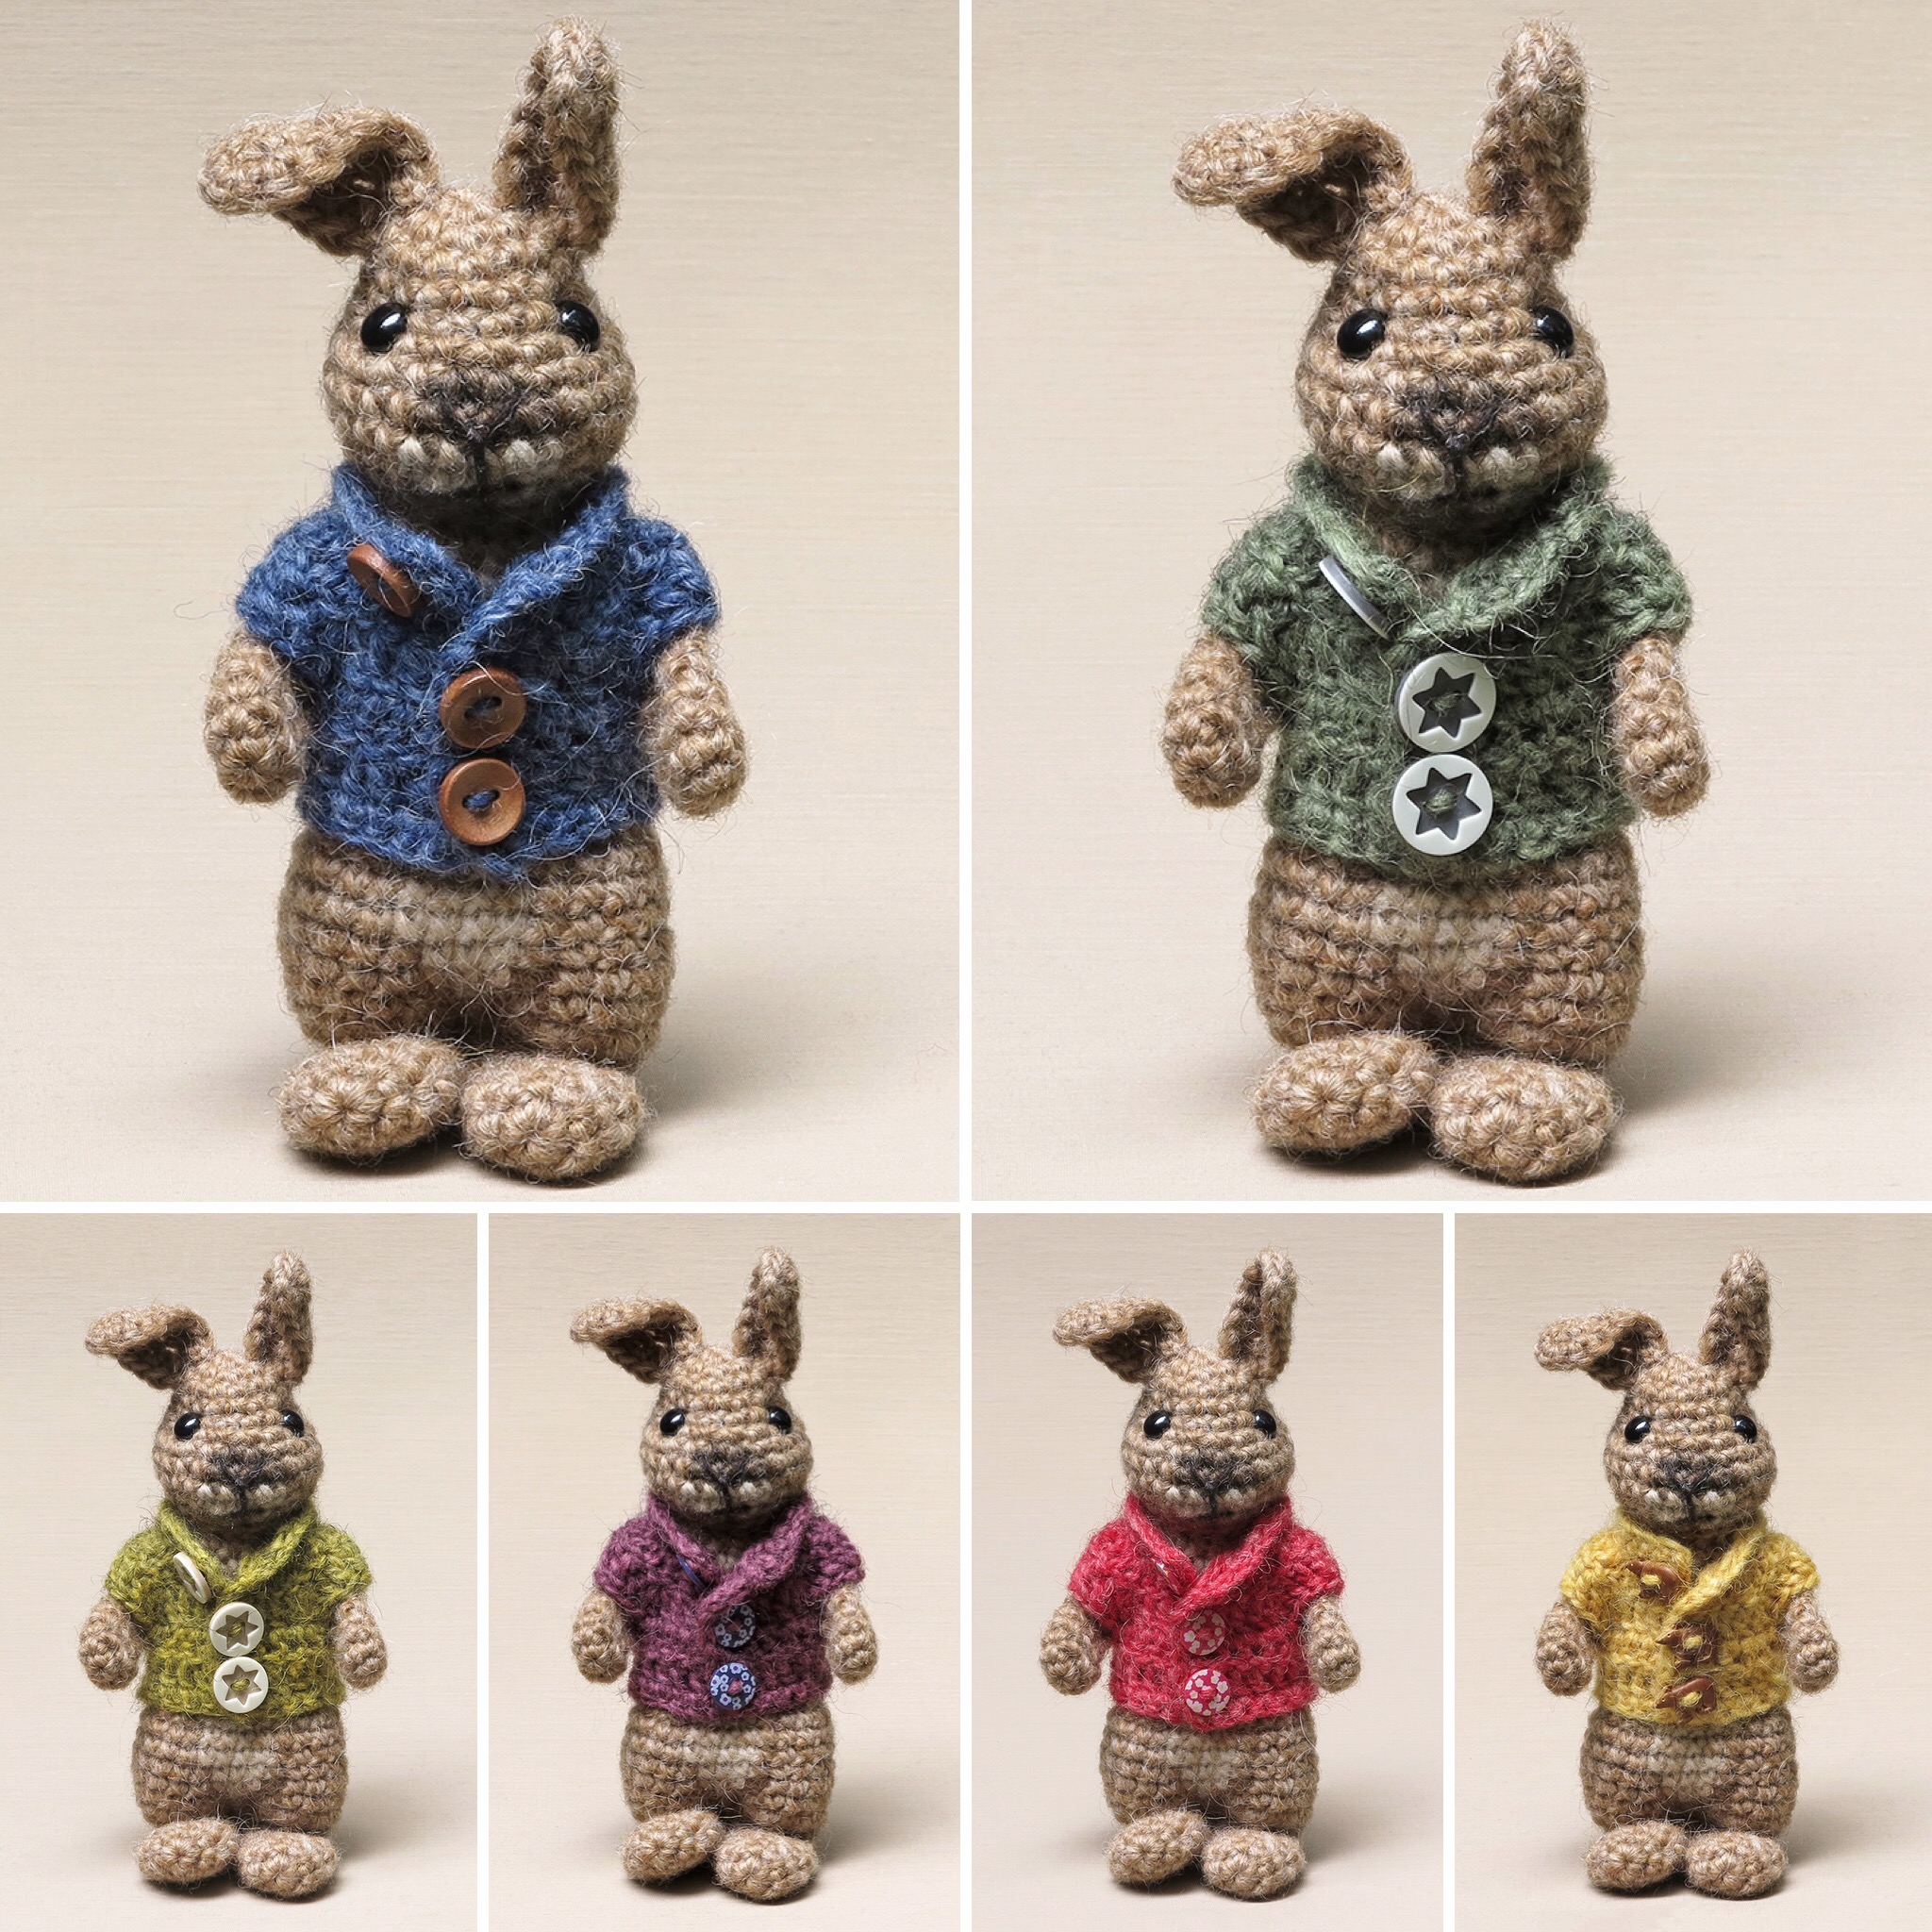
Well, what happened here? I liked Poochey in his trendy cardigan so very much that I decided to add him as a “dapper rabbit pattern” to my shops. Would you’ve been able to resist it? Just look at this utterly adorable crochet rabbit in his fancy outfits!
I cannot give myself all the credit for this. After I released the little cardigan pattern, Jan made a delightful collection of lovely little cardi’s for her crochet bunnies. After seeing her ever-so-cheerful pictures, I decided I just had to make a separate pattern for Poochey in the cardigan. I made Poochey’s cardigan just for fun after seeing a knitted rabbit wearing a sweater on Instagram, but when I put the sweater on and took that picture of him a while back, I began to get the idea of making a separate pattern. But because it felt a bit strange to re-launch an existing pattern, I wasn’t sure if it was a good idea. Jan made me realise that it is! Not everyone who visits my blog would want this version, but I don’t want other crafters missing out on this.
And how much fun it is to make all those little cardigans! Not only that, but all the tiny cute buttons you can’t put on your own garments, you can use for little bunny cardigans. I had so much fun looking for buttons that matched my bright-coloured sweaters. I found buttons with flowers and stars, animal-shaped ones – oh, there are so many fabulous buttons to find! And I cannot help laughing at Poochey’s expression every time I see it. In every single picture he has that same look of utter confusion. Which cardigan is your favourite? Mine is the green one with the star buttons.
Here are few original pattern pictures of this dapper crochet rabbit; below them you can find info about and links to buy the pattern.
Info about & links to buy the pattern
Poochey and his cardigan are made with Istex Lett Lopi, a 100% wool with a lot of fuzziness. If you use the recommended yarn, he will be 7 inch / 17 cm high. I would strongly recommend a fuzzy yarn, because it hides the seams of the colour changes.
The pattern is written in US terms and contains a clear and colour-coded description of how to crochet and assemble the crochet rabbit amigurumi, with extra illustrations and example pictures at the bottom to help you get everything right. In the pattern you can also find what materials you need, the yarn colour numbers, in short, everything you need to know to make your own dapper rabbit(s). All the additional information you need to know about this pattern you can find in the shop listings. You can buy this pattern in my shop at Ravelry, on Etsy or order it here.
Heads up: it has a one-dollar release discount till Thursday the 11th of June. If you already have the pattern for Poochey and Fudge but want to make Poochey like this, you can find the free pattern for the cardigan here.
I’m ever so excited to present to you this little gift pattern. Just look at these crochet bumblebee species!
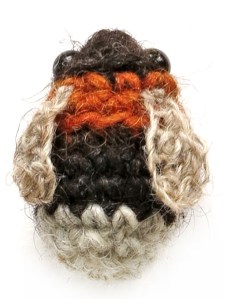
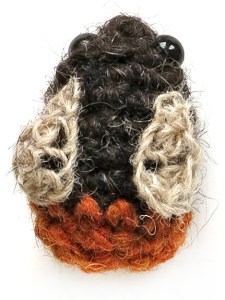
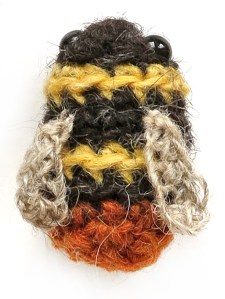
Last week I had a Spring holiday and suddenly got the idea of making a free crochet bumblebee pattern. The first bumblebee turned out so lovely that I decided to make more kinds of bumblebees. And when they where finished, I wanted to create a classic-looking image with the bees on a white background and their species name written next to them. In short, I had a lot of fun with my sweet little pattern and hope you will too! Bumblebees and insects are so important but their numbers are declining dramatically. Make these bees to show the world we must not forget about them! 🐝
Crochet bumblebees
Before you start
This pattern is written in standard American crochet terms. It’s useful to read it before you start. If you use the recommended yarn, your bumblebees will be 3 inch / 5 cm long. Because the size of the bee is dependent on the yarn you use and how tight you crochet, it’s useful to experiment with the eye size, despite my recommendations. I would strongly recommend a fuzzy yarn for the bumblebees. The yarn I’ve used is Istex Lètt lopi, a 100% wool. Use a stitch marker to mark the beginning of a round, move it up each time you start a new round. The colour changes are written after the description of the round, so read the whole line before you start. Always change colour in the last loop of a stitch, so the loop on the hook you end with is the new colour. That means the next stitch is in the new colour, not the one you changed in. At Son’s Popkes is a tips & tricks category. Here you can find useful info regarding my patterns.
Materials
For these bumblebees you’ll need worsted weight yarn and an E US/3.5 mm crochet hook. You’ll also need some lace weight yarn (Lopi Einband) for the wings: beige heather (0886). You need four colours of worsted weight yarn (left-over bits are enough): sheep or mixed black (0052 or 0005), yellow (1703), orange (1704) and light grey (0054). For the eyes I’ve used 7 mm animal eyes. You will also need fibrefill to stuff the bees.
Accessories
Hook E US / 3.5 mm, scissors, embroidery needle, stitch markers or paper clips.
Abbreviations: ch = chain, sc = single crochet, st = stitch, sl st = slip stitch, hdc = half double crochet stitch, dc = double crochet stitch, s2tog = invisible decrease.
White-tailed bumblebee (bombus terrestris)
Body
Bottom of bee
Start in black, change colour when indicated. To get neater colour changes, you aren’t working in a spiral but closing each round with a sl st. At the end of each round, sl st in the first sc of the next round, then ch 1 and sc in that same stitch. This is the 1st stitch of the next round. At the end of each round you will skip over the sl st and ch and crochet a sl st, ch, sc in the following stitch. Don’t cut the yarnbetween the colour changes but carry it along.
1. magic ring of 4 = 4
2. (sc in next, 2 sc in next) x 2 = 6
Mark the stitches of round 3 in which you’ll make the 2nd and the 6th stitch with a coloured strand. (Insert the strand into the gap of the stitch you normally put your hook in.) When the strand is placed, just do the stitch like you always do. You’ve now marked where you later attach the eyes.
3. (sc in next 2, 2 sc in next) x 2 = 8, change colour to yellow in last st, sl st in 1st
4. ch 1, sc in same, [2 sc in next, (sc in next, 2 sc in next) x 3] in BLO = 12, change colour to black in last, sl st in 1st
5. ch 1, sc in same, [sc in next 11] in BLO = 12, sl st in 1st
Attach the eyes permanently in the marked spots. It helps turning the piece inside-out when you attach the caps. After I attached the eyes, I inserted a little bit of stuffing between them, as shown in the images below.
6. ch 1, sc in same, sc in next 11 = 12, change colour to yellow in last st, sl st in 1st
7. ch 1, sc in same, [sc in next 11] in BLO = 12, change colour to black in last and cut yellow, sl st in 1st
8. ch 1, sc in same, [sc in next 11] in BLO = 12, change colour to light grey in last and cut black, sl st in 1st
9. ch 1, sc in same,[sc in next 11] in BLO = 12, sl in 1st
10. ch 1, sc in same, s2tog, (sc in next, s2tog) x 3 = 8, sl st in 1st
Stuff the bumblebee.
11. ch 1, sc in same, sc in next, s2tog, sc in next 2, s2tog = 6, sl st in 1st
Add a little bit of stuffing if needed and then sew the hole closed by putting the needle from the inside out through all the outside loops of the 6 st, clockwise. If you do it correctly, you can now pull the end and it will close the gap. Make sure your bombus has a nice oval bottom.
Red-tailed bumblebee (Bombus lapidarius)
1-3. Follow the instructions for the white-tailed bee but skip the sl st and ch 1 and don’t change colour to yellow in round 3.
4. In BLO: (sc in next, 2 sc in next) x 4 = 12
5. sc in each around = 12
Attach the eyes in the marked spots.
6-7. sc in each around = 12
8. sc in each around = 12, change colour to orange in last and cut black, sl st in 1st
9. ch 1, sc in same, sc in next 11= 12, sl st in 1st
10-11. follow the instructions for the white-tailed bumblebee.
Tree bumblebee (Bombus hypnorum)
1-3. Follow the instructions from the white-tailed bumblebee, change colour to orange instead of yellow.
4. ch 1, sc in same, [2 sc in next, (sc in next, 2 sc in next) x 3] in BLO = 12, sl st in 1st
5. ch 1, sc in same, sc in next 11 = 12, change colour to black in last st and cut orange, sl st in 1st
Attach the eyes in the marked spots.
6. ch 1, sc in same, [sc in next 11] in BLO = 12, sl st in 1st
7. ch 1, sc in same, sc in next 11 = 12, sl st in 1st
8. ch 1, sc in same, sc in next 11 = 12, change colour to light grey in last and cut black, sl st in 1st
9. ch 1, sc in same, [sc in next 11]= 12, sl st in 1st
10-11. follow the instructions for the white-tailed bumblebee.
Early bumblebee (Bombus pratorum)
To make this bee, follow the instructions for the white-tailed, but make the bottom in orange instead of light grey. That’s all.
Wings
Make two for each bumblebee, use the thinner yarn with the same hook. If you use Lopi yarn but don’t have the Einband weight, split a lopi strand in half. Make the starting chain as long as the end, so you can use both ends together to attach the wings.
1. ch of 6, in 3rd ch from hook dc, dc in same, hdc in next, sc in next, sl st in next and leave yarn ends for sewing.
Use both yarn ends to sew the wings to the body. Sew them on top of the third round behind the head, as shown in the images. The head ends at the first round you do in BLO.
Wow, how cute is this? Have fun with your bumblebee collection. You now have the ability to make even more kinds!
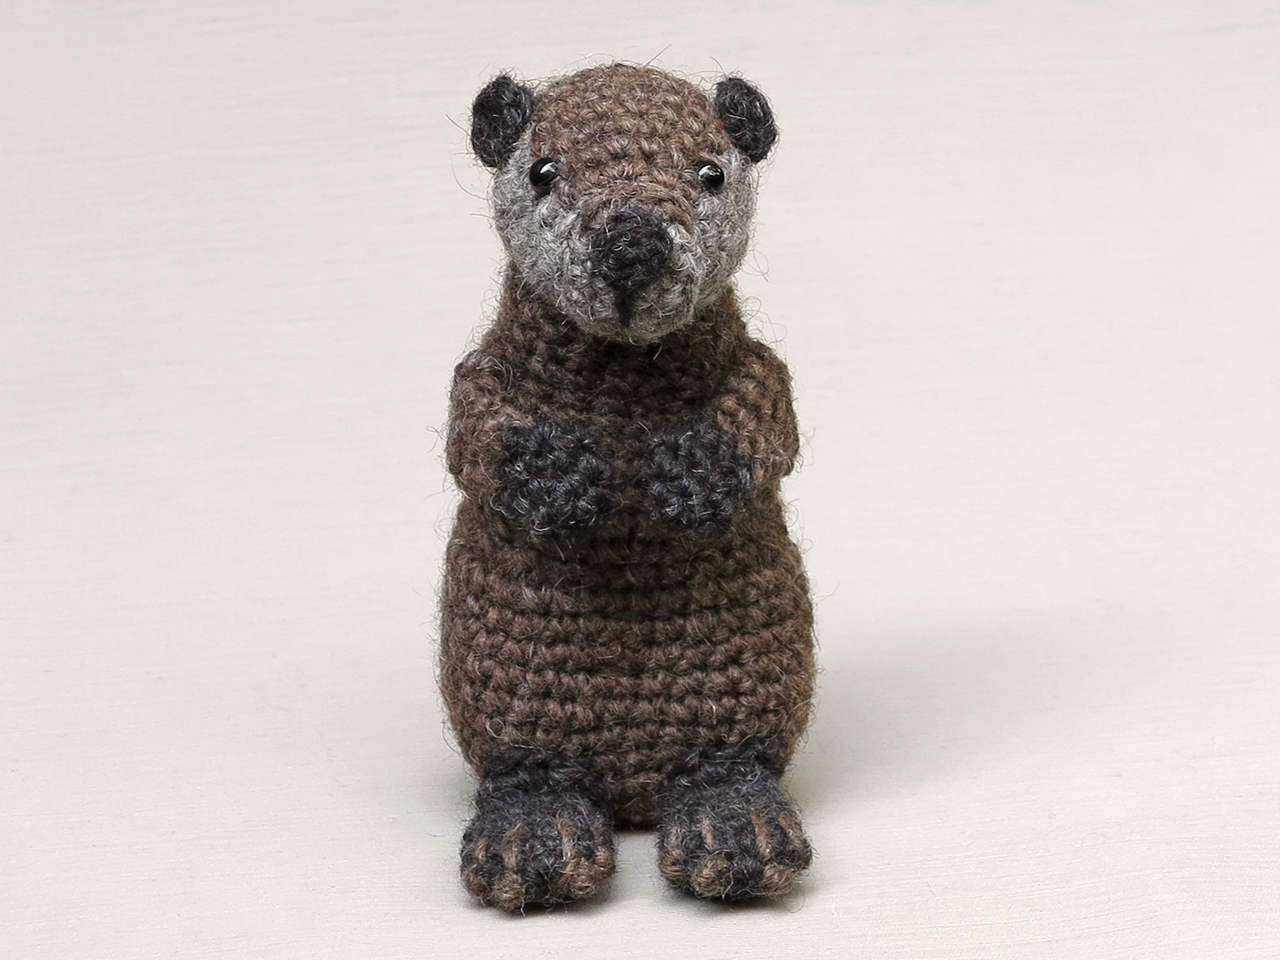
Maybe this is the most special and adorable pattern I’ve ever made. I proudly present to you a mother and her pup, Sno & Snoosle the crochet sea otters pattern.
Look at them together! They almost look as heartwarming together as real sea otters. Some animals melt my heart when I look at them. I have to admit, I’m easily melted by animal beauty. Seeing mice, blackbirds or foxes doesn’t really matter, to me they all are gorgeous. But when I was looking online at pictures of sea otters, I even got a bit emotional by some of them. The love a sea otter has for its pup is so overwhelming. The way she holds her baby, tends and dries it and the way the baby sleeps on top of her, feeling completely safe, it’s absolutely heartwarming and shows the intelligence and consciousness of them. Of course the utter cuteness of the sea otter and especially the pup helps. Baby sea otters look like living plushies. Their thick and warm coat makes them look incredibly cute and that was a huge challenge for me in the design process. How could I ever match the cuteness of a real baby sea otter?
Well, I did the best I could, my first prototype pup looked more like a sloth than a sea otter, but at least I knew how not to make it. Actually, I started with the head of the adult. Most adult sea otters have a white face that looks flat, but if you take a better look, you notice they do have quite a snouty face. So, I had to find a way to make the face look flat, but with a muzzle. After several attempts I found the solution. The body of course was not easy to design either, because I wanted the otter to look upwards a bit. That meant I had to make a curved neck. Also, I wasn’t sure about how to attach the legs and tail to the body to make it look natural. When I got stuck on the adult, I started on the pup, a teeny tiny thing it is! In order to achieve making a tiny little otter, I decided to crochet the body as one piece, so you connect the tail and legs and from that point you work your way upwards. That of course was also the solution to create a realistic looking body for the adult otter. How splendid that worked out.
Because I like this text to be as short as possible, I’m not going to tell more about the process. But I do want to add that I am ever so delighted with the result. I absolutely love my sea otter amigurumis. Here are some more pictures and below them you can find info about and links to buy the pattern. And yes, the baby is part of this crochet sea otter pattern!
Info about & links to buy the pattern
Sno and Snoosle are made with Istex Lett Lopi, a 100% wool with a lot of fuzziness. If you use the recommended yarn, your adult otter will be 8 inch / 20 cm and the baby 5.5 inch / 12 cm long.
The pattern is written in US terms and contains a clear and colour-coded description of how to crochet and assemble the animals, with extra illustrations and example pictures at the bottom to help you get everything right. In the pattern you can also find what materials you need, the yarn colour numbers, in short, everything you need to know to make your own adorable sea otter duo. All the additional information you need to know about this pattern you can find in the shop listings. You can buy this pattern in my shop at Ravelry, Etsy or order it here.
This pattern has a one dollar release discount till Friday the 22nd of Februari.
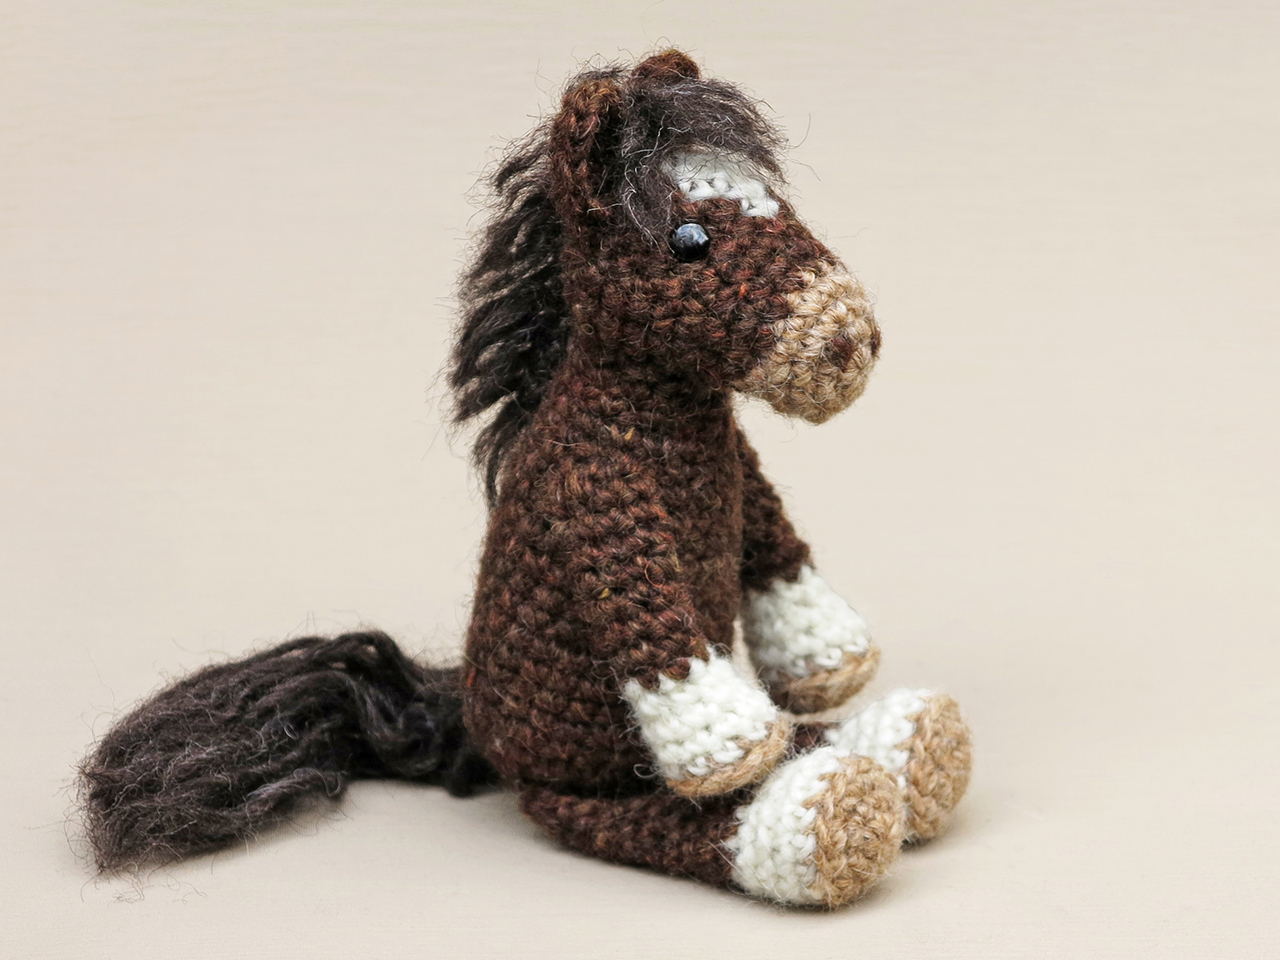
Brace yourselves, horse girls and boys, for I have finally made you a pattern! I present to you Windu the crochet horse!
Now that this amigurumi horse is finished, I almost regret I haven’t made a horse sooner. I think it’s not just horse people who will like this majestic cutie. I cannot deny that I have a preference to make small, furry wild animals. Horses are gorgeous and clever but I’ve never been a horse girl. There is a big heathland in our area that we often visit where sheep and cows and two sweet Shetland ponies graze. When we go there, we always call the ponies and they come running to us and we can pet them. They have a gorgeous wild fur, and it is so amusing to see those two characters between the other grazers. But it was when I met the Exmoor ponies in the wetlands close to my home that I got excited about making a horse pattern. I absolutely fell in love with those gorgeous, fuzzy and wild ponies.
Because Exmoor ponies are quite big, I decide I could make a horse pattern instead of a pony, as they look so similar anyway. And it is basically up to us, isn’t it? I mean, Windu could just a well be a Shetland pony as a horse!
When I started working on this crochet horse pattern, I wasn’t sure what colours to use. I decided to go freestyle and see what would happen. When I had created the perfect shape for the head, I knew I wanted a lighter nose and a white triangle shape on the head. When I designed the legs, my idea was to give this horse white socks. But while testing, I discovered a darker foot sole with white on top looked perfect. The pieces of the puzzle fell together and I found that I had created this beautiful horse. I’m especially proud of the shape of the head and the mane. Because the head has a very realistic horse shape, you can use any colour you like to create your own horse. So go ahead crafters, experiment and create your favourite! Here are some more pictures of Windu, and below them you can find info about the pattern and links to buy it.
This lovely fuzzy horse is made with Istex Lett Lopi, a 100% wool with a lot of fuzziness. He is 6 inch / 15.5 cm when sitting.
The pattern is written in US terms and contains a clear and colour-coded description of how to crochet and assemble this animal, with extra illustrations and example pictures at the bottom to help you get everything right. In the pattern you can also find what materials you need, the yarn colour numbers, in short, everything you need to know to make your own horse amigurumi. All the additional information you need to know about this pattern you can find in the shop listings. You can buy this pattern in my shop at Ravelry, Etsy or order it here.
This pattern has a one dollar release discount till Thursday the 13th of December, so get your copy soon!
It’s my pleasure to present a new crochet animal pattern to you! This time I made a rather nibbly little creature. I proudly present to you Floki the beaver amigurumi.
A crochet beaver pattern has been on my list of animals for a long time, and now I have finally made one. I’m so glad I did. This beaver turned out to be a little doll but he is also very realistic. Before I start making a crochet animal, I think about how I picture the animal, and with beavers it’s their relaxed way of living that is striking to me. They are kind of plump creatures and whatever they do, they do it with total ease. I really like watching them.
So, for this beaver amigurumi I had in mind to create a ‘relaxed’-looking doll, nicely shaped with big webbed feet. For the body I wanted to try a different method of shaping, by crocheting the leg- and hip-shapes directly into the body with some extra increases. It worked out quite well, but after the body was stuffed, the shapes became a bit less noticeable. I decided a bit of extra shaping was needed after the body was stuffed, so I sewed a few stitches through the completed body to recover the intended dent. That worked out perfectly and resulted in chubby little hips, and a small tummy even emerged above the hips, how lovely! The dent that formed at the back could easily be covered underneath the big tail, which creates the bottom of the back before the actual tail starts.
The idea of how to make the feet looked webbed came pretty easily after the cute little toes I made for the realistic hedgehog. I had in mind to give the beaver the same little toes (nails), this time in a contrasting colour. Now if I embroidered four lines halfway over each foot, starting in the nails, I could create the impression of webbed feet. Luckily for me, my plan worked. The arms I kept small and basic, as beavers have such cute little front paws.
Now I’m being all positive about the process, but I had some difficulties. My hedgehog pattern had become so amazing that it felt like I had to make something just as perfect. And with every piece I made for this beaver, I was thinking ‘is this good enough?’ It was silly, really. I had to let that feeling go, because it is nonsense to think that hedgy is the best thing I ever made and now everything has to be just as perfect. I’m totally being honest here: I actually thought of abandoning the beaver. Fortunately, I’m not the kind of person to give up on something, and I had my mind set on finishing this beaver, so after a while that feeling disappeared and I started to really love the little creature I was making. I had so much fun I even made him a little stick. Here are some more pictures of little Floki, and below them you can find all the info you need to get the pattern.
This realistic crochet beaver is made with Istex Lett Lopi, a 100% wool with a lot of fuzziness. He is 5.5 inch / 14 cm high when made with this yarn. The pattern includes the instructions for the little stick. 🌿
The pattern is written in US terms and contains a clear and colour-coded description of how to crochet and assemble this animal, with extra illustrations and example pictures at the bottom to help you get everything right. In the pattern you can also find what materials you need, the yarn colour numbers, in short, everything you need to know to make your own beaver amigurumi. All the additional information you need to know about this pattern you can find in the shop listings. You can buy this pattern in my shop at Ravelry, Etsy or order it here.
This pattern has a one dollar release discount till Friday the 9th of November so get your copy in time!
 When I started this pattern, I was worried that crafters wouldn’t really fancy making a cranky-faced plushy, but my worries receded when I posted a first teaser picture and so many of you fell in love with the face right from the start! Now I knew I had to make sure I would meet your expectations and design a fabulous cranky and cute owl amigurumi.
How I designed the face is a funny story. I started out with the barn owl face as a basis, but that didn’t work out for a little owl or a pigmy owl face. So I fumbled around trying different things. At some point, when I was playing with a basic round shape, I discovered that if I folded the top down, I got the perfect owl’s frown, how delightfully simple! Just the folded circle wouldn’t do, it needed some colouring and a beak. So I worked ahead and that’s how this striking face came to be.
Many of you asked about these striking eyes. The eyes I used for this crochet owl pattern are animal safety eyes with a dark pupil and transparent backs. I painted the backs yellow with acrylic paint and added a little felt patch to create the dark line around the eyes, voila, easy peasy.
The body is pretty basic by itself, but when I started to add the spots things became somewhat challenging to crochet. And as I wrote the pattern down, my head started to spin at some point. I’m sorry about all the colour changes, even I didn’t enjoy them! But they really are worth the effort because they make the most fabulous textured owl’s body. And if you keep your yarns separated, like one on the left and one on the right, and you keep grabbing them from the same direction, they will not tangle. You need to get into that ‘rhythm’ for the wings as well.
To sum things up, this crochet owl has a seamless body and head made from the bottom up. Right before you close the head, you attach the face with eyes to the head. Not much sewing needs to be done here because the eyes secure the face quite well already. The feet, tail and wings need to be sewn to the body and that’s it.
Here are some more pictures of this little / pigmy owl amigurumi, and below them you can find all the info you need about the pattern.
When I started this pattern, I was worried that crafters wouldn’t really fancy making a cranky-faced plushy, but my worries receded when I posted a first teaser picture and so many of you fell in love with the face right from the start! Now I knew I had to make sure I would meet your expectations and design a fabulous cranky and cute owl amigurumi.
How I designed the face is a funny story. I started out with the barn owl face as a basis, but that didn’t work out for a little owl or a pigmy owl face. So I fumbled around trying different things. At some point, when I was playing with a basic round shape, I discovered that if I folded the top down, I got the perfect owl’s frown, how delightfully simple! Just the folded circle wouldn’t do, it needed some colouring and a beak. So I worked ahead and that’s how this striking face came to be.
Many of you asked about these striking eyes. The eyes I used for this crochet owl pattern are animal safety eyes with a dark pupil and transparent backs. I painted the backs yellow with acrylic paint and added a little felt patch to create the dark line around the eyes, voila, easy peasy.
The body is pretty basic by itself, but when I started to add the spots things became somewhat challenging to crochet. And as I wrote the pattern down, my head started to spin at some point. I’m sorry about all the colour changes, even I didn’t enjoy them! But they really are worth the effort because they make the most fabulous textured owl’s body. And if you keep your yarns separated, like one on the left and one on the right, and you keep grabbing them from the same direction, they will not tangle. You need to get into that ‘rhythm’ for the wings as well.
To sum things up, this crochet owl has a seamless body and head made from the bottom up. Right before you close the head, you attach the face with eyes to the head. Not much sewing needs to be done here because the eyes secure the face quite well already. The feet, tail and wings need to be sewn to the body and that’s it.
Here are some more pictures of this little / pigmy owl amigurumi, and below them you can find all the info you need about the pattern.