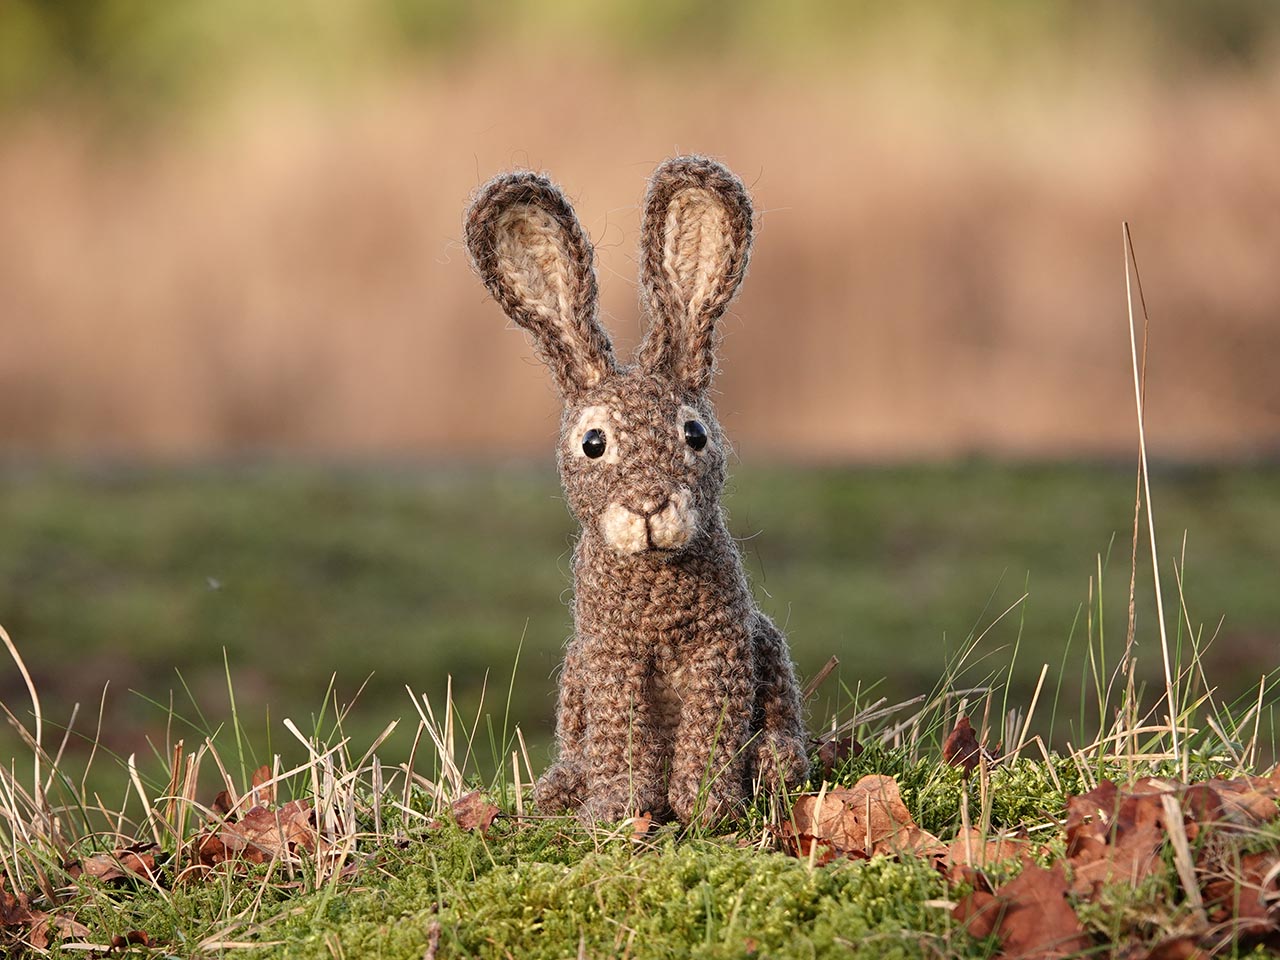
In the midst of winter (the snow had just melted when I took Hazy outside), I proudly present the pattern for Hazy, the brown hare.
A hare pattern has long been on my list. A few years ago, I made a start but couldn’t capture the right feel and something came up, so I put it on hold for the time being. Then I read the wonderful book Raising Hare by Cloe Dalton, and I fell so deeply in love with hares again that I was eager to immediately start a hare amigurumi.
From my last attempt, I remembered struggling to get the right character in the face. Hares have beautiful light fur patterns around the eyes, but such patches are always a challenge since I prefer working them in with colour changes rather than sewing them on; it is tricky to get the right shape. After studying hares so much, though, this time I got them right. I quickly fell in love with the little face I’d created!
Hares are surprisingly colourful, with all sorts of shades in their coat. Their ears have dark tips and a white back, just like the tail. To keep this pattern simple and affordable, though, I stuck to just two colours instead of four. That made it extra crucial to capture a hare’s essence in the shape and look.
At one point, with the first prototype finished, I took a short break (those always give me a fresh perspective on a design) and did some knitting. When I looked up, there was the little hare gazing at me expectantly. It made me laugh; of course, I’d placed it there myself, but for a brief, oblivious moment our eyes locked, and I felt an instant fondness for that doll.
Finishing took a bit longer than anticipated, with holidays getting in the way. I always struggle to restart after time off, but luckily most of the work was done, I just needed to make a little tail, write down the pattern, and add some extra instruction photos. I’m so delighted with the result! Below are some more pictures of Hazy the amigurumi crochet hare, along with all the information you need to get the pattern.


This is an intermediate pattern made with basic stitches. The difficulty lies in attaching the front paws. Instructions for working up the body are well explained.
This crochet hare is made with Istex Lett Lopi, a 100% wool yarn known for its fuzziness. It is 7.5 inch / 19 cm measured from the bottom to the tips of the ears. The pattern includes clear and colour-coded instructions on how to crochet and assemble the animal, along with instructional images with notes. You’ll also find pictures of the finished animal at the end. In the pattern, you’ll discover what materials you need as well as the yarn colour numbers; in short, everything necessary to create your own realistic hare amigurumi! All the additional information you need to know about this pattern you can find in the shop listings. You can purchase it in my shop at Ravelry or Etsy.
And heads up! This pattern has a one-dollar release discount until February. Feel free to let me know if you need any additional information!