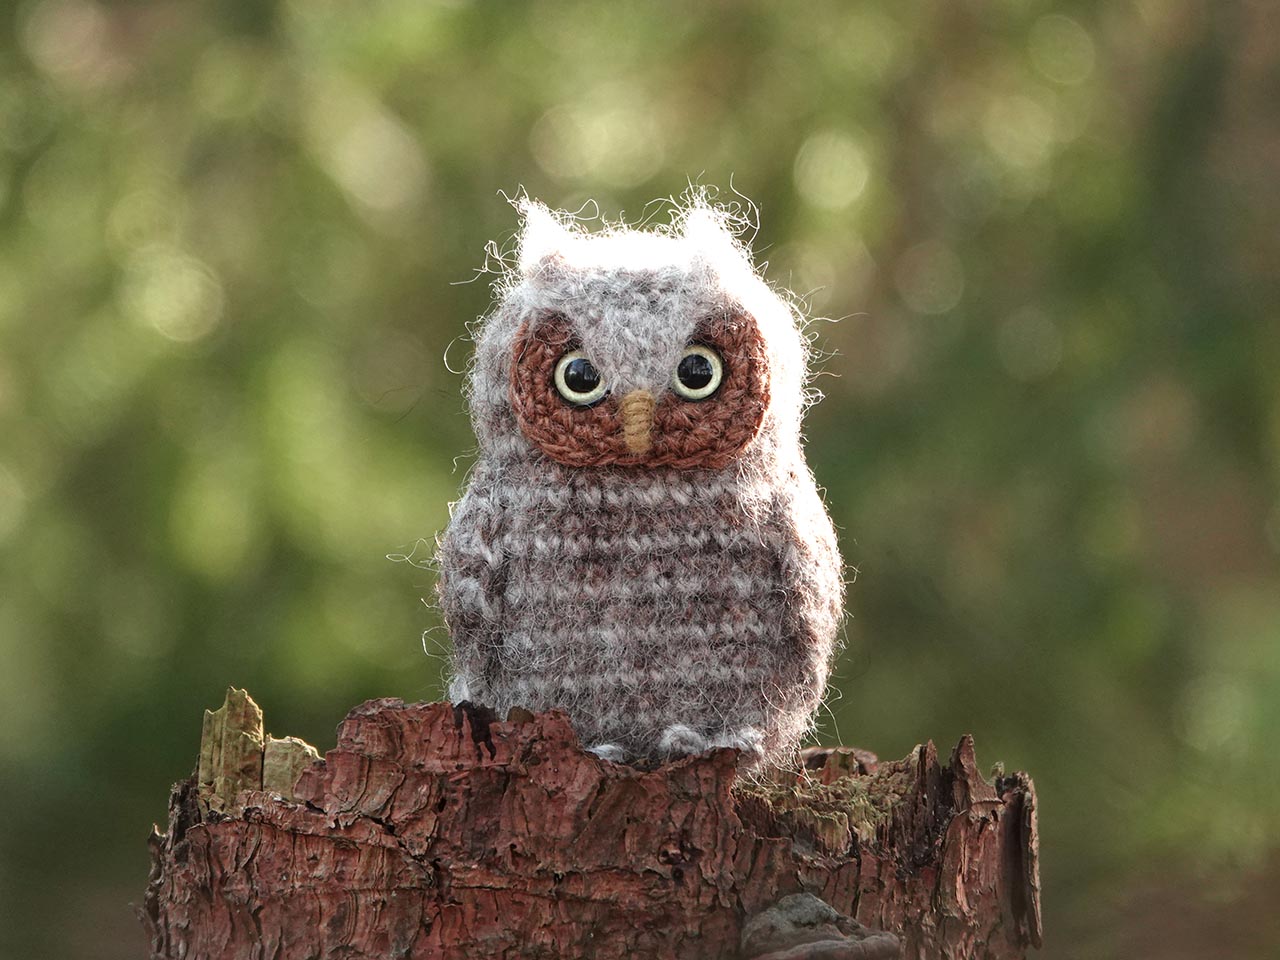
Patterns

Opidori, realistic crochet skunk pattern

With great excitement, I present to you the pattern for a crochet skunk!

For a long time, I wanted to create a skunk amigurumi pattern, but the complexity held me back. After I posted the Corgi photo on Instagram, a lovely girl from Poland asked if I’d ever considered designing a skunk pattern. That very week, the idea of a skunk pattern was on my mind, so I decided to go for it. Since she is a skunk lover, I wanted to ask if she’d like to test the pattern once ready, but she was ahead of me and volunteered first.

I knew this would be a tricky animal to crochet, and I soon encountered some challenges. I aimed for the white stripe on the face to be as narrow as possible, but how could I do that when increases needed to be made there as well? After several versions, I decided a two-stitch-wide stripe would suffice for now; I could revisit it after completing the body.

For the body, I knew there was only one way to construct it, but that meant the head would sit higher than I preferred. I didn’t have many options because of the white stripes on the back of skunks, which run horizontally from front to back; an additional challenge. However, this body shape made it relatively easy to keep it straight, so I needed to figure out how to position the head. Ultimately, that wasn’t too difficult.

Then came the tail, which gives this animal its grace. Before starting, I thought a mixed-colour tail in thinner yarn held together would work perfectly. However, once finished, my wonderful partner suggested that the white line of the body should extend into the tail (he also gave the skunk its fabulous name!). I didn’t really felt like making a complex tail, but I couldn’t shake the idea, knowing he was right. So, I made a new tail, despite my desire to avoid reversed loop stitches. After three hours of eager work, I decided to add an alternative version for older crafters. Even my hands got sore from the RLS, so the option where you attach the fur later will surely be appreciated.

Once the body and tail were finished, I revisited the face. Even though I had been focused on the other parts of the pattern, I had been contemplating a way to achieve a one-stitch-wide stripe. I tested my idea, and it worked wonderfully! Now, the adorable little skunk was complete!

As often happens, my fabulous pattern tester Kendra from Kendra’s Crafty Crafts provided the best feedback I could ask for. She said that once her skunk was finished, it reminded her of those videos featuring feisty baby skunks stomping at people with their tails up. We must have seen the same videos because they inspired me as well. Skunks are wonderful animals and not as stinky as people think; they only use their spray when there is a serious threat. So, if you get sprayed, you probably deserved it!

I’m so proud of this little crochet skunk; it turned out even better than I imagined. The downside now is that I worry people might think it looks fake. Let’s hope they find my blog and read this post. Below are some more pictures of Opidori the crochet skunk, along with all the information you need.

This is an intermediate pattern made with basic stitches. The difficulty lies in creating the seamless body. Instructions for working up the body are well explained.

This crochet skunk is made with Istex Lett Lopi, a 100% wool yarn known for its fuzziness. It is 6 inches (15 cm) from nose to bottom and from feet to end of tail. The pattern includes clear and colour-coded instructions on how to crochet and assemble the animal, along with instructional images with notes. You’ll also find pictures of the finished animal at the end. In the pattern, you’ll discover what materials you need as well as the yarn colour numbers; in short, everything necessary to create your own realistic skunk amigurumi! All the additional information you need to know about this pattern you can find in the shop listings. You can purchase it in my shop at Ravelry or Etsy.
And heads up! This pattern has a one-dollar release discount until November the 27th. Feel free to let me know if you need any additional information!

Patterns

Choppie, crochet Corgi pattern

It’s my pleasure to present to you a new crochet dog. This time, I made a Corgi amigurumi pattern, so meet Choppie the crochet Corgi. Is it a puppy or a dog? That is up to you!

amigurumi corgi puppy

Corgis are adorable, silly-looking dogs with loads of character, so it was quite a challenge to capture their personality. Even finding the right colours quickly became an endeavour. My regular yarn, Ístex Léttlopi, doesn’t come in an ochre shade. I first tried making the Corgi in orange and white, but it didn’t really work out. So, I had to look for a substitute yarn made of 100% wool. I remembered something I had seen a while back in a local shop, and that yarn had the most perfect mixed ochre. It’s called Rauma Garn Vams, and it comes from Norway. It’s a worsted weight rather than aran, but I took my chances and ordered some. I hoped that despite being slightly thicker, I could still use my size E / 3.5 mm hook. When I made the first test piece, I was relieved to find it worked perfectly, with a gauge almost the same as my regular yarn. So, time to start designing this fabulous dog!

After a few tries, I made a head I liked. It still lacked some of that Corgi personality; it was good, but not perfect. Still, I decided it was a solid start and continued working on the rest of the dog. Since I’d made a few “sausage dogs” before, I already had a basic body shape to build upon. After adjusting the proportions and colours, I soon had a lovely little body that looked just right. This is always my favourite stage, because I can finally assemble a prototype. Once the head was attached to the body, the Corgi spirit began to shine through, or at least I thought so. But when Guido saw it, he commented, “This will be a stunning Corgi if you make the muzzle smaller and maybe add some cheeks.” Oh well, I thought. Back to redesigning the head…

Of course, I couldn’t ignore a remark like that, so I had to fix it. When I designed the head, I struggled to make the white cheeks symmetrical, and creating a narrow line pointing upwards was quite a tricky detail. But I managed, and with this head as a base, I quickly realised how I could adjust a few small things without disrupting the colour scheme. Once I finished, I showed it to my love, and he agreed that this face finally captured the true Corgi spirit.

The final thing to decide was the tail. Corgis come in different varieties; some have a tail, some just a stumpy tail, and some only flaunt a big white fluffy bum. I figured I’d have to see what suited Choppie best. First, I made a version with a tail. Then I tried one with just a bump. Surprisingly, the second version looked especially cute, so I decided Choppie would have a dottie tail. But don’t worry, for those of you with a Corgi sporting a tail, I included instructions for all three tail options.

So, here it is, the new pattern! I hope you enjoy it as much as the other dogs. Below are some more pictures of Choppie, the crochet Corgi amigurumi, along with all the information you need.

This crochet dog is made with Rauma Garn Vams, a 100% wool yarn known for its fuzziness. The dog is 6  inch /15 cm long and about 5 inch/ 12 cm high. The pattern includes clear and colour-coded instructions on how to crochet and assemble the doll, along with instructional images with extra notes. You’ll also find pictures of the finished doll at the end. In the pattern, you’ll discover what materials you need as well as the yarn colour numbers, in short, everything necessary to create your own realistic corgi amigurumi! All the additional information you need to know about this pattern you can find in the shop listings. You can purchase it in my shop at Ravelry or Etsy.

And heads up! This pattern has a one-dollar release discount until October the 9th. Feel free to let me know if you need any additional information!

Patterns

Tashi, realistic crochet red panda pattern

With much joy, I present you the pattern for this magical creature. This is Tashi, the crochet red panda pattern.

Ever since I finished the raccoon pattern, I knew I wanted to create a red panda pattern in the same style. I actually made a red panda years ago, and even back then, I was dreaming about crafting a cute red panda doll on all fours, I just didn’t know the right technique for it. Now was the perfect moment to design the cutest red panda pattern ever!

The first time I saw a picture of a red panda, I immediately fell in love with this amazing animal. A few years later, I saw them in a zoo and was struck by their sheer beauty. They have perfect body proportions, beautiful rust-red fur with dark and light accents, and such a sweet, round face. Their bushy, striped tail makes them even more striking. I’ve always had a soft spot for European wildlife, but the red panda is one of the few exceptions I utterly adore!

Designing this pattern was a delight. I started by making a lovely round head with a curious face. After a few attempts, a tiny red panda face looked up at me, and I knew this was it. Next, I had to adjust the raccoon body to make it look more like a red panda. Getting the dark chest to blend seamlessly with the dark chin of the face was the biggest challenge, but with some trial and error, I finally achieved something striking that matched the dark part of the head. The last part I did was the tail, and it really makes a stunning finish!

I am so delighted with how this red panda amigurumi turned out, and I even took him with me on an adventure in the wild! I hope you crafters will love him as much as I do!  Below are some more pictures of Tashi the crochet red panda, along with all the information you need.

This crochet red panda is made with Istex Lett Lopi— a 100% wool yarn known for its fuzziness. It is 6 inches (15 cm) from nose to bottom. The pattern includes clear and colour-coded instructions on how to crochet and assemble the doll, along with instructional images and notes next to the text. You’ll also find pictures of the finished doll at the end. In the pattern, you’ll discover what materials you need as well as the yarn colour numbers—in short, everything necessary to create your own realistic red panda amigurumi! All the additional information you need to know about this pattern you can find in the shop listings. You can purchase it in my shop at Ravelry or Etsy.

And heads up! This pattern has a one-dollar release discount until June the 19th. Feel free to let me know if you need any additional information!

Patterns

Doerak, crochet German Shepherd pattern

After many requests for this pattern, I am excited to finally present my German Shepherd amigurumi. This is Doerak, a crocheted German Shepherd puppy!

Crochet dog outdoor

You might be wondering about the name Doerak. It comes from a German Shepherd puppy I fell in love with as a child during a holiday. In Dutch, “Doerak” affectionately means something like “little scoundrel.”

I began this pattern with full confidence but soon realised that deciding on the colouring was quite challenging. What is the most standard German Shepherd coat? I struggled to find a definitive answer because there are so many variations! For my version, cuteness was the key factor, so I experimented with different face colourings and chose the one that looked most like a German Shepherd puppy. Since I made several versions, some of which turned out really nice, I added an extra face option to the pattern. For Doerak, I chose the lighter colour around the eyes, the other version gives a darker appearance, with black around the eyes.

For the body, I used a basic colouring that makes it easier for you to customise it to match your own dog’s coat. I know many people want to create amigurumis of their own or a friend’s dog, and every dog “has its own coat.” My advice for anyone adjusting the colouring is to start with one of the existing versions as your base (you can use leftover yarn for this). Instead of a traditional stitch marker, use a contrasting coloured strand to mark the first stitch of each round, carrying it up with every round. This clearly identifies the first stitch and helps you divide your colour sections accurately. By doing this, you’ll have a clear reference point to customise the colour placement while maintaining the overall structure of the pattern. I also explain this in the pattern.

I’m already quite fond of my little crochet K9, and I hope this pattern inspires many unique dog amigurumis! Below are some more pictures of Doerak, the crocheted German Shepherd, along with all the information you need.

This crochet dog is made with Istex Lett Lopi— a 100% wool yarn known for its fuzziness. The dog is 5.5 inch /14 cm high sitting. The pattern includes clear and colour-coded instructions on how to crochet and assemble the doll, along with instructional images and notes next to the text. You’ll also find pictures of the finished doll at the end. In the pattern, you’ll discover what materials you need as well as the yarn colour numbers—in short, everything necessary to create your own realistic German Shepherd amigurumi! All the additional information you need to know about this pattern you can find in the shop listings. You can purchase it in my shop at Ravelry or Etsy.

And heads up! This pattern has a one-dollar release discount until April the 24th. Feel free to let me know if you need any additional information!

Patterns

Young Flamsie, a new realistic fox pattern

I’m delighted to introduce you to my new little fox amigurumi, sitting in a fairy tale world. Meet Young Flamsie!

After finishing my last pattern, I originally planned to design something entirely different. However, Tippy’s face-shaping technique intrigued me, I wondered how it would translate to a fox head. When creating Flamsie, I struggled to balance those foxy cheeks with symmetrical colour lining. Without overthinking, I experimented with a new fox face design. To my surprise, everything clicked! The revised shaping widened the cheeks beautifully, and after a few tweaks, the light-coloured chin and cheek placement worked perfectly. Now that I’d reached this point, I decided to create a new crochet fox pattern.

The message from an Etsy crafter came to mind; she’d shared an image of an AI wolf and asked if I could craft something similar. We both loved the idea of that non-existent doll, and while I agreed to try, I wasn’t sure when. With this adorable fox head on my desk, I realized I could adapt the concept using a fox instead of a wolf. I couldn’t simply recreate the AI design, I’m too critical for that, and I had my own ideas about blending styles. So I set to work, crafting a version similar to Flamsie but stockier and more youthful.

This fox amigurumi features a slightly larger head, shorter body, and front paws, giving it a cub-like appearance. I also simplified a few elements to make this version even easier than Flamsie. Some crafters found attaching the front legs tricky, so I added extra photos to clarify that step.

Though I considered replacing Flamsie with this version, rest assured, Flamsie remains too popular to retire! Instead, I named this one Young Flamsie, letting you choose which design to make.

Here are some more pictures of Young Flamsie the crochet fox, and below them, you can find all the information you need.

This crochet fox is made with Istex Lett Lopi— a 100% wool yarn known for its fuzziness. The fox is 5.5 inch /14 cm high sitting. The pattern includes clear and colour-coded instructions on how to crochet and assemble the doll, along with instructional images and notes next to the text. You’ll also find pictures of the finished doll at the end. In the pattern, you’ll discover what materials you need as well as the yarn colour numbers—in short, everything necessary to create your own realistic fox amigurumi! All the additional information you need to know about this pattern you can find in the shop listings. You can purchase it in my shop at Ravelry or Etsy.

And heads up! This pattern has a one-dollar release discount until March the 13th. Feel free to let me know if you need any additional information!

Patterns

Tippy, realistic crochet raccoon pattern

What’s with all that racket? It is with great pleasure that I present to you something new and exciting. Meet Tippy, the realistic crochet raccoon!

crochet raccoon pattern

Making a new raccoon pattern has been long on my list, along with many other animals, and it is often hard to choose. Raccoons aren’t a native species where I’m living, but these smart little creatures are sneakily spreading throughout nature. Most of them are zoo escapees, and once in the wild, they are very successful. I must admit I absolutely love these animals. I’ll never forget the moment I first spotted one on my camera trap, it was an absolute surprise that stole my heart!

A Creative Journey

In 2014, I created my first raccoon amigurumi. Wasby is a cute sitting doll with a striking face. But I’ve learned so many new skills since then and wanted to create something more realistic.

As I wrote in an earlier post, I’m not a fan of how AI is interfering with crochet animals. However, with a bit of reluctance (and maybe a little shame), I must admit that the creations AI has produced are amazing! This style, a blend of plush animals and crochet, unexpectedly inspired me to push my creative boundaries rather than discourage me. When I designed this raccoon doll, I used both images of real raccoons, plushies and this newfound style for inspiration. I experimented with body shapes, creating shorter and wider paws while refining proportions. My goal was to make the body as small as possible while keeping it realistic and I’m thrilled with how it turned out!

Crafting Challenges and Discoveries

I attempted completely seamless designs but found they lost the whimsical character I love. After multiple iterations, I realised that sewing the head to the body allows for more expressiveness, a technique that gives my animals their unique personality. One of my editors perfectly captured Tippy’s essence, commenting, “It looks just like a little baby raccoon ❤️.”

Here are some more pictures of Tippy the raccoon amigurumi, and below them, you can find all the information you need.

This is an intermediate pattern made with basic stitches. The difficulty lies in creating the seamless body. Instructions for working up the body are well explained.

This crochet raccoon is made with Istex Lett Lopi— a 100% wool yarn known for its fuzziness. The raccoon is 6 inches (15 cm) from nose to bottom. The pattern includes clear and colour-coded instructions on how to crochet and assemble the doll, along with instructional images and notes next to the text. You’ll also find pictures of the finished doll at the end. In the pattern, you’ll discover what materials you need as well as the yarn colour numbers—in short, everything necessary to create your own realistic raccoon amigurumi! All the additional information you need to know about this pattern you can find in the shop listings. You can purchase it in my shop at Ravelry or Etsy.

And heads up! This pattern has a one-dollar release discount until February the 6th. Feel free to let me know if you need any additional information!

Patterns

Merley, crochet highland cow pattern

With great joy, I present to you this wild-looking, friendly beast: I designed a pattern for a Scottish Highland cow!

Realistic crochet highland cow pattern

This amigurumi pattern has been on my to-do list for quite some time, but a very enthusiastic customer inspired me to design one now. I’ve loved these cows for a long time, when we go hiking, we often see them. They play an important role in our nature reserves as large herbivores, helping to keep grasses at bay so that more vulnerable plants have a chance to thrive. They are impressive creatures with their huge horns and wild fur, yet they are among the friendliest cows.

Designing an animal like this presents a fun challenge for me as a creator. The horns and hair add extra cuteness to the crochet animal. My goal was to create an easy-to-crochet cow that looked both striking and cute. However, I faced a dilemma in deciding how hairy to make it. I could either cover it in hair or simply add hairy details. I worried that an entirely hairy cow might make the pattern less appealing, and when I pictured it, the cow wasn’t fully hairy. I prefer to see the texture of the crochet stitches, so I decided that adding hairy details would work best for what I had in mind.

I envisioned this Scottish Highland amigurumi as a stocky doll on all fours with a sweet, furry face. As I designed the head, the placement of the hairy parts influenced its expression. After several test faces, I created one that I thought was perfect. However, it gave Merley a more serious look than I intended. I wanted her to have an open expression, so I decided to use my first design, which had a spontaneity that I really liked.

The initial versions of the body had legs that were way too long. I had to shorten them much more than I anticipated. My boyfriend was confident that shorter legs would look better, so I took his advice and omitted four rounds. He was right; this adjustment gave the amigurumi cow exactly the stocky look I hoped for! Due to the lack of a suitable colour in my favourite Istex Lett Lopi yarn, I used two strands of Istex Einband Lopi yarn held together. The most common colour for Scottish Highland cows is a golden rusty hue. Lett Lopi’s rust is too red, and the brown colours aren’t warm enough. Einband’s almond heather comes closest.

Here are some more pictures of Merley the crochet Highland cow, and below them you can find all the information you need about the pattern.

This is an intermediate pattern made with basic stitches. The difficulty lies in creating the seamless body and using rls stitches to achieve the hairy details. Instructions for working up the body are well explained, and I’ve also created a video tutorial for the rls stitch.

This crochet cow is made with a combination of Istex Einband loop and Istex Lett Lopi—both 100% wool yarn known for its fuzziness. The cow is 6 inches (15 cm) long. The pattern includes clear and colour-coded instructions on how to crochet and assemble the doll, along with instructional images and notes next to the text. You’ll also find pictures of the finished doll at the end. In the pattern, you’ll discover what materials you need as well as the yarn colour numbers—in short, everything necessary to create your own realistic Scottish highland cow amigurumi! All the additional information you need to know about this pattern you can find in the shop listings. You can purchase it in my shop at Ravelry or Etsy.

And heads up! This pattern has a one-dollar release discount until December the 18th. Feel free to let me know if you need any additional information!

Patterns

Fronsky, realistic tawny owl pattern

It is with great pleasure that I present to you a new realistic crochet owl: Fronsky, the tawny owl!

realistic crochet owl

I had originally planned to create another animal, but this summer I saw my first adult tawny owl and later spotted a second one. Having seen tawny owl chicks this spring, I was eager to see an adult. After some research, I discovered a few roosting spots where owls are regularly seen. Visiting sites like these isn’t usually my thing, but for a chance to see a roosting tawny owl, I had to make an exception. During our first three visits, the owl was not present, which left me disappointed. However, on our fourth visit—a sunny afternoon—the owl was there! What a delightful sight it was! I found it almost magical how that gorgeous creature sat calmly and even looked at us from its perch. I was overjoyed and managed to take a few amazing pictures.

A few weeks later, we travelled to Germany. During a hike, we stumbled upon an old corn mill that showed signs of a roosting owl. There were droppings around, pellets, and feathers stuck to the wall. I checked for the owl but found none. Later that week, we took an evening stroll after a day of rain. As we walked the path to the mill, I wondered if there might be an owl now. When we were almost there, I carefully walked beneath a large chestnut tree and cautiously looked up at the mill. And there it was! A huge gray morph tawny owl perched on a beam—it didn’t even fully open its eyes when I looked at it. This one was much closer than the first one I saw, and I finally realized just how large they are. My holiday was perfect!

When I returned to work, my mind was so full of owls that the only thing I could do was crochet another owl pattern. Since I’ve already made several species of owls, I could easily adapt those patterns into a chubby tawny owl. That sounds easier than it is though, but at least I didn’t have to start from scratch. Real owls vary significantly in size, but I decided to make this one slightly bulkier because I like all my dolls to be about the same size. Choosing the colours for this owl was challenging; however, to keep it simple, I decided to omit the rust colours of the brown morph and instead go for a more greyish morph—like the owl I saw in Germany. This way, it can be made using only three colours, which is more than enough.

An interesting detail: for this owl, I adjusted the feet. Owls have two toes at the front of their feet and two at the back. When I made my other owls, I didn’t know this detail, and I bet many of you might not either.

Here are some more pictures of Fronsky the tawny owl amigurumi. Below them you can find all the information you need about the pattern.

Pattern Details

This is an intermediate pattern made with basic stitches. The difficulty lies in the colour changes; the strands can quickly become tangled, so you need to keep your focus!

This crochet owl is made with Istex Lett Lopi—a 100% wool yarn known for its fuzziness—and stands 5.5 inches (14 cm) tall. The pattern includes clear and colour-coded instructions on how to crochet and assemble the doll, along with instructional images and notes next to the text. You’ll also find pictures of the finished doll at the end. In the pattern, you’ll discover what materials you need as well as the yarn colour numbers—in short, everything necessary to create your own realistic owl amigurumi! All the additional information you need to know about this pattern you can find in the shop listings. You can purchase it in my shop at Ravelry or Etsy.

And heads up! This pattern has a one-dollar release discount until my birthday on October 6th. Feel free to let me know if you need any additional information!

Patterns

Frissle, crochet boarlet aka baby boar pattern

This time I felt like making something completely different. Meet Frissle, a crochet boarlet amigurumi!

baby boar amigurumi crochet pattern

When we go hiking, we often go to a place a little over an hour from where we live, where there is a lot of wildlife. If you are lucky, you can spot different kinds of animals there, like foxes, deer, and wild boar. I especially like going in Spring, when the days are longer and the boar have young (they can also have young in the winter, but you hardly ever see them then). In Spring they are much easier to spot, and I’m always so delighted when I see the boarlets in their stripy pyjamas.

Although I’ve always wanted to create a boarlet pattern, I was never sure about how to design it. But now that I’ve made a few animals on all fours, I had a good idea of how to shape this baby boar. The first test version looked more like a fawn than a piglet, but I have to start somewhere. Now I knew the paws needed to be much shorter and the head had to be placed lower and more to the front. So I made a second and a third version, and I then had the shape I liked. All I had to now was to design the stripy pyjama, which took some trial and error but in the end turned out ever so cute.

I’m very pleased with this new addition to my woodland creatures and absolutely love this crochet wild boar piglet. I hope you like it as much as I do. Maybe I should make a big, sturdy parent for it someday soon!

Here are some more pictures of the boarlet amigurumi, and below them you can find info about and links to buy the pattern.

This is an intermediate pattern. It’s made with basic stitches. The difficulty of this pattern lies in crochet-attaching all four paws. I try to explain it as thoroughly as possible, and it isn’t that difficult when you understand the principle. The benefit of this kind of shape is that there’s hardly any assembling to do once you’ve finished crocheting. You only need to attach the ears and the head.

This crochet baby piglet is made with Istex Lett Lopi, a 100% wool with a lot of fuzziness. It’s 5.5 inch / 14 cm tall. The pattern contains a clear and colour-coded description of how to crochet and assemble the doll, with instruction images with notes next to the text and pictures of the finished doll at the bottom. In the pattern you can also find out what materials you need, the yarn colour numbers — in short, everything you need to know to make your own realistic boarlet amigurumi. All the additional information you need to know about this pattern you can find in the shop listings. You can purchase it in my shop at Ravelry or Etsy.

And heads up! This pattern has a one dollar release discount till the 10th of July.

Patterns

Barnsbie 2, realistic barn owl pattern

I’m so excited to present you this pattern! Meet Barnsbie the second, a super-realistic but too-cute-to-be-real crochet barn owl.

realistic barn owl pattern

When I made my first crochet barn owl pattern, I was rather pleased with its looks. But after I had learned some new techniques while designing the long-eared owls, I didn’t really like old Barnsby anymore. In my eyes he started to look like a silly-looking man.

‘A man?’ Yes, well, whilst I loved the legs when I designed Barnsby, I now really don’t like them any more. All owl species have long legs, you don’t often see them because when they sit on a branch, they are hidden between fluffy feathers. When I designed Barnsby, I wanted to show the legs too. But later I preferred the ‘branching’ look (like bird plushes mostly have too) of just the feet sticking out underneath the belly. And I also wanted to try something different for the face, something more realistic and less ‘big nose’-looking.

So I sat behind my desk and tried all sorts of things. I recently purchased a super-cute but rather silly-looking barn owl plush (I have a thing for plushes), and that was my example. I had to melt for my crochet version, as much as for that wonky-looking plushy.

At some point in the process, I saw my partly-finished new Barnsbie lying in my working basket, and in that moment I knew I had succeeded. I totally loved that look. Especially the face profile looks amazing, and this crochet barn owl has the perfect balance between a realistic and a cute amigurumi.

Here are some more pictures of the little cutie, and below them you can find info about and links to buy the pattern.

This is an intermediate pattern. It’s made with basic stitches. If you’re experienced, you can go for the spotted version, but if you don’t like colour changes too much, you can leave out the grey yarn and just go for a two-coloured owl. The difficulty of this pattern lies in the face shaping. I try to explain it as thorough as possible, but it requires some extra skills rather than just crocheting.

This crochet owl is made with Istex Lett Lopi, a 100% wool with a lot of fuzziness. It’s 5 inch / 13 cm tall. The pattern contains a clear and colour-coded description of how to crochet and assemble the doll, with instruction images with notes next to the text and pictures of the finished doll at the bottom. In the pattern you can also find out what materials you need, the yarn colour numbers — in short, everything you need to know to make your own realistic owl amigurumi. All the additional information you need to know about this pattern you can find in the shop listings. You can purchase it in my shop at Ravelry or Etsy.

And heads up! This pattern has a one dollar release discount till the 16th of May.