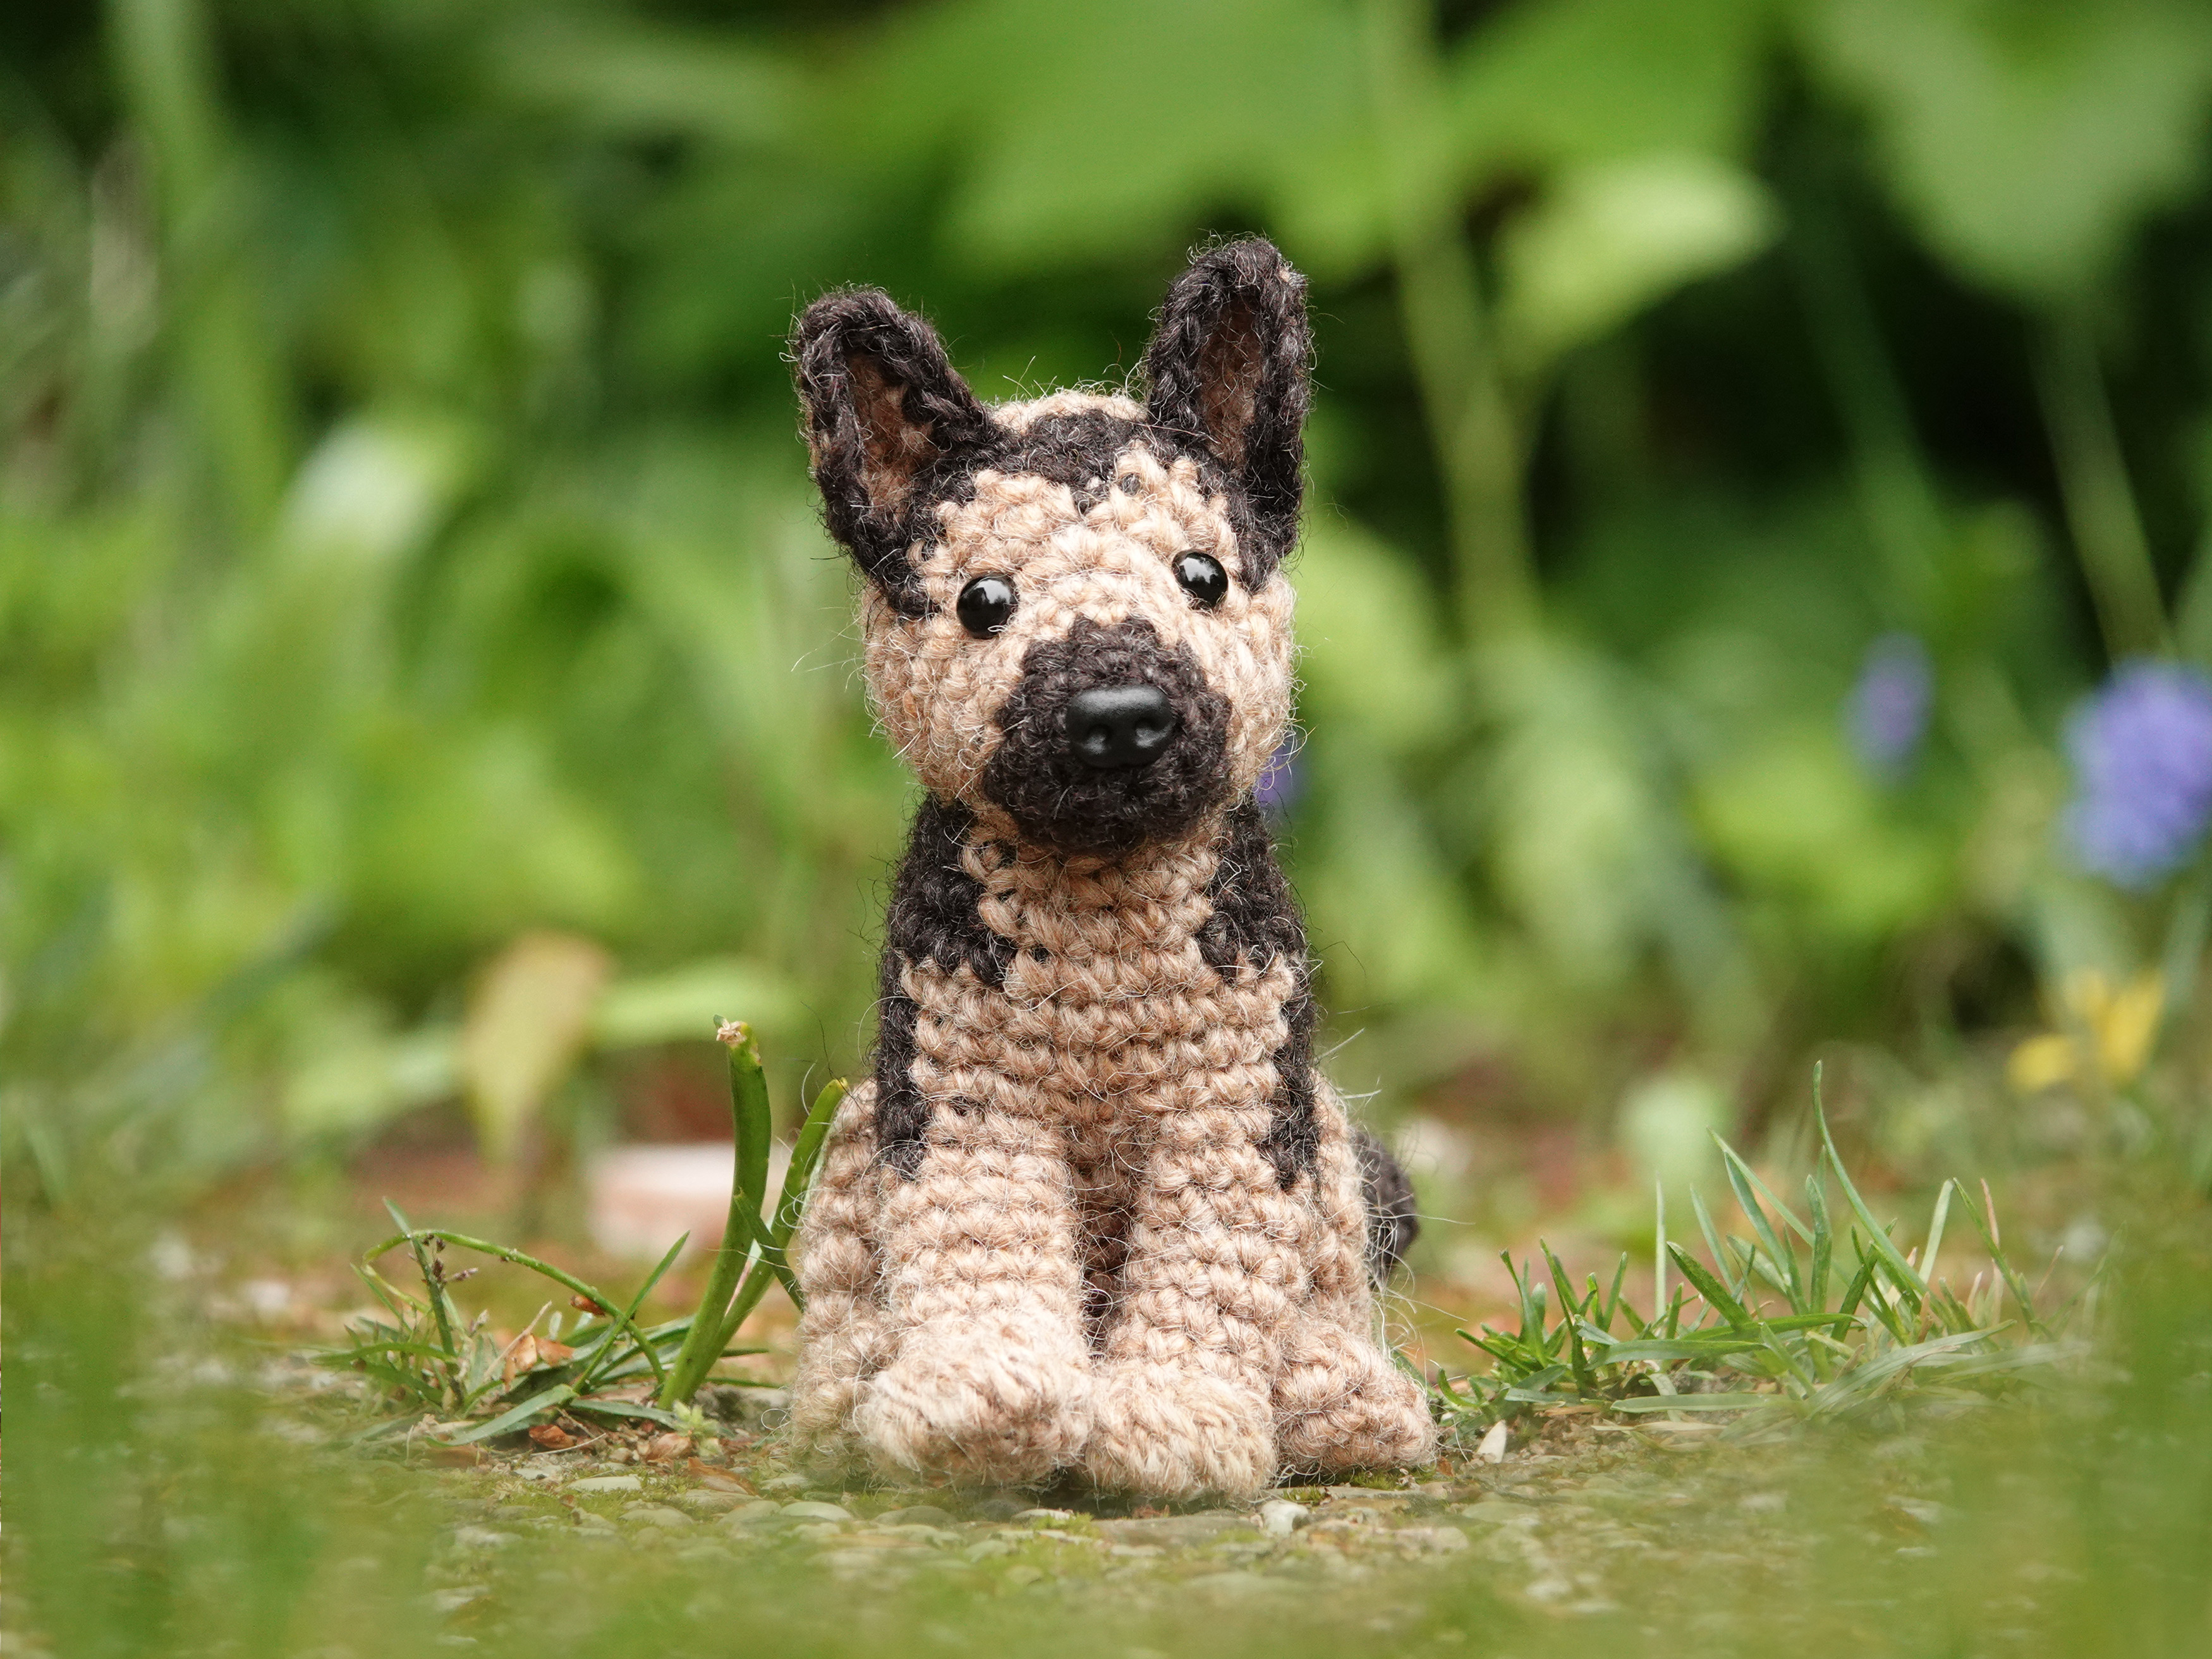
Patterns

Winter Woolfie, Eurasian wolf pattern

And here he is! Winter Woolfie turned out to be a Eurasian wolf.

eurasian wolf crochet pattern

When I finished the Border Collie pattern I immediately knew I wanted to make a furry version of my wolf. And since I’m not completely settled into our new house just yet I could do with an easy project. But I suppose I can’t do easy and this took much more time than I had anticipated.

When working on the head I decided to improve the facial colouring. And when I was finally satisfied with the new look, I began to realize that I could make a Eurasian wolf, the wolf that is once again living in my country after a long period of absence. We now have four wolf packs in the Netherlands, with one pack not even very far from where I live. So I wanted to make a tribute to our own fantastic wolf.

The Eurasian wolf is quite similar to the North American (grey) one but, surprisingly for me, the Eurasian wolf is bigger. It also has a more rusty colour overall. North American species are more diverse and colourful than the European wolves, so not to worry, you can make your ‘own’ wolf too with this pattern.

So, eventually the Winter Woolfie pattern turned out to be almost completely different. The shape stayed the same, but the colouring of each body part has changed, and I added facial and chest hair to create the winter coat. A more experienced crafter can mix and match the patterns to make a winter version of the original Wolf amigurumi. And of course you can leave out the loops to make a crochet wolf in Summer coat. Or when you make a wolf family you can give the male the fluffy appearance, and the female the slender, short-haired look. There are many possibilities. Let’s celebrate this special animal, and let’s never forget its crucial role in maintaining biodiversity*!

For now, here are some more pictures of this new crochet wolf pattern. You can find info about and links to buy the pattern below.

Info about & links to buy the pattern

This is a moderate pattern to make. Most parts work up pretty easily, but the reversed loop stitches for the head, chest and tail take some extra effort. The winter wolf is made with Istex Lett Lopi, a 100% wool with a lot of fuzziness. It’s 6 inch /15 cm sitting. The pattern contains a clear and colour-coded description of how to crochet and assemble the wolf, with instruction images next to the text and example pictures at the bottom to help you get everything right. In the pattern you can also find out what materials you need, the yarn colour numbers — in short, everything you need to know to make your own adorably mini wolf. All the additional information you need to know about this pattern you can find in the shop listings. You can purchase it in my shop at Ravelry, Etsy or order it here.

And heads up! This pattern has a one dollar release discount until December the 22nd!

*Wolves, like beavers, are eco-engineers. They can change the appearance and biodiversity of immense landscapes with their presence, because their prey —herbivores —will act differently. This has an enormous effect on landscapes and on the variety of plants and species that live there. If we want to save our environment, we must trust certain animals and their abilities to restore landscapes that have been exploited by humans back into the rich habitats they once were.

Patterns

Schnoodge, crochet Schnauzer pattern

I proudly present to you something completely different: Schnoodge the crochet Schnauzer pattern!

realistic crochet dog pattern

After I finished my second dog pattern, I got so many requests for all sorts of dogs that I decided to do at least two dog patterns a year. One night when I was in bed I suddenly thought, ‘How much fun would it be to design a bearded Schnauzer?’ and I pictured a very cute hairy Schnauzer face.

When still working on the Siamese cat, I tried a first bearded dog head just to check if it would work, and the result was so delightful that I knew this was going to be the first new dog.

To make a bearded dog, there was one thing I had to find a new solution for: the loop stitch that would create the long brows and beard. Normally, the loop forms on the inside of your work, so you have to turn the piece inside out. That would mean that the complete head had to be turned inside out and the stitches without loops would also be the wrong side, and I don’t like that look. I had to find a way to get the loops to the front side.

How hard could it be to just pull the loops through each stitch after it was finished? I tried several ways and each time I cut the loops very short after I’ve pulled them through the stitches to see if the stitches would hold. Most of my methods were as secure as the ‘normal’ loop stitches, so I could just pick the one that had the best look. In the end it works the same as the normal loop stitches. As long as you don’t cut the loops shorter than 1 cm/ 0.5 inch, the stitches will hold, even if you put a lot of pressure on them. And for those of you who don’t like doing a complicated loop stitch, I added the instructions for how to attach the hair later.

Now, I could write more about designing this dog, but I want to tell you something about making choices.

Personally, I find that making choices is the most difficult thing about designing crochet animals. And it’s not a few choices I have to make! For every little thing there are options to consider. Mostly it’s about sizing, but also about how realistic I want a design to be. It’s like, ‘Shall I make the legs 10 stitches wide, or would they look better a little bit bigger?’ I have to try both to see how it looks. When I see the result I think, ‘What if I make them shorter, would that be better’? So I have to make another body with shorter legs to see how that looks, et cetera. After many more choices, I assemble the animals, and then come new questions. ‘Would it have looked nicer if I made the neck a little bit thicker?’ I can choose to try that, or I can leave it as it is. I could go on like this for a while, lol. In the end I always love the result and all the choices that can drive me nuts are worth the effort!

Here are some more pictures of this super-cute Schnauzer amigurumi, and below them you can find all the info about the pattern.

Info about & links to buy the pattern

This pattern is quite advanced because of the reversed loop stitch. I’ve added the link to a tutorial online and added a clear description of how to pull the loops through, but a stitch like this requires more skill than basic stitches. For beginners who really want to make this dog I also added an instruction for how to insert the hair later.

This dog is made with Istex Lett Lopi, a 100% wool with a lot of fuzziness. It’s 5.1 inch /13 cm sitting. The pattern contains a clear and colour-coded description of how to crochet and assemble the doll, with instruction images next to the text and example pictures at the bottom to help you get everything right. In the pattern you can also find out what materials you need, the yarn colour numbers — in short, everything you need to know to make your own silly Schnauzer doggy. All the additional information you need to know about this pattern you can find in the shop listings. You can purchase it in my shop at Ravelry, Etsy or order it here.

And heads up! This pattern has a one dollar release discount till the 5th of May.

Patterns

Maisie, crochet Siamese cat pattern

After making the very complex stoat patterns, I felt like making something a bit more simple. So I made a new cat! This is Maisie, a shy crochet Siamese.

realistic crochet cat pattern
When I designed my first amigurumi cat, Baltazar, I made all sorts of cat faces in the process, just for the fun of it. I made a tuxedo cat, a tortoise shell, an orange tabby, a Siamese and a few more. It resulted in a lovely image for Instagram and I knew I would finish some of these later.

So, the pleasant thing when designing this pattern was that I already had a finished head. I only had to design a new coloured body. Luckily for me – and for you, too – Siamese cats don’t have very complicated stripes or colour patches, so I could quickly work my way up the body. Only the back paws were a bit of trial and error, because I wanted to create a shape in colouring that made it look like the legs are folded underneath the hips for this sitting cat.

Maisie turned out to be a bit more shy-looking than Balthazar, probably because of the dark facial features. I really love how each animal has its own character. Seeing the creatures made with my patterns always gives me much joy, because I see my own work in it, but also a new and unique doll.

Here are some more pictures of this curious crochet cat, and below them you can find all the info about the pattern.

Info about & links to buy the pattern

This is a pretty easy and quick amigurumi Siamese to make. Only the colouring of the face and the attaching of the front paws require some extra concentration. The cat is made with Istex Lett Lopi, a 100% wool with a lot of fuzziness. It’s 5.1 inch /13 cm sitting. The pattern contains a clear and colour-coded description of how to crochet and assemble the doll, with instruction images next to the text and example pictures at the bottom to help you get everything right. In the pattern you can also find out what materials you need, the yarn colour numbers — in short, everything you need to know to make your own lovable Siamese cat. All the additional information you need to know about this pattern you can find in the shop listings. You can purchase it in my shop at Ravelry, Etsy or order it here.

And heads up! This pattern has a one dollar release discount until March the 30th.

Patterns

Okiri, realistic crochet owl pattern

Woot woot, I’m so happy I can finally present this pattern to you! I wasn’t sure about how to define this owl, because it resembles both the European little owl (steenuil in Dutch) and the American pigmy owl. Both are most adorable small owls, and I believe Okiri would almost make a live-size Pigmy owl. So meet my new realistic crochet owl pattern, isn’t he adorable?! amigurumi little owl and pigmy owl When I started this pattern, I was worried that crafters wouldn’t really fancy making a cranky-faced plushy, but my worries receded when I posted a first teaser picture and so many of you fell in love with the face right from the start! Now I knew I had to make sure I would meet your expectations and design a fabulous cranky and cute owl amigurumi. How I designed the face is a funny story. I started out with the barn owl face as a basis, but that didn’t work out for a little owl or a pigmy owl face. So I fumbled around trying different things. At some point, when I was playing with a basic round shape, I discovered that if I folded the top down, I got the perfect owl’s frown, how delightfully simple! Just the folded circle wouldn’t do, it needed some colouring and a beak. So I worked ahead and that’s how this striking face came to be. Many of you asked about these striking eyes. The eyes I used for this crochet owl pattern are animal safety eyes with a dark pupil and transparent backs. I painted the backs yellow with acrylic paint and added a little felt patch to create the dark line around the eyes, voila, easy peasy. The body is pretty basic by itself, but when I started to add the spots things became somewhat challenging to crochet. And as I wrote the pattern down, my head started to spin at some point. I’m sorry about all the colour changes, even I didn’t enjoy them! But they really are worth the effort because they make the most fabulous textured owl’s body. And if you keep your yarns separated, like one on the left and one on the right, and you keep grabbing them from the same direction, they will not tangle. You need to get into that ‘rhythm’ for the wings as well. To sum things up, this crochet owl has a seamless body and head made from the bottom up. Right before you close the head, you attach the face with eyes to the head. Not much sewing needs to be done here because the eyes secure the face quite well already. The feet, tail and wings need to be sewn to the body and that’s it. Here are some more pictures of this little / pigmy owl amigurumi, and below them you can find all the info you need about the pattern.

Info about & links to buy the pattern

The pattern for this realistic crochet little owl and pigmy owl is pretty straightforward. The colour changes can make your had go spinning, so take your time there! This animal is made with Istex Lett Lopi, a 100% wool with a lot of fuzziness. It’s 4.3 inch / 11 cm tall. The pattern contains a clear and colour-coded description of how to crochet and assemble the doll, with instruction images next to the text and example pictures at the bottom to help you get everything right. In the pattern you can also find out what materials you need, the yarn colour numbers — in short, everything you need to know to make your own cranky owl. All the additional information you need to know about this pattern you can find in the shop listings. You can purchase it in my shop at Ravelry, Etsy or order it here. And heads up! This pattern has a one dollar release discount until the 4th of November!
Patterns

Munchie, crochet fawn pattern

With great pleasure I can finally present to you my baby roe deer pattern! This time of the year they are just born and if you are lucky you can hear them call for their mother if you’re visiting a rural area or forest. They are well hidden in a high grass field or dense bushes, so you are very lucky if you see one.

crochet baby deer

Fawns are so gorgeous with their spotted fur that provides excellent camouflage. They often sit well hidden, making themselves as small as possible. That of course offered me a nice challenge: how could I best design this baby deer? From the start I knew I wanted to create a crochet fawn in a sitting position with its legs folded beneath the body.

I started designing the head, and when it was finished I worked on the body, first in one colour to create the right shape, with a bended neck made with a few short-rows. When I was satisfied with the shaping, I started the colouring. At first I wasn’t sure about how many colours to use. I knew a fawn’s back is much darker than the flanks, but it meant using an extra colour and I prefer to use as few colours as possible. But just the lighter brown combined with the light spots didn’t give the result I had in mind. I really had to add that warm, dark brown colour to get the desired look. The body made in those three colours looks so beautiful. Creating spots takes a bit more effort, but the result is so rewarding, and the result is the perfect camouflaged fawn body.

For the legs, I had to find out how to attach them. I tried a one-piece shape, but it made the fawn too stiff. So I decided to make loose limbs. I’ve used pipe-cleaners in the legs to make them bendable into all sorts of poses, but I know some of you prefer not to use them or cannot because they are not safe for small children. Because the legs aren’t stuffed they stay quite flexible, and if you want the fawn sitting in the same position as Munchie, you can simply sew them like that with a few stitches.

This is another very realistic crochet animal pattern, and I really enjoy designing them. I hope you like this special fawn as much as I do! Here are some more pictures of this fawn amigurumi, and below them you can find all the info you need about the pattern.

Info about & links to buy the pattern

The pattern for this realistic crochet fawn is rather easy, but the colour changes require some extra concentration.

This fawn is made with Istex Lett Lopi, a 100% wool with a lot of fuzziness. It’s 5.5 inch /14 cm long. The pattern contains a clear and colour-coded description of how to crochet and assemble the doll, with instruction images next to the text and example pictures at the bottom to help you get everything right. In the pattern you can also find out what materials you need, the yarn colour numbers — in short, everything you need to know to make your own fawn. All the additional information you need to know about this pattern you can find in the shop listings. You can purchase it in my shop at Ravelry, Etsy or order it here.

And heads up! This pattern has a one dollar release discount till Tuesday, the 23rd of June!

Patterns

Hambea, crochet beagle pattern

amigurumi beagle

When I was a little girl, beagles were my favourite dogs. I found them perfection. Their size, proportions and colouring I absolutely adored. And they had such a sweet face, too! I really wanted to have a beagle, but my mum wasn’t so much a dog-lover, and after a failed attempt to own a dog (a basset hound because they could not jump at her), I knew owning a beagle would not happen as long as I was a child. I got over it, and while growing up I became more a cat person, so I still haven’t owned a beagle and probably never will. But now I do have this little beagle friend! I made Hambea to honour my childhood adoration.

This being the second dog pattern I made, I could turn all my attention to the colouring. Creating the pointed white line on the face was the most difficult part, because of awkward decreases that were in the way. But practise makes perfect, and in the end I got a facial stripe that looks the way I pictured it. Beagles have such a distinctive colour pattern on their body, and I really enjoyed designing that. It was such a delight to see the beagle slowly take shape.

I always work with Istex Lètt Lopi, but I could not find the perfect reddish brown for a beagle. I decided to use Istex Einband Lopi, the lace version of Lett Lopi, and hold two strands together, which worked perfectly well. When I saw the beagle one of the testers made, I realised the acorn brown Lètt Lopi also worked well.

Hambea doesn’t have a collar or harness, but I did add the instructions for a harness to the pattern, for those of you who want to give their beagle a little extra colour.

Here are some more pictures of Hambea, and below them you can find all the info you need about this pattern and links to buy this amigurumi beagle pattern.

Info about & links to buy the pattern

The pattern for this realistic crochet beagle is rather easy, but the colour changes require some extra concentration. Even less experienced crocheters will be able to make this dog.

Hambea is made with Istex Lett Lopi and Einband Lopi (held together matching one strand of Lett Lopi), a 100% wool with a lot of fuzziness. He’s 5.1 inch /13 cm sitting. The pattern contains a clear and colour-coded description of how to crochet and assemble the doll, with instruction images next to the text and example pictures at the bottom to help you get everything right. In the pattern you can also find out what materials you need, the yarn colour numbers — in short, everything you need to know to make your own dog. All the additional information you need to know about this pattern you can find in the shop listings. You can buy this pattern in my shop at Ravelry or Etsy or order it here.

And heads up! This pattern has a one dollar release discount till Tuesday, the 1st of April!

Patterns

Woolfie, realistic crochet wolf pattern

Never have I worked on a pattern for so long, and now I can finally show you Woolfie, my refreshing new crochet wolf pattern!

Realistic crochet wolf

Refreshing? Well, yes, I learned a few new techniques to make this wolf amigurumi. More about that later.

For quite a while I have wanted to make a fox that can sit but that has flexible limbs. Somehow it didn’t work out no matter what I tried, so at some point I gave up. But then came the news that a wolf had been seen in my country, and then another one and even more. Wolves have been extinct for a long time in my country, but these sightings meant that wolves were interested in living here. And then a female wolf settled in a rural part of the Netherlands and successfully raised three pups. Wolves have now officially returned! I think this is fabulous, and I hope it will work out. Of course I had to make a new wolf pattern now. I stepped back into the ‘drawing room’ and took another look at my fox sketches. It became clear that if I wanted to make a fabulous wolf, I would need to improve the technique I had tried to use for that fox. So I practised, making many sketches to visualise how everything should look. And then I started crocheting.

First I made the head. I figured that if I made a cute face, it would be difficult to quit and I would have to finish the rest. And it worked! After I made the head, I started trying out different body shapes. One thing was certain: the body and front paws needed to be seamless. Since I already had a long time to think about it after I stopped working on that fox, I soon found the right shape and size. Then the body needed colouring. I looked at many wolf pictures and decided that my wolf needed to have a light-coloured chest with a grey back. But when I finished the body like that, the front looked like a straight flat piece, very shapeless and not at all what I had in mind. I had to use my imagination to think of a solution that still looked realistic but added much more character. I grabbed my main sketch and started drawing again. After a few tries I found something I liked and worked it out in crochet, and it looked perfect.

But then I had a setback. When I started the body, I thought, ‘I’ll figure out the back paws later’. That wasn’t very smart of me. When I pinned the basic back paws I had made to the body, it looked all wrong. Now I had a complex-looking, seamless body with simple, silly-looking back paws. That weekend I had no idea how I was going to shape them. And then I looked at Boeloe the Koala and got an idea: what if I slimmed down the body and create paws like Boeloe’s, with a hip and a leg part? Would that create the flexible look I desired? Some quick math revealed that I only had to slim down the lower bit of the body to compensate for the bulk the hips would add. Because I didn’t want to end up regretting that I hadn’t made a seamless tail, I also worked out how to create a hole for that.

After all the effort and a pile of failed attempts, Woolfie now is sitting in front of me and he is so gorgeous! He looks more like an excited wolf pup than an adult wolf, but who cares about that? This is a win-win situation: I made a super-realistic new wolf pattern AND I learned a lot of new crochet skills. And the good thing for you is, the way these techniques are worked into the pattern doesn’t make it much more difficult to make, because you can just follow the instructions. I have figured out for you how to do these cool things the easy way!

Here are some more pictures of sweet Woolfie, and below them you can find all the info you need about this wolf amigurumi pattern.

Info about & links to buy the pattern

This realistic crochet wolf is made with Istex Lett Lopi, a 100% wool with a lot of fuzziness. He is 6 inch / 15 cm sitting when made with this yarn. This isn’t a very difficult animal to crochet, even the seamless bits are quite easy to attach if you follow the instructions.

The pattern contains a clear and colour-coded description of how to crochet and assemble this animal, with extra illustrations and example pictures at the bottom to help you get everything right. In the pattern you can also find what materials you need, the yarn colour numbers, in short, everything you need to know to make your own realistic wolf amigurumi. All the additional information you need to know about this pattern you can find in the shop listings. You can buy this pattern in my shop at Ravelry, Etsy or order it here.

This pattern has a one dollar release discount till Thursday the 16th of April!

Patterns

Boeloe, crochet koala bear pattern

Many crafters are making koalas at the moment to give attention to this vulnerable animal that has suffered so much from the fires in Australia. I decided to join them and have designed a beautiful koala amigurumi pattern. This is Boeloe, a super-sweet and vulnerable-looking crochet koala.

realistic crochet koala bear

It really breaks my heart to read and see what has happened to animals in Australia. Not only koalas and other mammals but so many birds, reptiles and insects have suffered and died in the fires. It’s devastating! I really hope designers like myself can help rescue wildlife and restore habitats a little bit by designing patterns so people can make and sell the dolls to collect money to donate to Australian wildlife organisations. I will donate the earnings from the first six patterns I sell to Wires, an Australian wildlife rescue organisation. I know it is not a huge amount, but even small donations help.

When designing this animal, there were so many pictures of burned and suffering animals that it was hard to find example pictures. But I tried my best to create a cute and realistic-looking crochet koala. Very important to me was to capture its vulnerability, which was difficult. I figured that as long as I tried to make the face look as realistic as possible, it should work. When I posted a teaser picture on Instagram, someone commented “so sweet and vulnerable-looking.” I was really glad it showed! Despite all the devastating pictures, it was interesting to design this pattern. To me, koalas are kind of silly-looking animals, with their big heads and lack of tails. But they are incredibly cute and they have absolutely gorgeous, almost teddy-like fur. It was a fun challenge to design a pattern that matched that cuteness. I had thought about brushing the animal all over, but I decided not to. The texture of the Lopi yarn adds enough fuzziness, and I like it when you can clearly see that it is a crochet animal. Here are some more pictures of this adorable koala amigurumi and below them you can find info about and links to buy the pattern.

Info about & links to buy the pattern

Boeloe is made with Istex Lett Lopi, a 100% wool with a lot of fuzziness. If you use the recommended yarn, your koala will be 4.7 inch / 12 cm sitting.

The pattern is written in US terms and contains a clear and colour-coded description of how to crochet and assemble the animal, with extra illustrations and example pictures at the bottom to help you get everything right. In the pattern you can also find what materials you need, the yarn colour numbers – in short, everything you need to know to make your own vulnerable friend. All the additional information you need to know about this pattern you can find in the shop listings. You can buy this pattern in my shop at RavelryEtsy or order it here.

This pattern has a one dollar release discount till Thursday, the 19th of February. I hope many of you will make this pattern, just for yourself or to sell, so that together we can help Australian wildlife! If you like to see quick updates about my work, please follow my Instagram page.