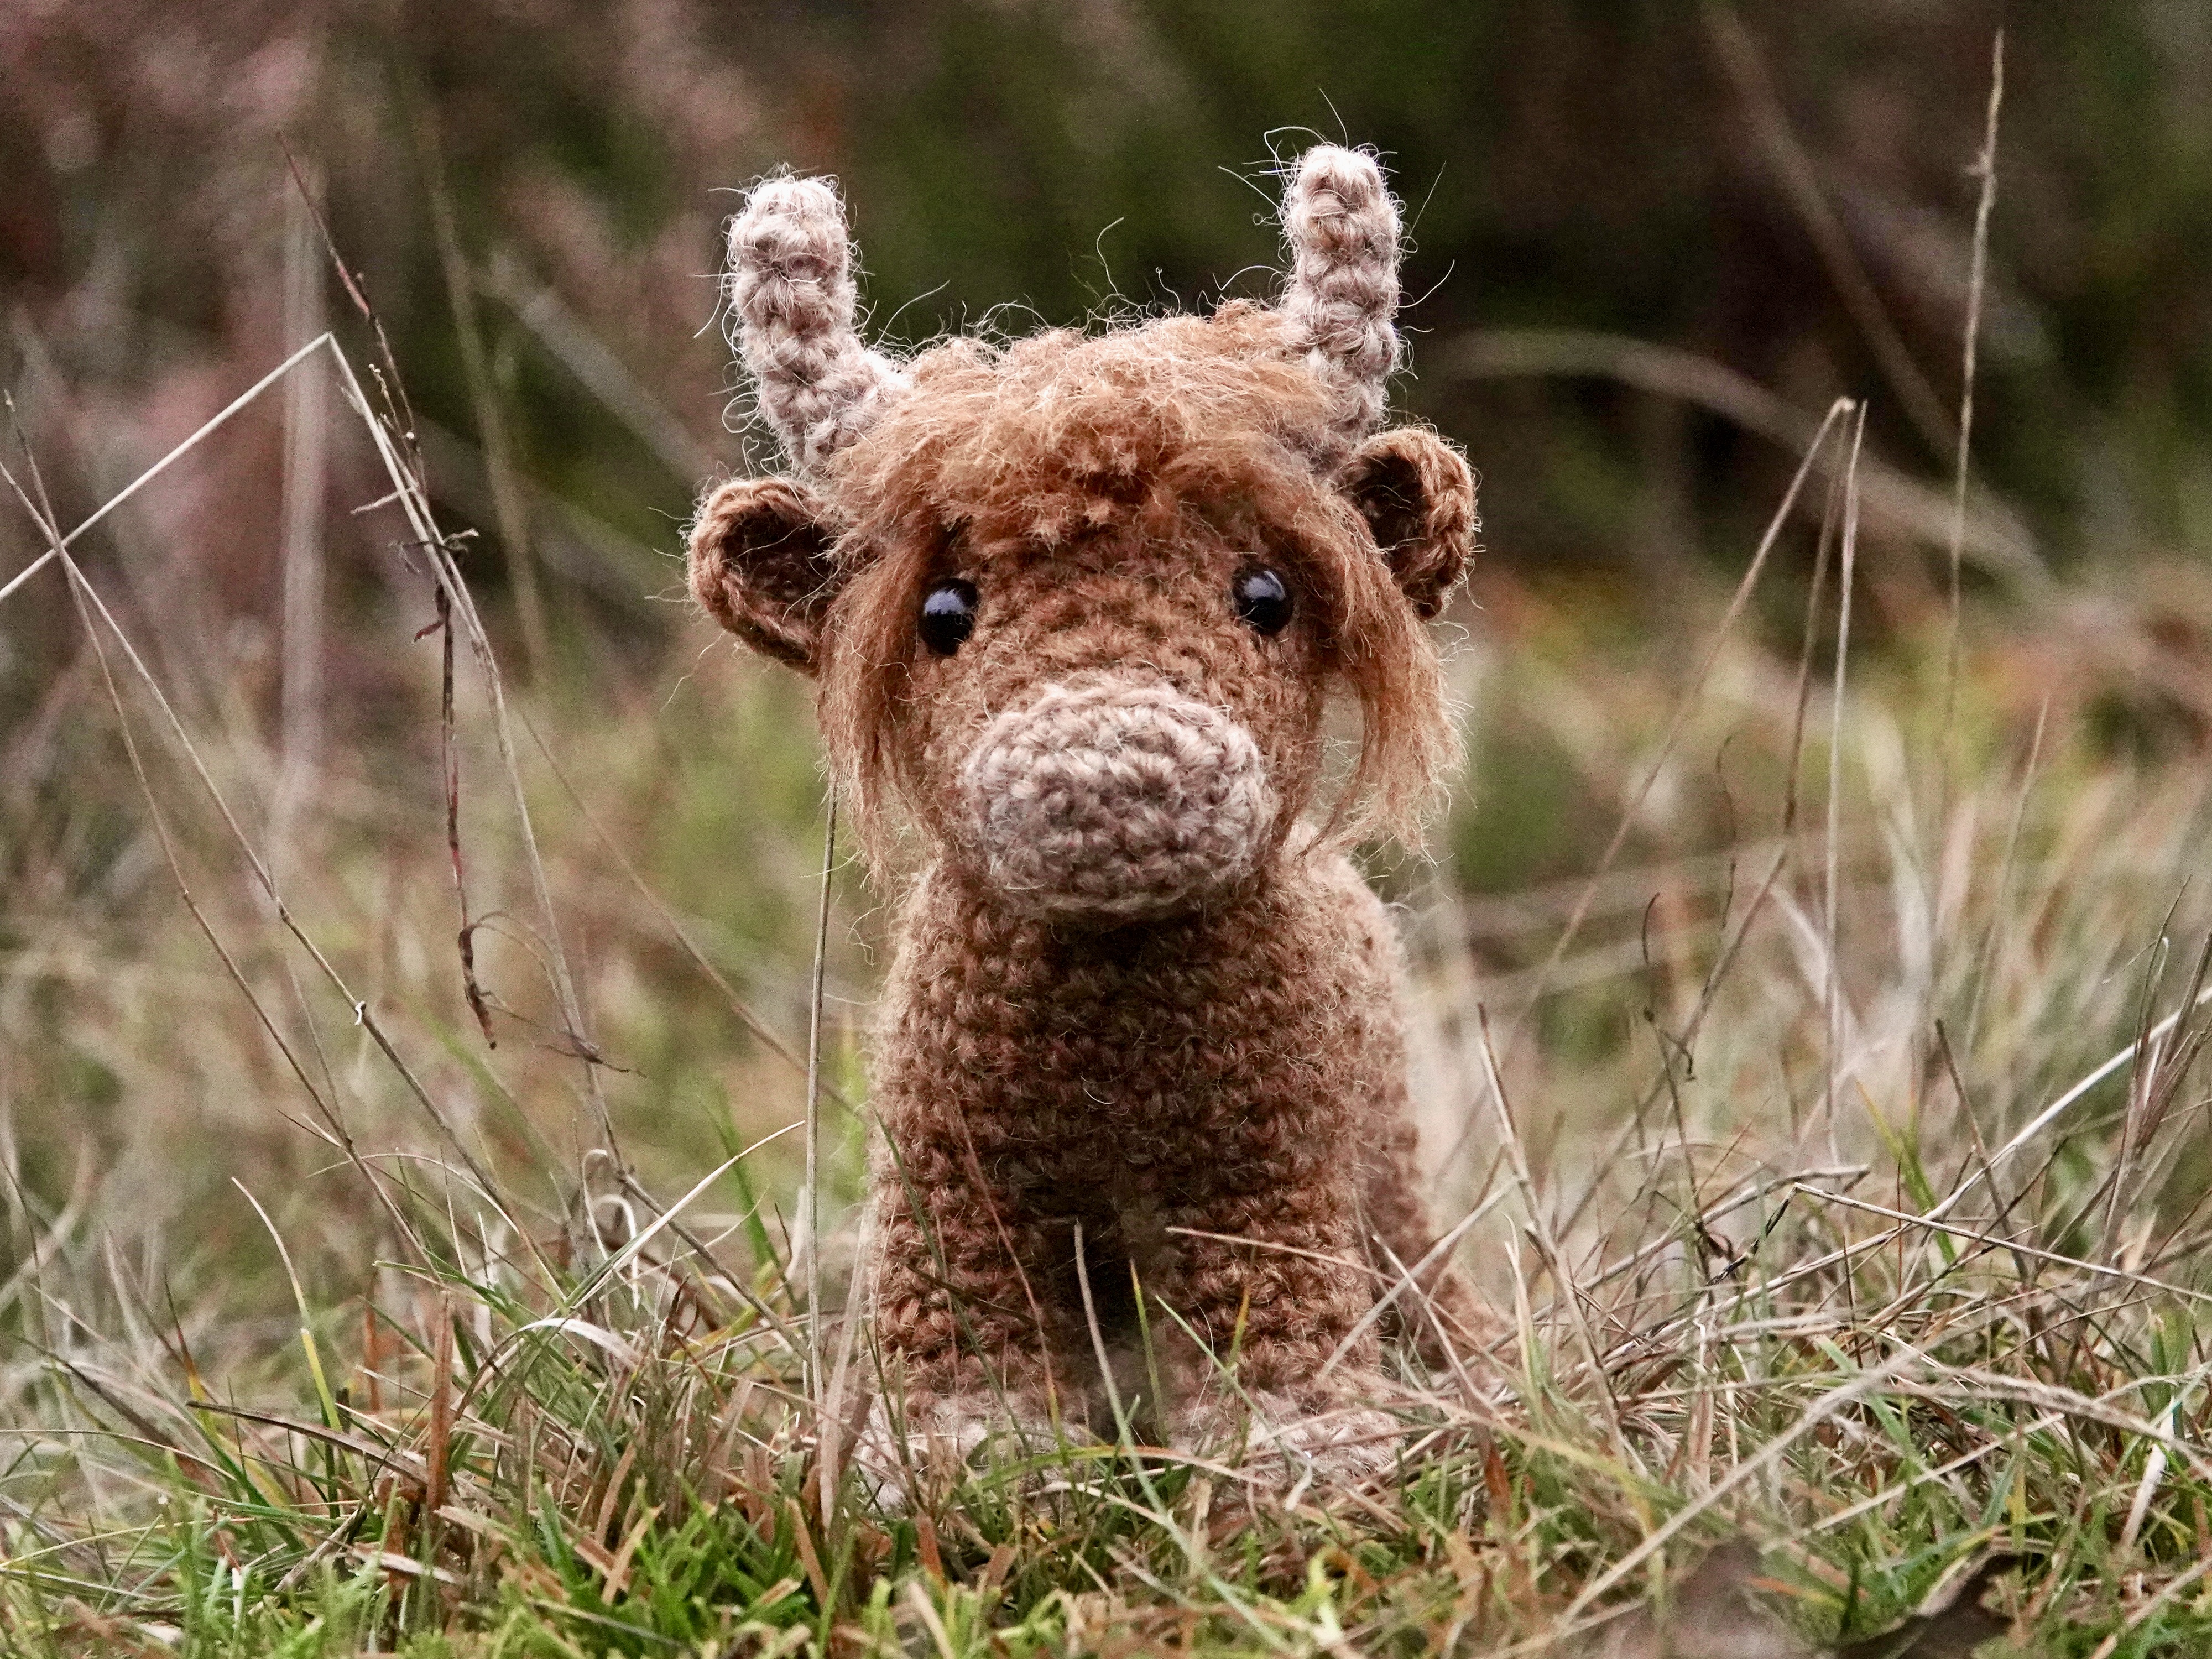
Patterns

Free Santa hat & mini antlers pattern

Look at this happy Christmas duo! Don’t they look adorable wearing their little decorations?!

Long ago I designed the crochet Santa hat pattern and a few years later I added the pattern for the mini antlers. This weekend I had the idea to do a fun photo-shoot with my newest animals wearing them. But oh no! It seemed that I’d lost the Santa hat! I looked everywhere but couldn’t find it. I was almost about to order a skein of yarn to make a new one, when I thought of a last place where it could be and there I found it!

Because I’ll be posting a lot of pictures of animals wearing these lovely items, I decided to refresh both patterns. So here they are! Happy crocheting and dressing up your Popkes with crochet Santa hats and antlers!

Mini Santa hat pattern

For this pattern you need worsted weight yarn and hook E US/ 3,5 mm. I’ve used Lett Lopi yarn; colours white 0051 and dark red 1409. You’ll also need sewing materials and a hard brush to fuzzy up the brim and pompom.

The red part, work in rows

1. magic ring of 6 = 6

2. sc in each around = 6, close with sl st.

3. ch 2, (dc in next 2, 2 dc in next) x 2 = 8, sl st,

4. ch 2, (dc in next 3, 2 dc in next) x 2 = 10, sl st.

5. ch 2, (dc in next 4, 2 dc in next) x 2 = 12, sl st.

6. ch 2, (dc in next 3, 2 dc in next) x 3 = 15, sl st.

7. ch 2, (dc in next 4, 2 dc in next) x 3 = 18, sl st.

8. ch 2, (dc in next 8, 2 dc in next) x 2 = 20, sl st.

9. ch 2, (dc in next 9, 2 dc in next) x 2 = 22, sl st.

10. ch 2, (dc in next 10, 2 dc in next) x 2 = 24, change colour to white in sl st. If you need a bigger mini hat, don’t change to white just yet and continue like above by adding two stitches each round, till your hat is the right size. Keep in mind there will be white folded rounds (three rounds of sc’s) below the red part of the hat.

11. ch 2, (dc in next 11, 2 dc in next) x 2 = 26, sl st.

12. ch 1, sc in each around = 26, sl st.

13. ch 1, sc in each around = 26, sl st.

14. ch 1, sc in each around = 26, sl st in 1st and leave yarn end for sewing.

Now fold the white part upwards, so your hat will have a nice and thick brim. Sew it tight with the yarn end.

Mini antlers pattern

For the antlers you also need the worsted Lett Lopi yarn in the colour brown and any other colour you like and the same hook as above. Pipe-cleaners to make the pieces bendable are optional. I have used them but they are not safe for small children!

The antlers (brown, make two of each piece)

Part 1

1. magic ring of 4 = 4

2 – 6. sc in each around = 4, sl st and leave yarn end

Part 2

1. magic ring of 4 = 4

2 – 4. sc in each around = 4, sl st and leave yarn end

Part 3

1. magic ring of 4 = 4

2 – 3. sc in each around = 4, sl st and leave yarn end

Now you can insert the pipe-cleaners in the longest 4 pieces. Stretch the parts to get the right length and make sure the cleaners in the longest two (part 1’s) stick out just a little bit, so you can prick them into the headband. Now attach the parts 2 to the bottom parts of the parts 1 and the parts 3 to the top part of the parts 1, as shown in the picture. Weave in the yarn ends except for the yarn ends of the longest parts, so you can use them to sew the antlers to the headband.

Headband (any cheerful colour will do)

1. magic ring of 4 = 4

2 – 22. sc in each around = 4, sl st.

Now stretch this piece too and insert the pipe-cleaner. Now you can sew the band closed by putting the needle from the inside out through all the outside loops of the 4 st, clockwise. If you do it correctly, you can pull the yarn end and it will close the gap.

All you have to do now is attach the antlers to the headband, about two rounds apart.

There, now you can give all your Popkes a reindeer metamorphose!

Patterns

Okiri, realistic crochet owl pattern

Woot woot, I’m so happy I can finally present this pattern to you! I wasn’t sure about how to define this owl, because it resembles both the European little owl (steenuil in Dutch) and the American pigmy owl. Both are most adorable small owls, and I believe Okiri would almost make a live-size Pigmy owl. So meet my new realistic crochet owl pattern, isn’t he adorable?! amigurumi little owl and pigmy owl When I started this pattern, I was worried that crafters wouldn’t really fancy making a cranky-faced plushy, but my worries receded when I posted a first teaser picture and so many of you fell in love with the face right from the start! Now I knew I had to make sure I would meet your expectations and design a fabulous cranky and cute owl amigurumi. How I designed the face is a funny story. I started out with the barn owl face as a basis, but that didn’t work out for a little owl or a pigmy owl face. So I fumbled around trying different things. At some point, when I was playing with a basic round shape, I discovered that if I folded the top down, I got the perfect owl’s frown, how delightfully simple! Just the folded circle wouldn’t do, it needed some colouring and a beak. So I worked ahead and that’s how this striking face came to be. Many of you asked about these striking eyes. The eyes I used for this crochet owl pattern are animal safety eyes with a dark pupil and transparent backs. I painted the backs yellow with acrylic paint and added a little felt patch to create the dark line around the eyes, voila, easy peasy. The body is pretty basic by itself, but when I started to add the spots things became somewhat challenging to crochet. And as I wrote the pattern down, my head started to spin at some point. I’m sorry about all the colour changes, even I didn’t enjoy them! But they really are worth the effort because they make the most fabulous textured owl’s body. And if you keep your yarns separated, like one on the left and one on the right, and you keep grabbing them from the same direction, they will not tangle. You need to get into that ‘rhythm’ for the wings as well. To sum things up, this crochet owl has a seamless body and head made from the bottom up. Right before you close the head, you attach the face with eyes to the head. Not much sewing needs to be done here because the eyes secure the face quite well already. The feet, tail and wings need to be sewn to the body and that’s it. Here are some more pictures of this little / pigmy owl amigurumi, and below them you can find all the info you need about the pattern.

Info about & links to buy the pattern

The pattern for this realistic crochet little owl and pigmy owl is pretty straightforward. The colour changes can make your had go spinning, so take your time there! This animal is made with Istex Lett Lopi, a 100% wool with a lot of fuzziness. It’s 4.3 inch / 11 cm tall. The pattern contains a clear and colour-coded description of how to crochet and assemble the doll, with instruction images next to the text and example pictures at the bottom to help you get everything right. In the pattern you can also find out what materials you need, the yarn colour numbers — in short, everything you need to know to make your own cranky owl. All the additional information you need to know about this pattern you can find in the shop listings. You can purchase it in my shop at Ravelry, Etsy or order it here. And heads up! This pattern has a one dollar release discount until the 4th of November!
Patterns

Bolthus, realistic ferret aka polecat pattern

I’m so delighted I can finally present to you my new and realistic ferret or polecat pattern. This is Bolthus, a crochet animal on all fours!

realistic ferret crochet pattern

When I started designing crochet animals I wanted to make playful, comic-looking dolls that looked realistic enough to resemble the real animal but are dolls. As I continued designing patterns, the realistic look became more and more important. I started making realistic sitting animals like the wolf and cat, and occasionally I designed an animal on all fours like the guinea pig, realistic hedgehog and badger. I’ve always found it extra challenging to design an animal on all fours, mostly because playfulness is important for my designs and a standing animal might look too stiff and statue-like.

So designing this very realistic ferret amigurumi was a big step. I wanted to keep it as simple and seamless as possible. I started designing the head and quickly realised that it would look very realistic if I made the head and neck in one piece. But that created difficulties: how could it be attached to a body? I’d already decided I was going to crochet the front paws and chest as one piece bottom-up, so now I had a head and neck crocheted top-down that I had to attach to a chest that was crocheted bottom-up. Sewing together two openings like that is very illogical, so I had to figure out a method to crochet the chest and front paws top-down continuing from the neck.

Normally I would crochet the paws first, crochet them together and work ahead for the body. Now I had to do it the other way around. Continuing from the neck, I crocheted the chest, and when it was long enough I split it in half to crochet the paws seamlessly to it. It worked like a charm!

So now I had a finished front piece that needed a back. Designing the back of the body was pretty straightforward, I just needed to figure out the right size and shaping. After a few attempts and a bit of help from my Instagram followers, I had the perfect long ferret body. Now all that needed to be done were the back paws and the tail. The back paws were a bit challenging because they needed a particular shape, but with some practising I managed to get them right. The tail was easy peasy!

The most exciting part came when all the pieces were finished: assembling the crochet ferret. For me this always takes a lot of effort, to get everything in the right place and write it down understandably for you. Sewing the back to the front piece needs to be done very precisely, and I think it is the most challenging part of this pattern. But if you do it with patience he’ll turn out fabulous.

My worries that an animal on all fours would become stiff didn’t turn out to be justified. I absolutely love this crochet ferret and find him very mischievous and playful-looking. I hope you like him as much as I do!

Here are some more pictures of this ferret or polecat amigurumi, and below them you can find all the info you need about the pattern.

Info about & links to buy the pattern

The pattern for this realistic crochet ferret/ polecat is pretty straight forward. The colour changes and assembling require some extra concentration. This animal is made with Istex Lett Lopi, a 100% wool with a lot of fuzziness. It’s 9.5 inch / 24 cm from nose to tail end. The pattern contains a clear and colour-coded description of how to crochet and assemble the doll, with instruction images next to the text and example pictures at the bottom to help you get everything right. In the pattern you can also find out what materials you need, the yarn colour numbers — in short, everything you need to know to make your own ferret. All the additional information you need to know about this pattern you can find in the shop listings. You can purchase it in my shop at Ravelry, Etsy or order it here.

And heads up! This pattern has a one dollar release discount until Thursday, the 12rd of August!

Patterns

Munchie, crochet fawn pattern

With great pleasure I can finally present to you my baby roe deer pattern! This time of the year they are just born and if you are lucky you can hear them call for their mother if you’re visiting a rural area or forest. They are well hidden in a high grass field or dense bushes, so you are very lucky if you see one.

crochet baby deer

Fawns are so gorgeous with their spotted fur that provides excellent camouflage. They often sit well hidden, making themselves as small as possible. That of course offered me a nice challenge: how could I best design this baby deer? From the start I knew I wanted to create a crochet fawn in a sitting position with its legs folded beneath the body.

I started designing the head, and when it was finished I worked on the body, first in one colour to create the right shape, with a bended neck made with a few short-rows. When I was satisfied with the shaping, I started the colouring. At first I wasn’t sure about how many colours to use. I knew a fawn’s back is much darker than the flanks, but it meant using an extra colour and I prefer to use as few colours as possible. But just the lighter brown combined with the light spots didn’t give the result I had in mind. I really had to add that warm, dark brown colour to get the desired look. The body made in those three colours looks so beautiful. Creating spots takes a bit more effort, but the result is so rewarding, and the result is the perfect camouflaged fawn body.

For the legs, I had to find out how to attach them. I tried a one-piece shape, but it made the fawn too stiff. So I decided to make loose limbs. I’ve used pipe-cleaners in the legs to make them bendable into all sorts of poses, but I know some of you prefer not to use them or cannot because they are not safe for small children. Because the legs aren’t stuffed they stay quite flexible, and if you want the fawn sitting in the same position as Munchie, you can simply sew them like that with a few stitches.

This is another very realistic crochet animal pattern, and I really enjoy designing them. I hope you like this special fawn as much as I do! Here are some more pictures of this fawn amigurumi, and below them you can find all the info you need about the pattern.

Info about & links to buy the pattern

The pattern for this realistic crochet fawn is rather easy, but the colour changes require some extra concentration.

This fawn is made with Istex Lett Lopi, a 100% wool with a lot of fuzziness. It’s 5.5 inch /14 cm long. The pattern contains a clear and colour-coded description of how to crochet and assemble the doll, with instruction images next to the text and example pictures at the bottom to help you get everything right. In the pattern you can also find out what materials you need, the yarn colour numbers — in short, everything you need to know to make your own fawn. All the additional information you need to know about this pattern you can find in the shop listings. You can purchase it in my shop at Ravelry, Etsy or order it here.

And heads up! This pattern has a one dollar release discount till Tuesday, the 23rd of June!

Patterns

Hambea, crochet beagle pattern

amigurumi beagle

When I was a little girl, beagles were my favourite dogs. I found them perfection. Their size, proportions and colouring I absolutely adored. And they had such a sweet face, too! I really wanted to have a beagle, but my mum wasn’t so much a dog-lover, and after a failed attempt to own a dog (a basset hound because they could not jump at her), I knew owning a beagle would not happen as long as I was a child. I got over it, and while growing up I became more a cat person, so I still haven’t owned a beagle and probably never will. But now I do have this little beagle friend! I made Hambea to honour my childhood adoration.

This being the second dog pattern I made, I could turn all my attention to the colouring. Creating the pointed white line on the face was the most difficult part, because of awkward decreases that were in the way. But practise makes perfect, and in the end I got a facial stripe that looks the way I pictured it. Beagles have such a distinctive colour pattern on their body, and I really enjoyed designing that. It was such a delight to see the beagle slowly take shape.

I always work with Istex Lètt Lopi, but I could not find the perfect reddish brown for a beagle. I decided to use Istex Einband Lopi, the lace version of Lett Lopi, and hold two strands together, which worked perfectly well. When I saw the beagle one of the testers made, I realised the acorn brown Lètt Lopi also worked well.

Hambea doesn’t have a collar or harness, but I did add the instructions for a harness to the pattern, for those of you who want to give their beagle a little extra colour.

Here are some more pictures of Hambea, and below them you can find all the info you need about this pattern and links to buy this amigurumi beagle pattern.

Info about & links to buy the pattern

The pattern for this realistic crochet beagle is rather easy, but the colour changes require some extra concentration. Even less experienced crocheters will be able to make this dog.

Hambea is made with Istex Lett Lopi and Einband Lopi (held together matching one strand of Lett Lopi), a 100% wool with a lot of fuzziness. He’s 5.1 inch /13 cm sitting. The pattern contains a clear and colour-coded description of how to crochet and assemble the doll, with instruction images next to the text and example pictures at the bottom to help you get everything right. In the pattern you can also find out what materials you need, the yarn colour numbers — in short, everything you need to know to make your own dog. All the additional information you need to know about this pattern you can find in the shop listings. You can buy this pattern in my shop at Ravelry or Etsy or order it here.

And heads up! This pattern has a one dollar release discount till Tuesday, the 1st of April!

Patterns

Golden Boy, realistic golden retriever pattern

I proudly present to you the first realistic dog pattern in a new series of dogs, Golden Boy the golden retriever, and he could as well be a blond labrador!

realistic dog amigurumi

‘A new series?’ you ask. Yes, for a long time I’ve been getting requests to design realistic dog patterns for all sorts of breeds. Because I prefer making wildlife patterns, I hadn’t responded to those requests. But something changed my mind. I noticed that many crafters have turned my wolf pattern Woolfie into a dog, which made me realise how enthusiastic people are about making dogs, and especially their own dog. So I decided to do a series of realistic dog patterns. My ultimate favourite dog is the border collie, but I also love blond golden retrievers with their sad puppy dog eyes and black noses. I decided to start with a single-coloured dog to completely focus on dog shapes, and when I’m more familiar with that, I can do dogs with their individual breed’s colouring, like the border collie and the beagle. And after coloured dogs, or in between, I can focus on the challenge of dogs with special kinds of fur, like poodles and bearded collies. It sure offers many exciting variations!

I never expected I would love designing a realistic crochet dog so much, but believe me, it’s fabulous when you ‘catch’ a breed’s true character in its facial features, and when I had my first prototype face done it really made me smile. The sad puppy dog eyes I love so much are truly there. Now every time I see Golden Boy looking at me with his sweet eyes I want to give him a little cuddle, he’s so adorable. Breeding and selection eventually created that expression that humans love so much, and I’m very excited that it is so easy to capture in crochet.

Because golden retrievers and labradors often are guide companions, I decided to give Golden Boy a colourful harness. Guide dog or just a pet, the harness makes him look extra cute! Below the pictures you can find all the info you need and links to buy this amigurumi dog pattern.

Info about & links to buy the pattern

The pattern for Golden Boy is easy; you can surely finish a dog in a day. It’s also a very suitable pattern for those of you who have just started crocheting amigurumi, because there are no colour changes and only basic stitches are used. The things that look more complicated are explained in detail, with images to guide you.

This dog is made with Istex Lett Lopi, a 100% wool with a lot of fuzziness. He’s 5.1 inch /13 cm sitting. The pattern contains a clear and colour-coded description of how to crochet and assemble the doll, with instruction images next to the text and example pictures at the bottom to help you get everything right. In the pattern you can also find out what materials you need, the yarn colour numbers — in short, everything you need to know to make your own dog. All the additional information you need to know about this pattern you can find in the shop listings. You can buy this pattern in my shop at Ravelry, Etsy or order it here.

And heads up! This pattern has a one dollar release discount till Tuesday, the 11th of Februari!

Patterns

Balthazar, realistic crochet cat pattern

This must be the most mischievous-looking amigurumi cat you’ve ever come across! I proudly present to you my playful and realistic crochet cat pattern.

Realistic crochet cat

Whilst writing this blogpost, Balthazar is standing opposite me on my desk looking like he’s up to no good. I have no idea how I do it, give an animal an attitude like that. It seems like it just happens, or perhaps I unconsciously prefer the version that has that slightly imperfect feature and I decide that will be the final version. Anyway, this new and realistic crochet cat looks like an adolescent cat that is fun to play with.

And that was my goal to begin with. Cats are the most cuddly, soft and lovely pets one can wish for, but they also are the most silly housemates you can get. So I had to get that characteristic in both the face and the posture. When I started working on the head, I realised cats have a distinctive-looking snout, a small nose, an almost laughing mouth and that lovely chin I always loved to touch when we still had a cat. I had to figure out a way to create a little chin (without it being a sewn-on piece), which you can easily outline with a sewn-on mouth. At some point I got an idea that was both a super-easy thing to crochet and that worked perfectly.When you make this cat, you’ll find out the simple trick I used.

When I started working on a cat pattern, I wasn’t sure yet what type of cat I should make, so I tried out several different versions. It was a lot of fun, but it also created a dilemma: which one will I finish? And should I make separate patterns for each kind or add these to one pattern? For now, I decided to just publish one pattern, of the tabby cat. But I probably will make an add-on pattern later for different kinds of cats.

When I designed this pattern, I wanted a cat that could both sit down with a relaxed grin, but also would be a playful doll for children. So it had to be flexible, and that is why I chose loose hind legs, to make the cat just a bit more playful than a seamless cat would be. I had so much fun doing this photoshoot, at some point I started the ‘playful’ pictures, and they turned out so lively, I was delighted with the result.  Just take a look at this! Below these pictures you can find all the info you need about the pattern.

Info about & links to buy the pattern

This crochet tabby cat is not very difficult to make, except for the colouring of the head, which takes a lot of attention. For some rounds you change colour stitch after stitch, and one unspotted mistake ‘messes the whole thing up’. I added extra pictures for these complicated rounds, and it is just matter of recounting each round you’ve finished to be sure you’ve done it right. The rest of the pattern should be easy to do; attaching of the front paws needs some extra attention but I added extra images there, too.

This cat is made with Istex Lett Lopi, a 100% wool with a lot of fuzziness. He’s 5.1 inch /13 cm sitting. The pattern contains a clear and colour-coded description of how to crochet and assemble the doll, with instruction images next to the text and example pictures at the bottom to help you get everything right. In the pattern you can also find what materials you need, the yarn colour numbers — in short, everything you need to know to make your own realistic crochet cat. All the additional information you need to know about this pattern you can find in the shop listings. You can buy this pattern in my shop at Ravelry, Etsy or order it here.

And heads up! This pattern has a one dollar release discount till Thursday, the 11th of December!

Patterns

Flunsie, relaxed and realistic crochet badger pattern

My experimental holiday project has turned into this utterly cute crochet badger! I proudly present to you this exciting new pattern for Flunsie, the realistic relaxing badger.

realsitic crochet badger

You’re right to think this took me a long time, because it really did! It started out as a summer project, to try out new techniques with a different yarn. It seemed like a fun idea to make myself a badger in this (un)charming pose that I often see when I watch videos of badgers taken with wildlife cameras. When they come out of their set at night, they’ll often sit in front of it for a while scratching and washing, and I just love that silly look. It seemed like the perfect pose to try out a new technique: short rows to make the head and body as one piece. But there was one thing I overlooked in my enthusiasm: my favourite animal has a striped head, and short rows combined with stripes aren’t the easiest combination when trying this for the first time. It was a disaster, and I gave up. It was only when I started working again that I grabbed my courage and decided to give it one more go. If it would work, how awesome would that be?! It had to become a pattern, too, not just a doll for me.

I decided to use my beloved Lopi yarn instead of the DK yarn I tried during my vacation, to have something familiar to work with. I also had the notes I had made, so I didn’t have to start from scratch. My idea was to go slow, one row at the time, because eventually the colours should line up. That approach worked well because I wasn’t feeling any pressure. I could undo rows as often as needed, and after many attempts, I finally had a head with a neck in the shape I desired and with perfect black and white badger stripes. I was so delighted!

Designing the body was easier because no short rows were needed there. I also made a drawing to scale, so I could lay the badger on top of it to check if the size and shape were good. Designing the paws was manageable, because I could use paws from other creatures have I designed and I only needed to adjust them. I also had the idea to make the feet extra special by adding ‘animal’ prints to them, and when I tried it out it looked amazing, very suitable it for this amigurumi badger.

When I was working on the pattern, I got a funny image in my mind of a knitting badger. I remembered this tiny knitted hat I have, added some toothpicks as knitting needles, took a picture, and posted it on Instagram. Every time I look at it I smile, and everyone totally loved it. So if you feel like it, you could make a knitting badger yourself! Here are some more pictures of Flunsie, and below them you can find more info about the pattern and links to buy it, so read on!

Info about & links to buy the pattern

I’m rating this crochet badger pattern as ‘advanced’ in my shops, but hope I made it so easy to work with that less experienced crocheters can make it, too. The short rows may sound difficult, but you just go back and forth sometimes instead of working into a continuous spiral. I added lots of instruction photos so you can see how to do the short rows.

This badger is made with Istex Lett Lopi, a 100% wool with a lot of fuzziness. He’s 5.1 inch /13 cm high. The pattern contains a clear and colour-coded description of how to crochet and assemble the doll, with instruction images next to the text and example pictures at the bottom to help you get everything right. In the pattern you can also find what materials you need, the yarn colour numbers — in short, everything you need to know to make your own badger amigurumi. All the additional information you need to know about this pattern you can find in the shop listings. You can buy this pattern in my shop at Ravelry, Etsy or order it here.

And heads up! This pattern has a one dollar release discount till Thursday, the 8th of October!

Patterns

Flamsie & cubs, two realistic crochet fox patterns!

I am so happy I can finally show you my finished crochet foxes. Meet Flamsie and the little ones!

amigurumi fox

This adventure started with the idea of making a fox with cubs. I’m monitoring wildlife as a volunteer, and this time of the year we see a lot of young foxes on our camera traps. I really love seeing them and was lucky enough to spot one when we were checking a heather field for badger activity. Suddenly a cute fox cub was looking straight at us!

I started this project with the cubs. Shaping something much smaller is a whole new thing for me, and I really had to get used to it. Also, getting the light-coloured chin and chest symmetrical turned out to be quite a challenge. It took me a long time to create a cub that I adored, and I soon realised that this little fox was way too special to just add to the fox pattern. This had to be a separate pattern so everyone could make it.

After the little ones were finished I started working on the adult. And you know what was ever so silly? Each head I made I found huge! Now I had to re-adjust to my normal size. I ignored my feelings of finding everything enormous and patiently designed the right shapes and colouring for the adult fox amigurumi. I stumbled upon the same colouring difficulties as for the cub, but I stubbornly kept trying until I got it right. There was no way I was going to make this crochet fox with a sewn-on muzzle, the head had to be made in one piece, just like the wolf.

Making the fox’s body was much easier because I got familiar with this way of working when I made the wolf. The fox had to be smaller and more slender with a bigger tail. When the fox was finished, I placed the wolf and fox next to each other and I was satisfied. They are both such lovely doll versions of the real animals, the slender fox and the sturdy wolf.

When I was working on the cubs and realised how much extra work it was going to be, I decided I wasn’t going to do something like this again. Nevertheless cats and kittens are popping into my mind already, because the end result is so delightful. Every time I pass my adorable fox family I get a smile on my face, they are so cute together! The adult fox is a playful doll which you can place in different poses, and the cubs are even easier to play with.

For those of you who look forward to making a family, the fox and cubs are ‘a pack’ until one week after the pattern release. After that they will be separate patterns. So I get them soon if you want them all!

Here are some more pictures of these totally cute crochet foxes, and below them you can find all the info you need to know about how to get the patterns.

Info about & links to buy the pattern

These realistic foxes are made with Istex Lett Lopi, a 100% wool with a lot of fuzziness. Flamsie is 5.5 inch / 14 cm sitting, the cubs are 6 inch / 15 cm long when made with this yarn. They aren’t very difficult to crochet, even the seamless bits are quite easy to attach if you follow the instructions.

The patterns contain a clear and colour-coded description of how to crochet and assemble the animals, with extra illustrations and example pictures at the bottom to help you get everything right. In the patterns you can also find what materials you need, the yarn colour numbers, in short, everything you need to know to make your own fox  amigurumis. All the additional information you need to know about this pattern you can find in the shop listings.

You can buy the pattern for Flamsie by clicking this Ravelry or Etsy link. And the pattern for the cubs by clicking this Ravelry or Etsy link. You can also buy both patterns directly from me here.

And heads up! For one week from now Flamsie’s pattern includes the pattern for the cubs. So if you want both, get it before the 22nd of Juli.

Patterns

Flisby, crochet kingfisher pattern

This must be the most challenging pattern I’ve ever designed. I proudly present to you Flisby, the amigurumi kingfisher!

amigurumi kingfisher

Birds are slowly becoming part of the collection of crochet animal patterns I’ve designed. Because birds aren’t fluffy and cuddly, they somehow often miss my attention. Only the ones that are very dear to me make it into a crochet pattern. The kingfisher is an example of that. For the last few years I’ve been doing volunteer work as a fieldworker, basically I’m tracking animals so that the local wildlife organisations can map what lives where, to protect the animals and, for example, to create save passageways underneath roads, etc. I started in a badger team, but this year I expanded my work by collecting otter spraints (scat) for DNA analyses. That’s when I stumbled upon beaver tracks in an area they had not been seen before (it was fabulous, imagine how excited I was!). That of course led to a search for the beaver’s home, and that brings me back to the kingfisher. Practically every time I was following the beaver’s trail, which was an amazing adventure, I heard or saw a gorgeous kingfisher. They are birds of an exceptional beauty, and you always hear their cheerful shrieks before you see them flash by. I’ve been fortunate to see one sitting down a few times, and I was surprised by how small they actually are. Somehow I made them bigger in my mind because they are so beautiful.

So then came the challenge to create a crochet version. How was I going to mix realism and my doll-ish style in a little crochet bird? I started with designing the bill, which had to be as small and pointed as possible. If I got the bill right, I basically knew the size for the rest of the bird. I had in mind to make the kingfisher in one piece, so a seamless bill, head and body. But when I made the bill seamless, the shape was all wrong, way too flat. And when I finished the head with all the colour changes in the right place, I crocheted ahead to make the body, but I couldn’t get the shape right. So I started a new body, from the bottom up. When all the pieces where finished, I decided to keep it like this. I liked the seam between the head and body, the versions I had that were made in one piece looked stiff. My crochet animals must look playful, and for a bird that’s more difficult than a mammal. I think I managed to add a bit of doll-style in how I designed the feet and wings. Of course real birds have tiny feet, so I could have used a different material to create realistic feet, but I love the features of crochet, so I made the smallest possible, cute little bobble stitch feet. It gives Flisby the right personality, it makes him a Popke!

I could write so much more about this process, about how difficult it was to choose the right colours and the effort to create the perfect colour changes. All I’ll say is, I really love my little kingfisher. I love how the embroidered spots create that glowing shine of feathers, and I also love how this crochet kingfisher is about life-size when he’s made with the yarn I used, how about that! Here are some more pictures of Flisby, and below them you can find all the info you need about this pattern.

Info about & links to buy the pattern

This realistic crochet kingfisher is made with Istex Lett Lopi, a 100% wool with a lot of fuzziness. He is 4.3 inch / 11 cm tall when made with this yarn. Despite the many colour changes for the head, this isn’t a very difficult pattern to crochet, as long as you follow the instructions to the letter and untangle your skeins after every round. The spots on the head and wings are easy enough to embroider because of the way they are placed. Assembling the animal and getting all the pieces in the right place will require some skill, but I guide you with the text and images in the pattern. As long as you take your time, you can make yourself a gorgeous little bird, I’m sure!

The pattern contains a clear and colour-coded description of how to crochet and assemble this animal, with extra illustrations and example pictures at the bottom. In the pattern you can also find what materials you need, the yarn colour numbers, in short, everything you need to know to make your own kingfisher amigurumi. All the additional information you need to know about this pattern you can find in the shop listings. You can buy this pattern in my shop at Ravelry, Etsy or order it here.

This pattern has a one dollar release discount till Thursday the 21st of May!