Patterns

Poochey and Fudge, crochet rabbit pattern

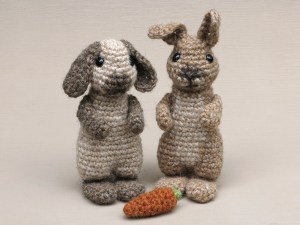
How did this happen? I wasn’t going to create new standing rabbits?! I wanted to redesign my lop rabbit pattern. But oh, my, they are so fabulously funny and cute, how could I stop making them? I very proudly present to you Poochey and Fudge, a new crochet bunny and lop rabbit amigurumi!

easter bunny, crochet rabbit pattern

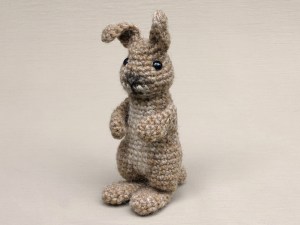
It all started with pears. When designing the crochet rabbit’s head, I realised a rabbit head is pear-shaped. Basically, when you draw a pear, then draw a little circle at the bottom of it with a nose and mouth in it, ears at the top and eyes over the sides in the middle, you have a perfect bunny head. Knowing that, I didn’t immediately know how to translate that into crochet, but it helped a lot and made me discover the not-so-obvious head shape I now so love. Yes, my rabbits have pear-shaped heads too.

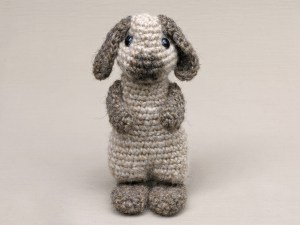
At this point, I still was working on a realistic lop rabbit, but having fun designing, I decided to also try a different-coloured head with the ears up. And that made all the difference! Not only did I love this version, so did many of you when I showed a little preview on Instagram. When contemplating this funny-looking character (yes, just a head, but I saw the rest of him), I knew an on-all-fours body would not work with this design. I imagined a silly, chubby, standing rabbit.

I also realised the leg/ feet shape of the sea otter would work perfectly for a flexible crochet rabbit body. Very cute, playful, and soft! These little bunnies have become so very whimsical. I adore their silly curly ears and surprised expressions. With crochet rabbits like these, there is no need to try to make them look perfect. It’s their wonkiness that makes them so utterly adorable.

You might be wondering about the differences between Poochey and Fudge. There aren’t many more than the eyes can see. They are practically the same with different colouring, except Fudge’s head is a bit narrower at the top and the lop ears are longer and shaped a bit differently, that’s all.

Here are some more pictures of these funny-looking crochet rabbits, and below them you can find info about and links to buy the pattern.

Info about & links to buy the pattern

Poochey & Fudge are made with Istex Lett Lopi, a 100% wool with a lot of fuzziness. If you use the recommended yarn, Poochey will be 7 inch / 17 cm high and Fudge 6 inch / 15 cm. If you are making a Poochey, I would strongly recommend a fuzzy yarn, because it hides the seams of the colour changes.

The pattern is written in US terms and contains a clear and colour-coded description of how to crochet and assemble the crochet rabbits, with extra illustrations and example pictures at the bottom to help you get everything right. In the pattern you can also find what materials you need, the yarn colour numbers, in short, everything you need to know to make your own utterly cute duo. All the additional information you need to know about this pattern you can find in the shop listings. You can buy this pattern in my shop at Ravelry, Etsy or order it here.

This pattern has a one dollar release discount till Thursday the 3rd of April.

Patterns

Free Easter crochet pattern

A few times a year I try to design fun and free crochet patterns, as a ‘thank you’, to all of you who have bought my crochet patterns and have supported me. This time I made little crochet Easter eggs and a basket that fits precisely two of the eggs.

free easter crochet pattern

With this free crochet pattern for little Easter eggs and a basket, you can create fun Easter ornaments. I made the size of the eggs and basket so it combines well with my crochet animal patterns.

Of course especially Finse will make a lovely, quizzical crochet Easter bunny.

crochet easter bunny, rabbit, hare amigurumi pattern, haakpatroon paashaas

Finse finds himself not particularly a crochet Easter bunny, but more a normal rabbit, as you can tell by his expression.


The eggs and basket pattern

For this pattern you’ll need worsted weight yarn and hook US E/3,5 mm. to get an approximately 2,7 inch /7 cm wide basket and 1,77 /4,5 cm high eggs. I used a bunch of colours of Lètt Lopi, a 100% wool. To stuff the eggs you will need fiberfill and a two beads or buttons are optional. I’ve used beads to accentuate where the handle of the basket is fixed.

You can use a paper clip as stitch marker to mark the beginning of each round. Move it up each time you start a new round. The exact colours I have used for this little pattern you can find below it and,  if you’ve become fond of Finse and want to complete the eggs and basket with a suitable bunny, you can find the pattern in my shop or my shop at Ravelry.

Abbreviations: ch = chain, sc = single crochet, sl st = stip stitch, dc = double crochet stitch, hdc = half double crochet stitch, s2tog = decrease.

The basket

Work around the chain.

1. ch of 7, in 2nd ch from hook 2 sc, sc in next 4, 2 sc in last, turn/go to bottom loops, 2 sc in bottom loop of that last st, sc in next 4, 2 sc in last = 16

2. 2 sc in next, sc in next 6, 2 sc in next 2, sc in next 6, 2 sc in next = 20

3. 2 sc in next, sc in next 8, 2 sc in next 2, sc in next 8, 2 sc in next = 24

4. 2 sc in next, sc in next 10, 2 sc in next 2, sc in next 10, 2 sc in next = 28, close with sl st.

5. ch 2 and go back (you go back so the stitches will be stacked different, which will form a nice seem for the side of the basket. You only do it this one time) dc in next 28 = 28, sl st

6. ch 2, dc in nect 28 = 28, sl st

7. ch 1, sc in next 28 = 28, sl st and weave in end.

 The strap.

Leave a long tail when you make the chain, for sewing.

1. ch of 20, in 2nd ch from hook hdc, hdc in next 17, sl st and leave tail.

(You can of course make the strap as long as you like, or two so you can make a backpack for a doll. Do whatever you like!)

Sew the strap to the basket and add a button or bead if you like.

 The eggs. In multiple colours. If you make striped eggs, change colour in the last stitch of a round. Change colour in the last loop of a stitch, so the loop on the hook you end with, will be in the new colour.

1. magic ring of 5 = 5

2. 2 sc in each around = 10

3. (2 sc in next, sc in next) x 5 = 15

4 – 6. sc in each around = 15

7. (sc in next 3, s2tog) x 3 = 12

8. sc in each st around = 12

9. (sc in next 4, s2tog) x 2 = 10, now stuff the egg firmly.

10. sc in each st around = 10

11. s2tog x 5 = 5. Sew the hole closed by putting the needle from the inside out, trough all the outside loops of the 5 st, clockwise. If you do it correctly, you can now pull the tail and it will close the gap. Weave in the end.

Lopi colour numbers. Brown: 0053, orange: 1410, yellow: 1411, pink: 1412, apple green: 1406, grey green: 9422 and mustard: 9264.

Have a lovely spring and Easter festive.