Patterns

Woolfie, realistic crochet wolf pattern

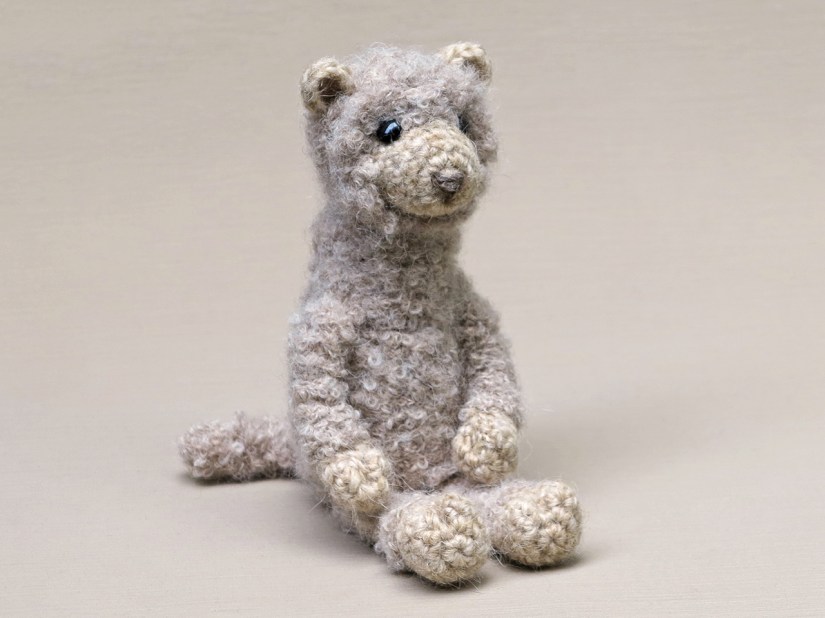
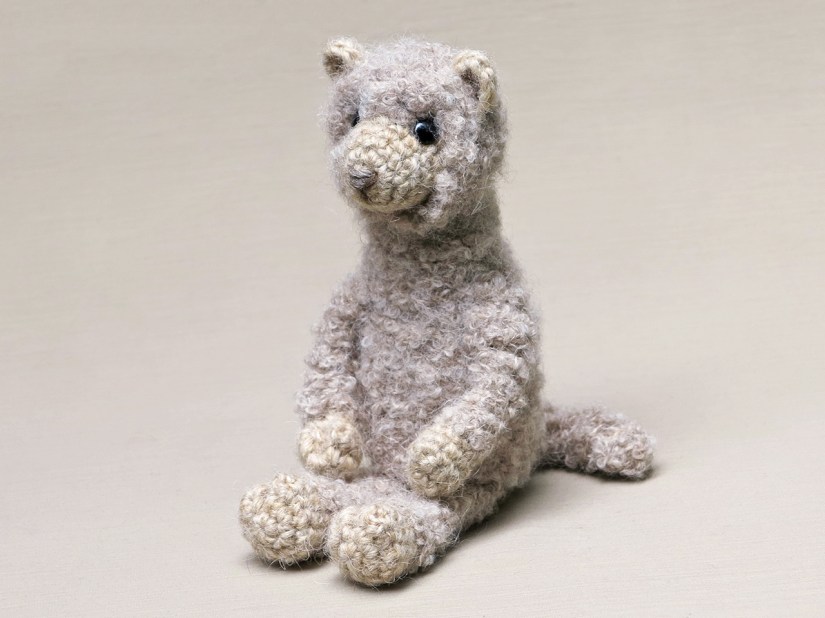
Never have I worked on a pattern for so long, and now I can finally show you Woolfie, my refreshing new crochet wolf pattern!

Realistic crochet wolf

Refreshing? Well, yes, I learned a few new techniques to make this wolf amigurumi. More about that later.

For quite a while I have wanted to make a fox that can sit but that has flexible limbs. Somehow it didn’t work out no matter what I tried, so at some point I gave up. But then came the news that a wolf had been seen in my country, and then another one and even more. Wolves have been extinct for a long time in my country, but these sightings meant that wolves were interested in living here. And then a female wolf settled in a rural part of the Netherlands and successfully raised three pups. Wolves have now officially returned! I think this is fabulous, and I hope it will work out. Of course I had to make a new wolf pattern now. I stepped back into the ‘drawing room’ and took another look at my fox sketches. It became clear that if I wanted to make a fabulous wolf, I would need to improve the technique I had tried to use for that fox. So I practised, making many sketches to visualise how everything should look. And then I started crocheting.

First I made the head. I figured that if I made a cute face, it would be difficult to quit and I would have to finish the rest. And it worked! After I made the head, I started trying out different body shapes. One thing was certain: the body and front paws needed to be seamless. Since I already had a long time to think about it after I stopped working on that fox, I soon found the right shape and size. Then the body needed colouring. I looked at many wolf pictures and decided that my wolf needed to have a light-coloured chest with a grey back. But when I finished the body like that, the front looked like a straight flat piece, very shapeless and not at all what I had in mind. I had to use my imagination to think of a solution that still looked realistic but added much more character. I grabbed my main sketch and started drawing again. After a few tries I found something I liked and worked it out in crochet, and it looked perfect.

But then I had a setback. When I started the body, I thought, ‘I’ll figure out the back paws later’. That wasn’t very smart of me. When I pinned the basic back paws I had made to the body, it looked all wrong. Now I had a complex-looking, seamless body with simple, silly-looking back paws. That weekend I had no idea how I was going to shape them. And then I looked at Boeloe the Koala and got an idea: what if I slimmed down the body and create paws like Boeloe’s, with a hip and a leg part? Would that create the flexible look I desired? Some quick math revealed that I only had to slim down the lower bit of the body to compensate for the bulk the hips would add. Because I didn’t want to end up regretting that I hadn’t made a seamless tail, I also worked out how to create a hole for that.

After all the effort and a pile of failed attempts, Woolfie now is sitting in front of me and he is so gorgeous! He looks more like an excited wolf pup than an adult wolf, but who cares about that? This is a win-win situation: I made a super-realistic new wolf pattern AND I learned a lot of new crochet skills. And the good thing for you is, the way these techniques are worked into the pattern doesn’t make it much more difficult to make, because you can just follow the instructions. I have figured out for you how to do these cool things the easy way!

Here are some more pictures of sweet Woolfie, and below them you can find all the info you need about this wolf amigurumi pattern.

Info about & links to buy the pattern

This realistic crochet wolf is made with Istex Lett Lopi, a 100% wool with a lot of fuzziness. He is 6 inch / 15 cm sitting when made with this yarn. This isn’t a very difficult animal to crochet, even the seamless bits are quite easy to attach if you follow the instructions.

The pattern contains a clear and colour-coded description of how to crochet and assemble this animal, with extra illustrations and example pictures at the bottom to help you get everything right. In the pattern you can also find what materials you need, the yarn colour numbers, in short, everything you need to know to make your own realistic wolf amigurumi. All the additional information you need to know about this pattern you can find in the shop listings. You can buy this pattern in my shop at Ravelry, Etsy or order it here.

This pattern has a one dollar release discount till Thursday the 16th of April!

Patterns

Barnsby, crochet barn owl pattern

I’m so excited to present you this pattern! Meet Barnsby, a super-realistic but too-cute-to-be-real crochet barn owl.

amigurumi owl

It has been such an interesting ride to design this owl amigurumi pattern. First of all, barn owls are wondrous-looking creatures with their flat dish-like-looking face. Basically, the face functions as a big ear. The flat disc catches sounds incredibly well, so that they can hear even the tiniest rustle of prey. The challenge for me was to create a flat face that would stay flat when attached to the head. Also, for this streamlined animal I wanted to make a design without too many bumps and attached bits. The owl had to be as seamless as possible.

And that was something new for me. This summer I’ve been experimenting with new techniques, and I had something in mind that could do the trick. I had never tried something like it before, but how hard could it be? I enthusiastically accepted the challenge. After a few silly-looking experiments, I learned how to use this technique properly. I’m not going to go into details, but attaching a body piece to an unfinished body and then crocheting ahead is a brilliant and super-easy way to get a seamless result. It won’t work for every animal or design, but it’s perfect for birds.

And the face! I got so many positive reactions about the owl’s face, so many people found it perfect. So very jolly you all liked it so much. The face is simply sewn to the head, and by pushing the stuffing to the back of the head and keeping the front practically empty, the face stays nice and flat.

I really hope the finished crochet owl meets your expectations! I can’t deny that I’m very proud of the looks and simplicity of this pattern. With this pattern I think even someone with basic skills can make this super-realistic-looking barn owl amigurumi.

Here are a few more pictures of Barnsby the barn owl, and below them you can find info about and links to buy the pattern.

Info about & links to buy the pattern

Barnsby the realistic barn owl is made with Istex Lett Lopi, a 100% wool with a lot of fuzziness. If you use the recommended yarn, he will be 6 inch / 15 cm high. I would strongly recommend a fuzzy yarn, because it hides the seams of the colour changes.

The pattern is written in US terms and contains a clear and colour-coded description of how to crochet and assemble the crochet owl amigurumi, with extra illustrations and example pictures at the bottom to help you get everything right. In the pattern you can also find what materials you need, the yarn colour numbers, in short, everything you need to know to make your own wondrous owl. All the additional information you need to know about this pattern you can find in the shop listings. You can buy this pattern in my shop at Ravelry, Etsy or order it here.

Heads up: it has a one-dollar release discount till Thursday the 10th of October.

Patterns

Pacu, crochet alpaca pattern

And here he is, the fuzziest and softest crochet animal you can imagine, this is Pacu the crochet alpaca amigurumi.

crochet alpaca pattern

Ever since I started knitting, I’ve been in love with alpaca yarn. This alpaca crochet pattern is an ode to this soft and utterly fluffy animal. And the perfect yarn to create that gorgeous fur is alpaca yarn of course. I prefer alpaca yarn to knit with, because it feels so delightfully soft on my skin to wear, but for my crochet patterns I’ve always worked with a more rough Icelandic wool. For this alpaca I’ve combined my two favourite yarns to create a perfect doll. Each part of Pacu is made in two steps. First a base is made with the Lett Lopi wool, partly worked in the back loops only, and to the unworked front loops the drops alpaca yarn is attached. Like this you can create a perfect looking fluffy fleece.

For this crochet alpaca, I found it very important to create a dense outer layer that made it look like there was an animal hidden somewhere beneath all the fur. Honestly, alpacas are very sweet but a bit silly looking animals, especially after they have had a shave. There isn’t much of them left when the hair comes off.  I shaped the fur very precisely around the snout and eyes to create that look and it gives Pacu that characteristic sweet expression. His long neck and small hooves make him a lovely doll shaped alpaca. Isn’t he the softest looking doll I ever made a pattern for?

Info about & links to buy the pattern

Pacu is made with a combination of Istex Lett Lopi, a 100% wool and Garnstudio Drops alpaca bouclé, a fuzzy loopy yarn. For those of you who can’t find a very fuzzy alpaca yarn I added alternative instructions to the pattern to create the furry look with a less fuzzy yarn. Pacu is 6.5 inch/ 16,5 cm when sitting. The pattern is written in standard American crochet terms and contains a clear and colour coded description of how to crochet and assemble this animal, with extra illustrations and example pictures at the bottom to help you get everything right. In the pattern you can also find what materials you need, the yarn colour numbers, in short, everything you need to know to make your own super soft alpaca amigurumi. All the additional information you need to know about this pattern you can find in the shop listings, like the yarn you need etc. You can buy this pattern in my shop at Ravelry, Etsy or order it here.

This pattern has a one dollar release discount till Wednesday the 1st of August!

Note: how very silly, it is the warmest weather one can image and I am publishing a fluffy, woolly alpaca, how appropriate!