Patterns

Bolthus, realistic ferret aka polecat pattern

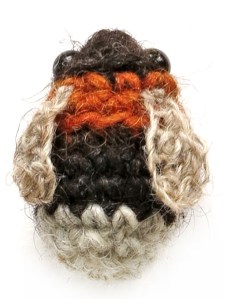
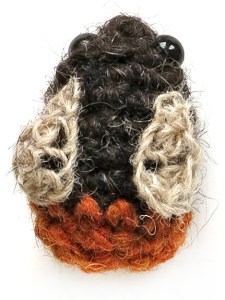
I’m so delighted I can finally present to you my new and realistic ferret or polecat pattern. This is Bolthus, a crochet animal on all fours!

realistic ferret crochet pattern

When I started designing crochet animals I wanted to make playful, comic-looking dolls that looked realistic enough to resemble the real animal but are dolls. As I continued designing patterns, the realistic look became more and more important. I started making realistic sitting animals like the wolf and cat, and occasionally I designed an animal on all fours like the guinea pig, realistic hedgehog and badger. I’ve always found it extra challenging to design an animal on all fours, mostly because playfulness is important for my designs and a standing animal might look too stiff and statue-like.

So designing this very realistic ferret amigurumi was a big step. I wanted to keep it as simple and seamless as possible. I started designing the head and quickly realised that it would look very realistic if I made the head and neck in one piece. But that created difficulties: how could it be attached to a body? I’d already decided I was going to crochet the front paws and chest as one piece bottom-up, so now I had a head and neck crocheted top-down that I had to attach to a chest that was crocheted bottom-up. Sewing together two openings like that is very illogical, so I had to figure out a method to crochet the chest and front paws top-down continuing from the neck.

Normally I would crochet the paws first, crochet them together and work ahead for the body. Now I had to do it the other way around. Continuing from the neck, I crocheted the chest, and when it was long enough I split it in half to crochet the paws seamlessly to it. It worked like a charm!

So now I had a finished front piece that needed a back. Designing the back of the body was pretty straightforward, I just needed to figure out the right size and shaping. After a few attempts and a bit of help from my Instagram followers, I had the perfect long ferret body. Now all that needed to be done were the back paws and the tail. The back paws were a bit challenging because they needed a particular shape, but with some practising I managed to get them right. The tail was easy peasy!

The most exciting part came when all the pieces were finished: assembling the crochet ferret. For me this always takes a lot of effort, to get everything in the right place and write it down understandably for you. Sewing the back to the front piece needs to be done very precisely, and I think it is the most challenging part of this pattern. But if you do it with patience he’ll turn out fabulous.

My worries that an animal on all fours would become stiff didn’t turn out to be justified. I absolutely love this crochet ferret and find him very mischievous and playful-looking. I hope you like him as much as I do!

Here are some more pictures of this ferret or polecat amigurumi, and below them you can find all the info you need about the pattern.

Info about & links to buy the pattern

The pattern for this realistic crochet ferret/ polecat is pretty straight forward. The colour changes and assembling require some extra concentration. This animal is made with Istex Lett Lopi, a 100% wool with a lot of fuzziness. It’s 9.5 inch / 24 cm from nose to tail end. The pattern contains a clear and colour-coded description of how to crochet and assemble the doll, with instruction images next to the text and example pictures at the bottom to help you get everything right. In the pattern you can also find out what materials you need, the yarn colour numbers — in short, everything you need to know to make your own ferret. All the additional information you need to know about this pattern you can find in the shop listings. You can purchase it in my shop at Ravelry, Etsy or order it here.

And heads up! This pattern has a one dollar release discount until Thursday, the 12rd of August!

Patterns

Free doll cardigan pattern

Maybe I should call it ‘Popke crochet cardigan pattern’. How cute is this?!

Most of you have already seen Poochey in his dapper outfit on my Instagram page and I got many requests for the little cardigan pattern. Because I wanted to design another little cardigan for the squirrel, I wanted to publish both when the squirrel was finished. And now is the time! Here are two free patterns for very trendy Popke cardigans. The cardigans are about the same size but the rabbit cardigan has different shaped sleeves, the squirrel cardigan doesn’t really have sleeves.

Instructions

I’ll keep this pattern very basic. The cardigans are approximately 7 cm / 3 inch wide and high, when made with worsted weight yarn and hook 3.5 mm/ E. I’ve used Istex Lett Lopi for the cardigans, the same yarn as the animals are made with.

Abbreviations: ch = chain, sc = single crochet, st = stitch, sl st = slip stitch, hdc = half double crochet stitch, BLO = work in back (inside) loops only, lst = loop stitch, s2tog = invisible decrease, pm = place marker.

The cardigans are made in rows. After you’ve made the starting chain, you do a first dc in the 4th ch from hook. You’ve actually made two dc’s because the top of the chain that forms when you work into the 4th stitch will be the 1st dc. After each turn, you ch 3 and dc in 5th ch from hook. Here you also make two dc’s in one and by skipping the 1st dc (that’s why you work into the 5th st) you keep the stitch count the same. It’s useful to keep marking the 1st stitches, because you might overlook them.

Rabbit cardigan

1. ch 26, in 4th ch from hook dc (pm in 1 st before this dc), dc in next 22 = 24, turn

2. ch 3, in BLO: in 5th ch from hook dc (pm in 1 st before this dc too), dc in next, 3 dc in next, dc in next 4, 3 dc in next, dc in next 6, 3 dc in next, dc in next 4, 3 dc in next, dc in next 3 = 32, turn

3. ch 3, in 5th ch from hook dc (make sure to mark the right stitch as 1st), dc in next 2, 3 dc in next (this is in the middle st of the 3 you did in the previous row), dc in next 6, 3 dc in next, dc in next 8, 3 dc in next, dc in next 6, 3 dc in next, dc in next 4 = 40, turn

4. ch 3, in 5th ch from hook dc, dc in next 3, dc in next (in the middle of 3), skip 8 st, dc in next (middle of 3), dc in next 10, dc in next (middle of 3), skip 8, dc in next (middle of 3), dc in next 5 = 24, turn

5. ch 3, in 4th ch from hook dc, dc in next 22, 2 dc in last = 26, turn

6.ch 1, in 2nd ch from hook sc, sc in next 5, hdc in next 2, dc in next 10, hdc in next 2, sc in next 5, sl st in last = 26, weave in yarn end.

Now sl st a neat seam all the way around the cardigan (not the collar) by starting at the top left corner. Make sure you have the same number of stitches on each front. The unworked loops from round 2 should be on the inside of the cardigan. You can add some buttons if you like, there is enough space between the stitches to form the buttonholes.

Squirrel cardigan

1. ch 26, in 4th ch from hook dc (pm in 1 st before this dc), dc in next 22 = 24, turn

2. ch 3, in 5th ch from hook dc, dc in next 2, skip next 3, ch 4, dc in next 10, skip next 3, ch 4, dc in next 4 = 26, turn

3. ch 1, in 2nd ch from hook sc (1st stitch), sc in next 7, dc in next 10, sc in next 8 = 26, turn

4. ch 1, in 2nd ch from hook sc, sc in next 4, hdc in next 3, dc in next 10, hdc in next 3, sc in next 5 = 26, turn

5. ch 1, in 2nd ch from hook 2 sc, sc in next 4, hdc in next 3, dc in next 10, hdc in next 3, sc in next 4, 2 sc in next = 28, turn

6. ch 1, in 2nd ch from hook sc, sc in next 4, hdc in next 4, dc in next 10, hdc in next 4, sc in next 4, sl st in last = 28, weave in yarn end.

Now sl st a neat seam like you did for the other cardigan. I’ve added small beads as buttons because there isn’t much space between the stitches to form buttonholes. But there are of course alternative ways to create ‘buttonholes’.

Note: this 1st version of the pattern isn’t edited professionally as, just by me, so if you notice a mistake, please let me know.

Copyright © 2019 by Sonja van der Wijk.

Flowers and bee amigurumi
Patterns

Free crochet bumblebee pattern

I’m ever so excited to present to you this little gift pattern. Just look at these crochet bumblebee species!

bumblebee amigurumi

Last week I had a Spring holiday and suddenly got the idea of making a free crochet bumblebee pattern. The first bumblebee turned out so lovely that I decided to make more kinds of bumblebees. And when they where finished, I wanted to create a classic-looking image with the bees on a white background and their species name written next to them. In short, I had a lot of fun with my sweet little pattern and hope you will too! Bumblebees and insects are so important but their numbers are declining dramatically. Make these bees to show the world we must not forget about them! 🐝

Crochet bumblebees

Before you start

This pattern is written in standard American crochet terms. It’s useful to read it before you start. If you use the recommended yarn, your bumblebees will be 3 inch / 5 cm long. Because the size of the bee is dependent on the yarn you use and how tight you crochet, it’s useful to experiment with the eye size, despite my recommendations. I would strongly recommend a fuzzy yarn for the bumblebees. The yarn I’ve used is Istex Lètt lopi, a 100% wool. Use a stitch marker to mark the beginning of a round, move it up each time you start a new round. The colour changes are written after the description of the round, so read the whole line before you start. Always change colour in the last loop of a stitch, so the loop on the hook you end with is the new colour. That means the next stitch is in the new colour, not the one you changed in. At Son’s Popkes is a tips & tricks category. Here you can find useful info regarding my patterns.

Materials

For these bumblebees you’ll need worsted weight yarn and an E US/3.5 mm crochet hook. You’ll also need some lace weight yarn (Lopi Einband) for the wings: beige heather (0886). You need four colours of worsted weight yarn (left-over bits are enough): sheep or mixed black (0052 or 0005), yellow (1703), orange (1704) and light grey (0054). For the eyes I’ve used 7 mm animal eyes. You will also need fibrefill to stuff the bees.

Accessories

Hook E US / 3.5 mm, scissors, embroidery needle, stitch markers or paper clips.

Abbreviations: ch = chain, sc = single crochet, st = stitch, sl st = slip stitch, hdc = half double crochet stitch, dc = double crochet stitch, s2tog = invisible decrease.


White-tailed bumblebee (bombus terrestris)

Body

Bottom of bee

Start in black, change colour when indicated. To get neater colour changes, you aren’t working in a spiral but closing each round with a sl st. At the end of each round, sl st in the first sc of the next round, then ch 1 and sc in that same stitch. This is the 1st stitch of the next round. At the end of each round you will skip over the sl st and ch and crochet a sl st, ch, sc in the following stitch. Don’t cut the yarn  between the colour changes but carry it along.

1. magic ring of 4 = 4

2. (sc in next, 2 sc in next) x 2 = 6

Mark the stitches of round 3 in which you’ll make the 2nd and the 6th stitch with a coloured strand. (Insert the strand into the gap of the stitch you normally put your hook in.) When the strand is placed, just do the stitch like you always do. You’ve now marked where you later attach the eyes.

3. (sc in next 2, 2 sc in next) x 2 = 8, change colour to yellow in last st, sl st in 1st

4. ch 1, sc in same, [2 sc in next, (sc in next, 2 sc in next) x 3] in BLO = 12, change colour to black in last, sl st in 1st 

5. ch 1, sc in same, [sc in next 11] in BLO = 12, sl st in 1st

Attach the eyes permanently in the marked spots. It helps turning the piece inside-out when you attach the caps. After I attached the eyes, I inserted a little bit of stuffing between them, as shown in the images below. 

6. ch 1, sc in same, sc in next 11 = 12, change colour to yellow in last st, sl st in 1st 

7. ch 1, sc in same, [sc in next 11] in BLO = 12, change colour to black in last and cut yellow, sl st in 1st 

8. ch 1, sc in same, [sc in next 11] in BLO = 12, change colour to light grey in last and cut black, sl st in 1st 

9. ch 1, sc in same,  [sc in next 11] in BLO = 12, sl in 1st

10. ch 1, sc in same, s2tog, (sc in next, s2tog) x 3 = 8, sl st in 1st

Stuff the bumblebee.

11. ch 1, sc in same, sc in next, s2tog, sc in next 2, s2tog = 6, sl st in 1st

Add a little bit of stuffing if needed and then sew the hole closed by putting the needle from the inside out through all the outside loops of the 6 st, clockwise. If you do it correctly, you can now pull the end and it will close the gap. Make sure your bombus has a nice oval bottom.


Red-tailed bumblebee (Bombus lapidarius)

1-3. Follow the instructions for the white-tailed bee but skip the sl st and ch 1 and don’t change colour to yellow in round 3.

4. In BLO: (sc in next, 2 sc in next) x 4 = 12

5. sc in each around = 12

Attach the eyes in the marked spots.

6-7. sc in each around = 12

8. sc in each around = 12, change colour to orange in last and cut black, sl st in 1st

9. ch 1, sc in same, sc in next 11  = 12, sl st in 1st

10-11. follow the instructions for the white-tailed bumblebee.


Tree bumblebee (Bombus hypnorum)

1-3. Follow the instructions from the white-tailed bumblebee, change colour to orange instead of yellow.

4. ch 1, sc in same, [2 sc in next, (sc in next, 2 sc in next) x 3] in BLO = 12, sl st in 1st

5. ch 1, sc in same, sc in next 11 = 12, change colour to black in last st and cut orange, sl st in 1st

Attach the eyes in the marked spots.

6. ch 1, sc in same, [sc in next 11] in BLO = 12, sl st in 1st

7. ch 1, sc in same, sc in next 11 = 12, sl st in 1st

8. ch 1, sc in same, sc in next 11 = 12, change colour to light grey in last and cut black, sl st in 1st

9. ch 1, sc in same, [sc in next 11]  = 12, sl st in 1st

10-11. follow the instructions for the white-tailed bumblebee. 

Early bumblebee (Bombus pratorum)

To make this bee, follow the instructions for the white-tailed, but make the bottom in orange instead of light grey. That’s all.

Wings

Make two for each bumblebee, use the thinner yarn with the same hook. If you use Lopi yarn but don’t have the Einband weight, split a lopi strand in half. Make the starting chain as long as the end, so you can use both ends together to attach the wings.

1. ch of 6, in 3rd ch from hook dc, dc in same, hdc in next, sc in next, sl st in next and leave yarn ends for sewing.

Use both yarn ends to sew the wings to the body. Sew them on top of the third round behind the head, as shown in the images. The head ends at the first round you do in BLO.


Wow, how cute is this? Have fun with your bumblebee collection. You now have the ability to make even more kinds! 

Copyright © 2019 by Sonja van der Wijk.