A few weeks ago, I received a message from a customer on Etsy. She had found pictures online of the most adorable crochet wolf and was wondering if I could design something similar, because the website she found it on was vague about the pattern and its designer. The wolf looked absolutely amazing, and I was astonished by how well this amigurumi was shaped. I replied that I could try something like that someday and continued with what I was doing.
While working, I kept thinking about the perfection of that wolf. So, I decided to take another look at the picture and wanted to find that website for myself. To my surprise, I found many similarly perfect crochet wolves when I Googled it. That was when I realised something wasn’t right. These wolves don’t exist! The images are AI-generated!
Every artist or designer nowadays is aware of the competition that comes from AI. It is a cheap solution for companies to get artwork or designs instead of hiring an illustrator or graphic designer. I wasn’t too worried about it because I reckoned AI would never be able to design an actual crochet doll. However, I never realised that AI images could be used to promote fake crochet animals.
I discovered that these images are used to rip off customers by selling fake patterns using these images. And there are many free patterns offered with links that don’t work. To my bewilderment, I also found sellers of average-looking amigurumi patterns who are using AI-generated images to sell their patterns on Etsy!
When searching for an animal on Etsy, the AI images show up looking amazing. They immediately get more clicks than others. When you click on them, you visit the listing page where there’s more information about the pattern (not everyone clicks; some just buy immediately). In the description of the listing, photos of the actual doll might be shown, but that first image steals the show. Most people have no idea that one is AI-generated, and they think that is the doll they can make with the pattern. Out of curiosity regarding how such patterns are judged, I read through reviews. Only a fraction of customers realise that the animal they made is different from the one in the picture. Most are satisfied and think theirs look less perfect because they aren’t as skilled as the designer. It made me sad.
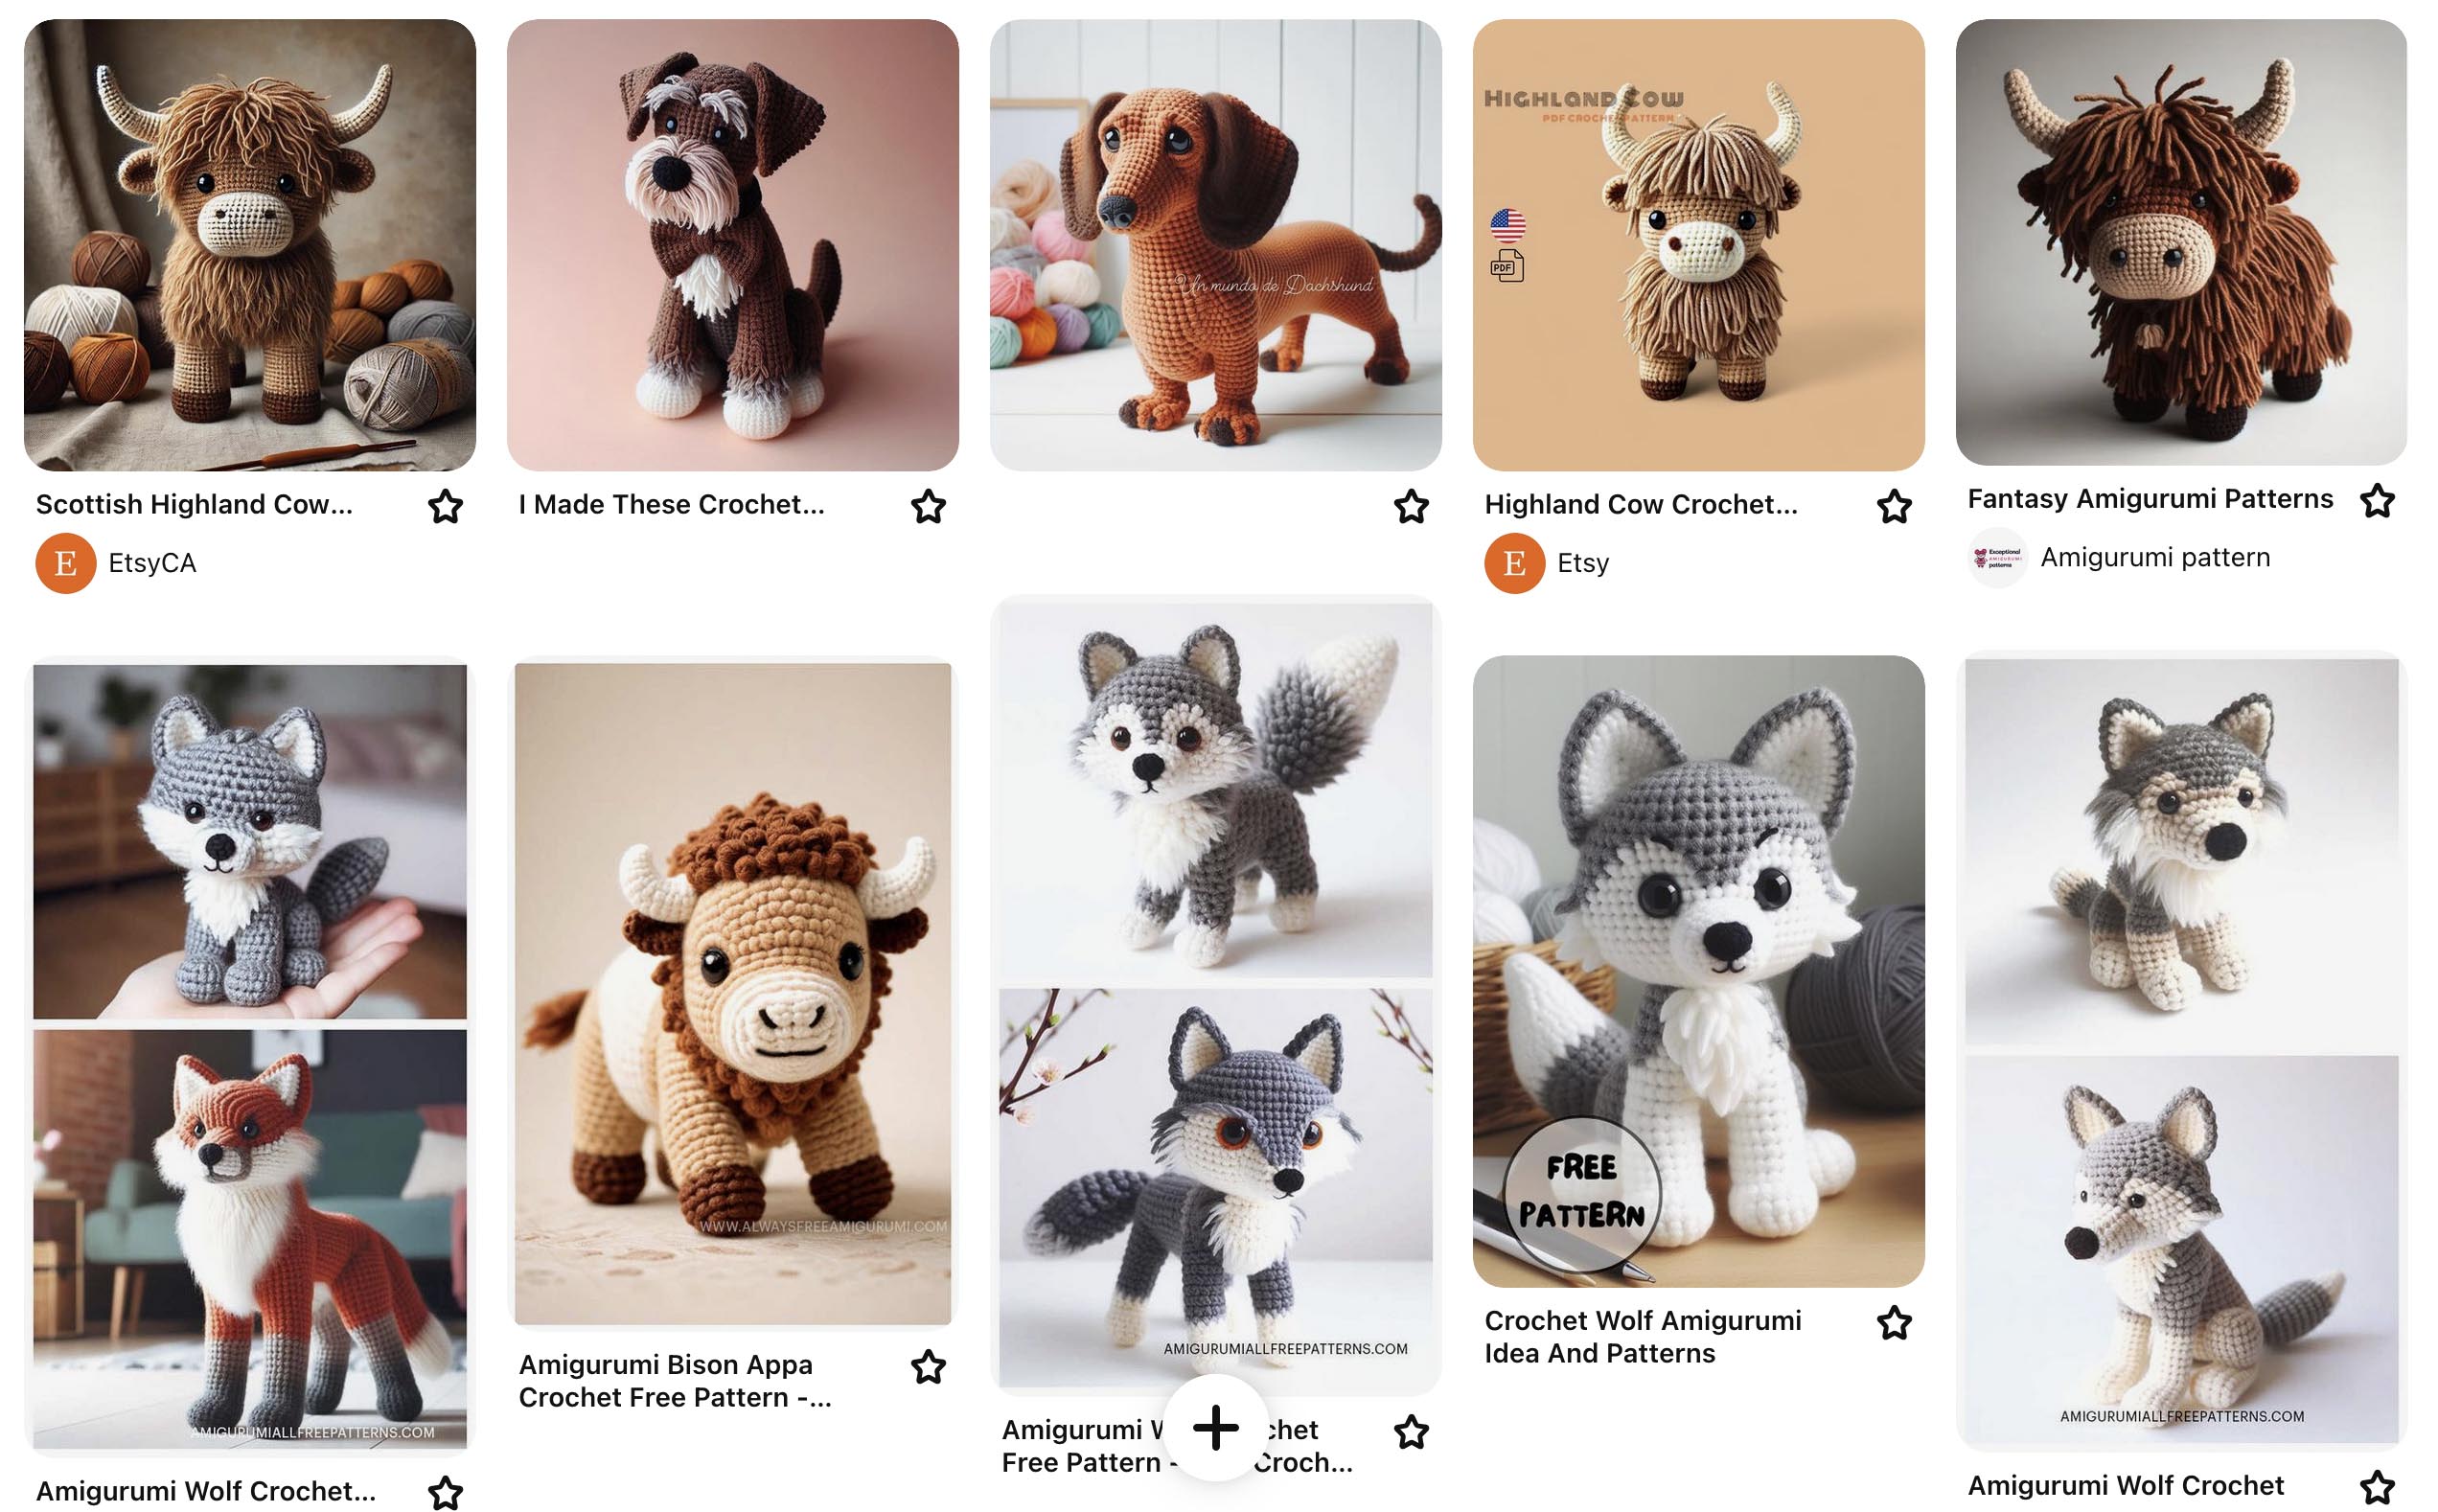
Especially Pinterest is full of fake images. I don’t know what happened there, but I stopped using it, it’s like scammers headquarters these days. But as you can see below, some of the images are pinned from Esty.
The text continues below these images…
How can you spot an AI-generated image?
At first glance, even I couldn’t tell whether a photo of an amigurumi was real or not. But once I learned what to look for, I could notice it in the blink of an eye.
Perfection
If a crochet animal and its picture are utterly perfect, you should immediately become suspicious. Let’s start with the picture. Take a look at the backgrounds. Everything looks plastic-like; the skeins of yarn are perfectly round. It all looks a bit weird, as if it’s from a 3D animation. If an animal is being held, the background always has this weird unnatural blur, not like a real picture. Now consider the dolls—they look absolutely perfect, with flawless little faces and sweet expressions, plus amazing fur details. Can anyone create it that perfectly?
Starting Points
Practically all amigurumi and crochet animals are crocheted in a continuous spiral. This means there’s always a starting point formed by a magic ring or chain. If you look closely at the images above, it is difficult to find the starting or end points. The paws especially look strange; how are they started or ended? There is no magic ring to be found or any visible spot where the stitches come together. This is definitely not homemade by a person!
Texture
The last clue to examine is texture. Most AI-generated animals have a flawless texture. All stitches have exactly the same tension and are stacked up perfectly. There is not a single stitch that is off. While AI can create perfect-looking crochet stitches, it also messes up certain parts. In every AI-generated image, you can find stitches that look unrecognisable—they’re not single crochets (sc’s), double crochets (dc’s), or anything familiar-looking. Sometimes there’s even a shape of a magic ring in a place where it can’t be! Additionally, some parts look sewn on while appearing crocheted at the same time—how could that be done? The fur parts either resemble spaghetti or are so soft that even a plush toy can’t compete.
To sum things up: you need to be suspicious of AI-generated images. When you buy a crochet animal pattern, take a good look at the image before making your purchase. If everything looks just a bit too perfect, it’s probably fake. If you’re unsure, take a closer look and keep these three points in mind. Before you know it, you’ll be able to spot a fake in the blink of an eye—just like I can!
One little note: when I searched for these fake crochet animals on Pinterest, I often came across my own designs among these phonies. I suppose that means I’m doing a good job competing with them so far. And mine definitely look real, with their furry texture and inconsistent stitches and the always imperfect product pictures with messy backgrounds I never get flawless. Who would have thought that would be a plus?!


