Patterns

Dandylion, crochet cat pattern

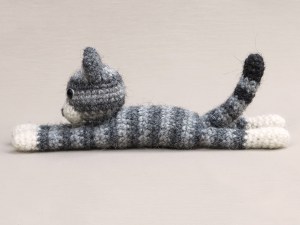
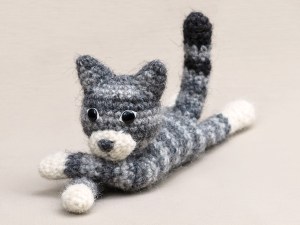
Dandylion is finished and he looks even more enthusiastic than I hoped for. As soon as I had him finished, I felt like making more. An orange striped version or a black one, maybe a wild cat. I love how he’s able to be positioned in different ways and he can surely observe you with his big eyes like real cats do.

amigurumi cat, crochet cat

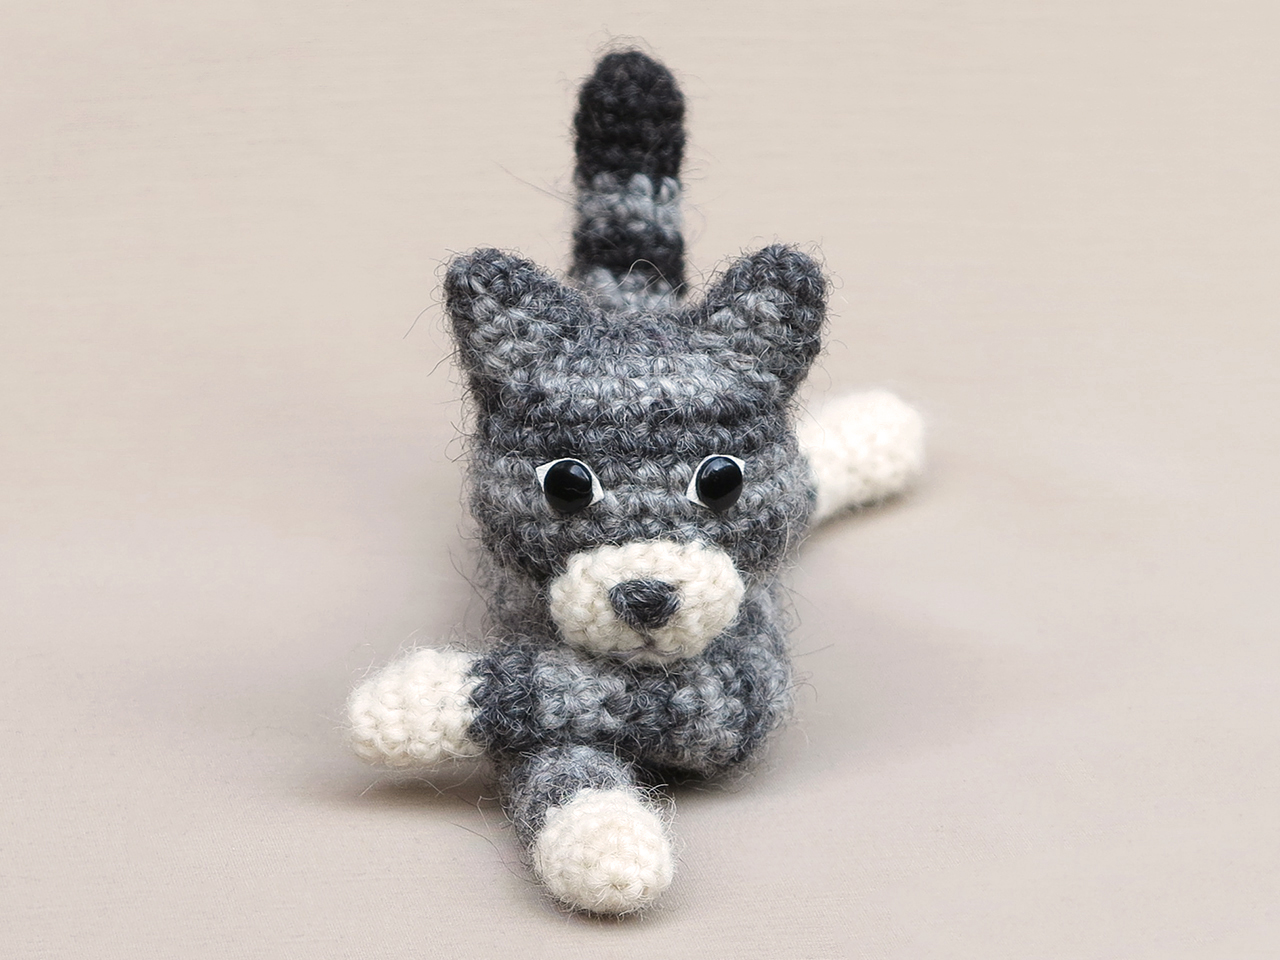
Meet Dandylion, my crochet kitty cat pattern. This is such a fun and playful cat amigurumi. He’s made with basic shapes and doesn’t look very realistic, but because of his authentic cat expression, he looks exactly like real a real cat, probably the only animal who lies like this, watching you and being up to no good.

Here are some more pictures of this mischief and scroll down for info about & links to buy the pattern.

Info about the crochet cat pattern

With this easy pattern you can make a lovely striped amigurumi cat or a cartoon version of your own cat. Just divide his colours in simple shapes and crochet ahead, it’s fun! The cat is lying 9.1 inch / 23 cm long, when made with worsted weight yarn. The crochet kitty cat pattern is for sale in my Ravelry shop, Etsy shop and you can also order it directly from me here. The pattern is written in standard American crochet terms and contains a clear and colour coded description of how to crochet and assemble the animal with example pictures next to the instructions and at the bottom. In the pattern you can also find what materials you need, the Lopi colour numbers, in short, everything you need to know to make this unique crochet animal. All the additional information you need to know about this pattern you can find in the shop listings.

Patterns

Personal use only

This weekend I got an email from someone, asking me if  I was okay with selling dolls made with my pattern. I was glad she asked me this, because I had to respond to her that I wasn’t okay with it.

I know some crochet character designers don’t mind it if people sell the dolls made with their pattern. But I do mind. I think it’s not fair to sell a doll which you didn’t design yourself. You are making money of someone’s else creations in some way. It’s not a very decent thing to do in my opinion.
Now I also know that when someone bought a pattern, they can do whatever they want with it, I can’t forbid anything. But I just hope ‘my customers’ understand my opinion about this and won’t sell the dolls.
In all my patters I’ll make a note that they are for personal use only, so for yourself or as a present, but not to make money with.
I hope you’ll understand.


Chit and Chat, Stories

Kitty cat crochet

There are so many idea’s I have, and each time I start a new project I have to pick which one I’m going to make. A squirrel and a sheep are hight on my list, but I also would like to make a cat. Sometimes the things on my list haven’t really ‘formed’ in my mind, so the idea that has, gets priority. This time the cat got it. There’s a clear image in my mind of how he should become and his colours etc. so I can’t wait to make him.

Here’s a sketch. He will be a ‘folded’ kitty.


Patterns

Flam, crochet fox pattern

Very playful, sturdy and cute. Meet my crochet fox amigurumi called Flam.

Flam, crochet fox

When I first published this crochet fox pattern in 2014, I was just at the beginning of my career as crochet animal pattern designer. Back then, I didn’t know how things would go in the future and what I posted here at my blog did not look as professional as it does today. So that is why this post really needed to be updated, and so did the pattern.

In the original post, I wrote about how pleased I was that the crochet fox doll resembled the sketch I made quite well. I always use a sketch as a guidance for the crochet version. Flam turned out to be such a playful doll and I love every bit of him.

Flam himself hasn’t changed that much, how could I, he actually is my best selling pattern! However, I did change his body and white belly, so it would look much rounder and neater. What really needed an update were the pictures. Nowadays I add many images to a pattern. Some helpful images next to the instructions and much more at the bottom of the pattern of the completed animal from all angles. Flam’s pattern looks all shiny and new now.

Just look at these new images of my crochet fox, I am so happy with the result. Below them you can find info about and links to buy the pattern.

crochet fox

Info about & links to buy the pattern

This crochet fox amigurumi is made with Istex Lett Lopi, a 100% wool. Flam is sitting 5.6 inch / 14.5 when made with worsted weight yarn.

The pattern contains a clear and colour coded description of how to crochet and assemble this animal, with extra illustrations and example pictures at the bottom to help you get everything right. In the pattern you can also find what materials you need, the yarn colour numbers, in short, everything you need to know to make your own playful fox amigurumi. All the additional information you need to know about this pattern you can find in the shop listings. You can buy this pattern in my shop at Ravelry, Etsy or order it here.

Happy crocheting!

Patterns

Witch hat pattern

Because Halloween is coming, I made a little free pattern to have fun with.

Teddy is! Or maybe not…..

Here’s the pattern, a picture of just the hat is below.

Crochet Witch Hat pattern.

For this pattern I used a fuzzy worsted weight yarn and a 3,5 mm / hook E. The hat is standing 10 x 12 cm / 3,9 x 4,7 inch.
The hat is made in the round in Double Crochet stitches. Join after each round and add a chain of 3 in the beginning of each round, as I’ve written in the pattern.

GO!

1. magic ring of 4 = 4, join
2. ch 1, sc in each st around = 4, join
3. ch 3, (dc in next st, 2 dc in next st) x2 = 6, join
4. ch 3, (dc in next st, 2 dc in the next 2 st) x2 = 10, join
5. ch 3, dc in next 2 st, 2 dc in next st, dc in next 4 st, 2 dc in next st, dc in next 2 st, = 12, join
6. ch 3, (dc in next st, 2 dc in next st) x6 = 18, join
7. ch 3, dc in each st around = 18, join
8. ch 3, dc in next 4 st, 2 dc in next st, dc in next 8 st, 2 dc in next st, dc in next 4 st = 20, join
9. ch 3, dc in next 4 st, 2 dc in next st, dc in next 9 st, 2 dc in next st, dc in next 5 st = 22, join
10. ch 3, (dc in next 10 st, 2 dc in next st) x2 = 24, join
11. ch 3, (dc in next 3 st, 2 dc in next st) x 6 = 30, join
12. ch 3, (dc in next 4 st, 2 dc in next st) x6 = 36, join.
13. ch 3, (dc in next 5 st, 2 dc in next st) x6 = 42, join, sl st, weave in end.

Little grey band
1. ch of 26, join.
2. ch 3, dc x 26, join and leave long tail for sewing band to hat.

DONE

Mistakes in this pattern? Nooooo, can’t be, well if so, let me know and I’ll fix it!


Stories

I thought I was finished…

Today I finished, or at least I thought so, my little fox. But when I had sewed the parts together I wasn’t completely happy with the result. He looks beautiful, but something isn’t right. This is a first time thing. Normally I notice these imperfections when I pin a doll together, but this time it looked all right.

What is wrong? He looks a bit too long I think, or his head is just a tiny bit too small. I decided I’m going to make slightly smaller feet and body (which I already made about 6 times to get this one…oh dear). That way he should come out perfectly. Some of my friends saw him today and thought he looked great, but as long as I’m not satisfied myself I can’t rest….He must by perfect.

Here’s his face before I sewed it. That was a bit of a struggle also, because it came out smaller when sewed together.