Patterns

Crowly, crochet raven pattern

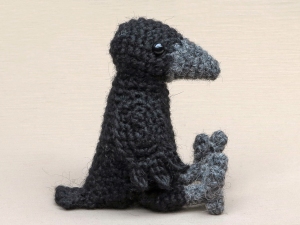
I hereby present to you yet another dark and mysterious creature: meet Crowly the crochet raven, or crow, that’s up to you!

amigurumi crow

I’ve wanted to make a raven or crow for a long time, but until now I hadn’t gotten into it. Crows aren’t cuddly cute creatures, but they are very intelligent and compassionate. I’m fascinated by them, and I especially love ravens. For a few years now we’ve seen ravens in the areas we hike. Well, most of the time we just hear their ‘krok krok krok’ call.

Now why have I called my raven amigurumi ‘Crowly’? To be honest, I wasn’t sure wether to make a crow or a raven. I assumed crows would be more loved and popular than ravens, so when I first started I was thinking Crowly should be a crow. But because ravens are my personal favourite, I wasn’t sure what to choose. 

I think this pattern offers the option for the crafter to decide what it is. Ravens and crows both belong to the corvids (corvidea) species. There are differences between the animals, especially the size and the shape of the wings, but this pattern isn’t realistic enough to show them. The details I added for the wings will work perfectly for either a crochet crow or raven, or even a rook if you make the top of the beak black.

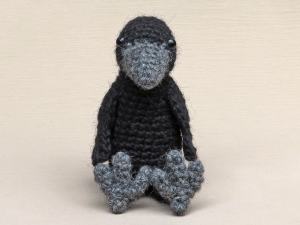
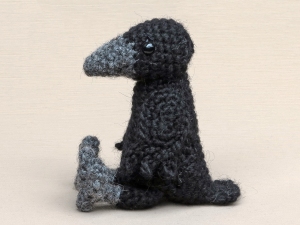
Here are some more pictures of this adorable crochet raven/ crow, and below them you can find info about and links to buy the pattern.

Info about & links to buy the pattern

Crowly is made with Istex Lett Lopi, a 100% wool with a lot of fuzziness. If you use the recommended yarn, your bird will be 5 inch / 13 cm standing.

The pattern is written in US terms and contains a clear and colour-coded description of how to crochet and assemble the animal, with extra illustrations and example pictures at the bottom to help you get everything right. In the pattern you can also find what materials you need, the yarn colour numbers – in short, everything you need to know to make your own cuddly corvid. All the additional information you need to know about this pattern you can find in the shop listings. You can buy this pattern in my shop at RavelryEtsy or order it here.

This pattern has a one dollar release discount till Thursday, the 25th of December, Christmas day! If you like to see quick updates about my work, please follow my Instagram page.

Art

A Son’s Popkes postcard!

Painted Christmas card

For a long time I thought about offering the Popkes artworks I made, some as Christmas cards, as postcards. I never actually dared to do it, until now! After many friends and crafters told me I really should give it a try, I decided to have my favourite winter-themed artwork printed as a postcard, how exciting! You can now order ‘A Popkes winter wonderland’ as an A6 postcard in my Etsy shop. I decided to offer a single card ($1,85) and sets of 2, 4, or 6.

The postcards are printed on 350gsm sulfate cardboard. The front is semi-glossy and the back is matte, perfect to write on. They are professionally printed in the Netherlands. On the back in the bottom left corner you’ll find a small graphic and info about the artwork. There is plenty of space to write on.

These cards feel like a classical winter animal tale. They would make a perfect Christmas greeting to send to your loved ones and friends or a lovely wall decoration to brighten up your room! If you are a Popkes fan, you know who’s on this card, but to those of you who don’t know, this postcard features Flam the fox, Finse the rabbit, and Falun the badger. For years it has been a tradition of mine to paint an original Christmas card to send to my family and friends. Before I started Son’s Popkes, I painted funny scenes featuring Santa experiencing bad luck. But when Son’s Popkes became a success, I realised it would be great fun to make the crochet animals the main characters of my Christmas cards. At some point, I even started painting more Popke artworks, where the animals are doing all sorts of things in their natural environment. Who knows what their next adventure will be?

Where to buy?

You can purchase the cards here. Keep in mind that if you order these in December, they will take longer to arrive because of the Christmas rush.

If you have questions or remarks about this postcard, don’t hesitate to leave a comment, I would love to hear from you!

Patterns

Free crochet snail pattern

Am I serious? Yes, I thought it would be fun to make a crochet snail, a little friend who can accompany the hedgehog in pictures. So why not make a free pattern as well. I know you all yearned for a crochet snail. Who doesn’t want to make a crochet snail?!

Crochet snail pattern

Before you start

This pattern is written in standard American crochet terms. It’s useful to read it before you start. If you use the recommended yarn, your snail will be 3 inch / 7 cm long. The yarn I’ve used is Istex Lètt lopi, a 100% wool. Use a stitch marker to mark the beginning of a round, move it up each time you start a new round.

Materials

For these snails you’ll need worsted weight yarn and an E US/3.5 mm crochet hook. You need 2 colours of yarn (left-over bits are enough): I’ve used light beige (0086) and acorn (0053) for the light snail and oatmeal (0085) and chocolate (0867) for the darker one. I’ve split a strand of the darkest colour to embroider a mouth. You will also need fibrefill to stuff the snail and a pipe-cleaner to bend the body is optional. Not really my style, but I painted the eyes, using acrylic paint. I couldn’t think of another way the create dark dots. (Needle felting could do the trick, but most people don’t have the tools for that.)

Accessories

Hook E US / 3.5 mm, scissors, embroidery needle, stitch markers or paper clips.

Abbreviations: ch = chain, sc = single crochet, st = stitch, sl st = slip stitch, hdc = half double crochet stitch, dc = double crochet stitch, s2tog = invisible decrease, dec = normal decrease.

Instructions

Shell

The whole shell (round 2 – 5) is worked in the backloops only, so the unworked frontloops form a visible spiral on the outside of the shell.

1. magic ring of 4 = 4

2. 2 sc in each around = 8

3. (sc in next, 2 sc in next) x 4 = 12

4. sc in each around = 12

5. (sc in next, dec) = 8, sl st in 1st backloop and leave yarn end for sewing.


Body

1. magic ring of 4 = 4

2. sc in each around = 4

3. (sc in next, 2 sc in next) x 2 = 6

4-9. sc in each around = 6

10. sc in next, s2tog, sc in next, 2 sc in next 2 = 7

11. sc in next, s2tog, sc in next 2, 2 sc in next, sc in next = 7

12. s2tog, sc in next 2, 2 sc in next, sc in next 2 = 7

13. repeat round 12 = 7

14. sc in next, 2 sc in next, sc in next, s2tog x 2 = 6, sl st and leave yarn end for sewing.

You can now insert a pipe cleaner if you like to use one. Sew the hole closed by putting the needle from the inside out through all the outside loops of the 6 st, clockwise. If  you do it correctly, you can now pull the end and it will close the gap. Weave in the end.

Make the eyes by attaching the yarn at the side of the head, between round 2 and 3. Ch 3 st, in 2nd ch from hook sl st and weave in the yarn ends as shown in the image. You can embroider the mouth between round 1 and 2.

Now stuff the shell and attach it to the body. Position the shell as shown in the image and sew between the frontloops of the last round so you don’t change the edge. I’ve sewn back and forth between the side of the snail. 

There, your not-so-slimy slimy new friend is finished! 

Uncategorized

Dapper Poochey, crochet rabbit pattern

Well, what happened here? I liked Poochey in his trendy cardigan so very much that I decided to add him as a “dapper rabbit pattern” to my shops. Would you’ve been able to resist it? Just look at this utterly adorable crochet rabbit in his fancy outfits!

I cannot give myself all the credit for this. After I released the little cardigan pattern, Jan made a delightful collection of lovely little cardi’s for her crochet bunnies. After seeing her ever-so-cheerful pictures, I decided I just had to make a separate pattern for Poochey in the cardigan. I made Poochey’s cardigan just for fun after seeing a knitted rabbit wearing a sweater on Instagram, but when I put the sweater on and took that picture of him a while back, I began to get the idea of making a separate pattern. But because it felt a bit strange to re-launch an existing pattern, I wasn’t sure if it was a good idea. Jan made me realise that it is! Not everyone who visits my blog would want this version, but I don’t want other crafters missing out on this.

And how much fun it is to make all those little cardigans! Not only that, but all the tiny cute buttons you can’t put on your own garments, you can use for little bunny cardigans. I had so much fun looking for buttons that matched my bright-coloured sweaters. I found buttons with flowers and stars, animal-shaped ones – oh, there are so many fabulous buttons to find! And I cannot help laughing at Poochey’s expression every time I see it. In every single picture he has that same look of utter confusion. Which cardigan is your favourite? Mine is the green one with the star buttons.

Here are few original pattern pictures of this dapper crochet rabbit; below them you can find info about and links to buy the pattern.

Info about & links to buy the pattern

Poochey and his cardigan are made with Istex Lett Lopi, a 100% wool with a lot of fuzziness. If you use the recommended yarn, he will be 7 inch / 17 cm high. I would strongly recommend a fuzzy yarn, because it hides the seams of the colour changes.

The pattern is written in US terms and contains a clear and colour-coded description of how to crochet and assemble the crochet rabbit amigurumi, with extra illustrations and example pictures at the bottom to help you get everything right. In the pattern you can also find what materials you need, the yarn colour numbers, in short, everything you need to know to make your own dapper rabbit(s). All the additional information you need to know about this pattern you can find in the shop listings. You can buy this pattern in my shop at Ravelry, on Etsy or order it here.

Heads up: it has a one-dollar release discount till Thursday the 11th of June. If you already have the pattern for Poochey and Fudge but want to make Poochey like this, you can find the free pattern for the cardigan here.

Chit and Chat

An experiment

Hi dear crafters,

Just writing this short post to let you know I’m going to try something new. It might sound like a big thing, but not to worry, my style will never change. What I am going to do is trying a new type of body. For a long time I’ve been thinking about making more flexible crochet animals. The idea is that these dolls can lie on their bellies, but can also sit upwards. To make them more soft and flexible I’m thinking of using a different, thinner yarn, called Drops Alpaca.

I have no idea if this will work, and maybe I’m able to get the right result with Lett Lopi, but I need some time to work it out.

I also hope to create a type of body that needs less assembling in the end. Sno & Snoosle and Poochey & Fudge already are a start of that, but I want to take it a few steps further, where you create holes from where you later can crochet ahead for the arms and legs. I’m very curious myself how that will work out.

I’m very excited about this for a while now and finally decided to give it a go. I’m starting with a playful little fox. I can’t promise there will be a pattern soon, but I’ll try my best to create the fox pattern I have in mind.

Happy Easter for now!


Patterns

Sno & Snoosle, crochet sea otter pattern

Maybe this is the most special and adorable pattern I’ve ever made. I proudly present to you a mother and her pup, Sno & Snoosle the crochet sea otters pattern.

crochet sea otter

Look at them together! They almost look as heartwarming together as real sea otters. Some animals melt my heart when I look at them. I have to admit, I’m easily melted by animal beauty. Seeing mice, blackbirds or foxes doesn’t really matter, to me they all are gorgeous. But when I was looking online at pictures of sea otters, I even got a bit emotional by some of them. The love a sea otter has for its pup is so overwhelming. The way she holds her baby, tends and dries it and the way the baby sleeps on top of her, feeling completely safe, it’s absolutely heartwarming and shows the intelligence and consciousness of them. Of course the utter cuteness of the sea otter and especially the pup helps. Baby sea otters look like living plushies. Their thick and warm coat makes them look incredibly cute and that was a huge challenge for me in the design process. How could I ever match the cuteness of a real baby sea otter?

Well, I did the best I could, my first prototype pup looked more like a sloth than a sea otter, but at least I knew how not to make it. Actually, I started with the head of the adult. Most adult sea otters have a white face that looks flat, but if you take a better look, you notice they do have quite a snouty face. So, I had to find a way to make the face look flat, but with a muzzle. After several attempts I found the solution. The body of course was not easy to design either, because I wanted the otter to look upwards a bit. That meant I had to make a curved neck. Also, I wasn’t sure about how to attach the legs and tail to the body to make it look natural. When I got stuck on the adult, I started on the pup, a teeny tiny thing it is! In order to achieve making a tiny little otter, I decided to crochet the body as one piece, so you connect the tail and legs and from that point you work your way upwards. That of course was also the solution to create a realistic looking body for the adult otter. How splendid that worked out.

Because I like this text to be as short as possible, I’m not going to tell more about the process. But I do want to add that I am ever so delighted with the result. I absolutely love my sea otter amigurumis. Here are some more pictures and below them you can find info about and links to buy the pattern. And yes, the baby is part of this crochet sea otter pattern!

Info about & links to buy the pattern

Sno and Snoosle are made with Istex Lett Lopi, a 100% wool with a lot of fuzziness. If you use the recommended yarn, your adult otter will be 8 inch / 20 cm and the baby 5.5 inch / 12 cm long.

The pattern is written in US terms and contains a clear and colour-coded description of how to crochet and assemble the animals, with extra illustrations and example pictures at the bottom to help you get everything right. In the pattern you can also find what materials you need, the yarn colour numbers, in short, everything you need to know to make your own adorable sea otter duo. All the additional information you need to know about this pattern you can find in the shop listings. You can buy this pattern in my shop at Ravelry, Etsy or order it here.

This pattern has a one dollar release discount till Friday the 22nd of Februari.

Art, Patterns

Bubbly, crochet otter pattern

And here he is, my whimsical looking crochet otter amigurumi called Bubbly.

realistic crochet otter pattern

It felt like I have been working on this pattern for ages. That’s probably because of all the free days we are having this time of year. But that doesn’t spoil the fun of publishing something new, on the contrary, I was looking so much forward to writing this post.

What do you think? Did I manage to capture the thing that make otters the popular and much loved animals as they are? I think I did, I’m so happy with this otter. Bubbly looks like an enthusiastic, funny young otter, who’s up to many tricks. Designing crochet animals and creating a doll that resembles the real animal in a basic way is a challenging thing, and for some animals it is harder than for others.

Otters are the kind of animal that need a bit of extra attention to give the doll the spirit real otters have. For example, my previous otter pattern looked like an otter, there’s no question about that and it is a lovely looking doll, but it missed that extra bit of character. This otter contains the sense of humor I like to add to my designs, his quizzical expression is priceless! I love Bubbly and hope you will love this otter amigurumi too.

Here are some more pictures of this funny looking crochet otter and below them you can find info about and links to buy the pattern.

Info about & links to buy the pattern

Bubbly is made with Istex Lett Lopi, a 100% wool with a lot of fuzziness. He is 6.2 inch/ 15,5 cm tall when made with this yarn. The pattern is written in standard American crochet terms and contains a clear and colour coded description of how to crochet and assemble this animal, with extra illustrations and example pictures at the bottom to help you get everything right. In the pattern you can also find what materials you need, the yarn colour numbers, in short, everything you need to know to make your own funny looking crochet otter amigurumi. All the additional information you need to know about this pattern you can find in the shop listings, like the yarn you need etc. You can buy this pattern in my shop at Ravelry, Etsy or order it here.

This pattern has a one dollar release discount till Tuesday the 29th of May!

Patterns

New updates

Hi there, here’s an update on the progress of the updates. I am using the word ‘update’ so often these days I’m even dreaming it, lol. But I don’t mind doing it. The lovely thing about updating older patterns is, and I mean the big updates with new pictures and all, is that it reminds me of how beautiful some of the older animals are. Because their pictures looked less impressive and new crochet animals shift my attention, I seemed to have forgotten about them. But look at this!

When I added this picture to Dandylion’s pattern I thought ‘wow’! Despite his basic shape, Dandylion is the funniest and most mischievous looking crochet cat you can find. I really enjoyed updating his pattern.

I also updated Teddy’s and Balloo’s pattern. With the new pictures, they too look like I designed them recently and I love how they look now.

In short, these are the new updates:

Together with my editor, I’ve re-written the instructions for Dandylion’s head, which you don’t crochet in a spiral. With these new instructions you get an almost invisible colour change. It’s brilliant! And the pictures are new, but that’s obvious.


When I took new pictures of Balloo, I realised he looked much more like a lamb than a sheep! The pattern has new and improved pictures.


Teddy is the first original Son’s Popkes pattern. Now he finally shines bright in his new pictures. The former pictures had some pillows as background and a messy piece of fabric. Not very professional, but despite that people loved him.


Next week I’m doing an update on Chief and Rupert. Their bellies need to be replaced by the fancy neater bellies I design nowadays and they can use better pictures too.

Happy Easter dear crafters, I really need a little break.

Art, Stories

Badger update

Hi crafty folks, I just wanted to give you and update on the progress of the badger. Here is a little teaser image for you.

I have a first badger finished and it is already sitting on my bedside table. Now you probably are thinking ‘what am I supposed to do with that info?’ Well, when a doll is finished, I always bring it with me to the bedroom, because I want to have it close to me. You know, like when you were a kid and put your new shoes next to your bed. Or was that only me?

Anyway, now you probably will understand I love this badger plushy to bits. It wasn’t easy to create this more realistic shaped pattern and I got stuck many times. I will tell all about that when I publish the pattern. What I can say now is that this crochet badger means a lot to me. Badgers are me favourite animals and after seeing one in the wild this summer it is very special to now have a homemade miniature badger next to my bed. I think this badger radiates my love for the animal and will make a very special pattern for all animal and badger lovers out there.

And one more thing. This crochet badger is brushed and to be sure all the proportions are good before I could do the promo and pattern photoshoot, I had to finish a first badger. I also want pictures in the pattern of how you assemble the animal, so I needed an unfinished doll for that purpose. I am happy to say everything turned out good so that means I will have two almost identical badgers. Maybe I will sell one off them. I have to think about that.

See you next week 🦊

Chit and Chat

Working on Ida monkeys

Hi peeps, it seemed appropriate to give you an update about what I’m up to. I am doing something I normally would not do. I am making two Ida monkeys as assignments. When I started Adi’s pattern, I planned on making an extra monkey for my friend and illustrator Esther van Hulsen. But I didn’t plan on making another one. When Esther showed Adi to the professor that bought the Ida fossil, he was so delighted with the result he wanted to have one too. Well, I could not reject that, it felt fair to make him one too.

img_4346So, now I am working on the monkeys. I have to change their appearance a bit to make these look exactly like Esther’s version, but that makes it more fun.

You probably wonder why I never take assignments to make animals. Well, the main reason is that I get attached to them. When working on them I start to love them and have trouble giving them away. Also, if I would take more assignments like these, it would mean I would be constantly making the same animals and have less time designing new patterns, and that is what I love doing most. Every time it’s a challenge to create a new and fabulous looking doll and it keeps me fresh!

Now about a new design. I haven’t decided yet what animal I am going to make after I have these monkeys finished and I am open to suggestions. If you come up with something I really like, it might be the animal I am making next. So don’t be shy and let me know what you would like to see!